To create a bright, bold sunburst tie-dye, start by choosing natural cotton fabric and pre-washing it. Pinch the center and twist it into a tight spiral, securing with rubber bands to form your sunburst sections. Mix vibrant dyes in squeeze bottles and carefully apply colors to each segment without over-saturating. Let the dye set for 6-8 hours wrapped in plastic, then rinse and dry gently. Keep going, and you’ll discover tips to perfect vibrant, sharp sunburst designs.
Table of Contents
Key Takeaways
- Pre-wash damp natural fabric and lay it flat to prepare for vibrant sunburst tie-dye.
- Pinch and tightly twist fabric center into a spiral, securing with several snug rubber bands.
- Mix and apply vibrant dye colors evenly using labeled squeeze bottles, avoiding over-saturation.
- Let dyed fabric set wrapped for 6-8 hours to ensure deep, lasting color absorption.
- Rinse fabric gently until clear, then air-dry away from direct sunlight to preserve brightness.
Gather Your Materials
Before you begin your sunburst tie-dye project, gather all the necessary materials so you won’t have to stop halfway through. You’ll need fiber-reactive dye in your chosen colors, rubber bands, plastic squeeze bottles for easy dye application, and protective gloves to keep your hands clean.
Gather all your tie-dye materials beforehand for a smooth, uninterrupted creative process.
Don’t forget a plastic table cover or garbage bags to protect your workspace. Have a large plastic bag or plastic wrap ready for setting your dyed fabric, and a bucket or sink with water for rinsing.
It’s also helpful to have paper towels or old rags on hand for quick cleanups. Finally, keep a spray bottle filled with water nearby to keep your fabric damp while you work.
Having everything ready guarantees a smooth, enjoyable tie-dye experience.
Choose Your Fabric and Prepare It
When choosing fabric for your sunburst tie-dye, go for natural fibers like cotton for the best color absorption.
Make sure you pre-wash your fabric to remove any chemicals or sizing that might block the dye.
Preparing your fabric properly will help your design come out vibrant and long-lasting.
Selecting Fabric Types
Since the fabric you choose directly affects how your sunburst tie-dye turns out, it’s important to pick the right material.
Natural fibers absorb dye better, resulting in brighter, more vibrant colors. Synthetic fabrics might resist dye, leading to dull results.
Cotton is a popular choice for its excellent dye absorption and softness. Linen and rayon also work well, offering unique textures and color depth.
Avoid polyester blends if you want vivid colors.
Consider these fabric options:
- 100% cotton: Best for vibrant, long-lasting colors
- Linen: Offers a textured, rustic look
- Rayon: Absorbs dye well, giving bright, smooth finishes
- Cotton blends: May produce muted colors due to synthetic content
Choosing the right fabric sets the foundation for a stunning sunburst design.
Pre-Washing Importance
Although selecting the right fabric is essential, you’ll need to pre-wash it to remove any sizing, dirt, or oils that could block dye absorption.
These residues can prevent your dye from soaking in evenly, which might cause patchy or faded colors in your sunburst design. When you pre-wash, use a mild detergent and avoid fabric softeners since they leave residues that interfere with dyeing.
Rinse thoroughly to guarantee all detergents are out. Washing also helps shrink the fabric beforehand, so your finished piece won’t distort after dyeing.
Fabric Preparation Techniques
Choosing and preparing your fabric properly sets the foundation for a stunning sunburst tie-dye design. Start by selecting 100% natural fibers like cotton or rayon, as they absorb dye best. Avoid synthetic blends—they won’t hold vibrant colors as effectively.
Once you’ve picked your fabric, make certain to pre-wash it to remove any sizing or finishes that could block dye absorption. After washing, keep the fabric damp for easier tying and dye penetration.
Here’s a quick checklist to get your fabric ready:
- Choose 100% natural fibers for vivid colors
- Pre-wash to remove chemicals and dirt
- Leave fabric damp before tying
- Use a flat surface to lay out fabric evenly
These steps guarantee your sunburst pattern pops with bright, bold color every time.
Create the Sunburst Fold
To create the sunburst fold, start by laying your fabric flat and pinching the center point firmly between your fingers.
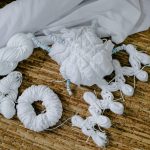
Next, lift the pinched spot and begin twisting the fabric tightly in a spiral motion, working outward from the center. Keep twisting until the entire fabric forms a compact, circular shape resembling a pie or a rosette.
As you twist, make sure the folds stay even and smooth to create distinct sunburst rays. Flatten the twisted bundle slightly to maintain a balanced shape that will help your dye pattern stand out.
This folding technique is key to achieving those bold, radiating designs that define sunburst tie-dye. Once folded, your fabric is ready for the next step to secure and dye.
Secure the Fabric With Rubber Bands
Once you’ve formed the tight sunburst fold, fasten it firmly with rubber bands to maintain its shape during dyeing. This step is essential to keep the fabric from unfolding and to create those distinct sunburst patterns.
Secure the tight sunburst fold firmly with rubber bands to preserve pattern clarity during dyeing.
Use several rubber bands to hold the folds tightly together without cutting into the fabric.
Here’s how to do it effectively:
- Wrap rubber bands around the folded fabric at different points to guarantee even pressure.
- Use 3 to 5 bands depending on the size of your sunburst.
- Make certain bands are snug but not so tight they damage the fabric.
- Position bands strategically to separate sections for different dye colors.
Fastening your sunburst properly sets the foundation for vibrant, sharp designs in the next steps.
Prepare Your Dye Colors
With your sunburst fold securely held in place, you can move on to preparing the dye colors that will bring your design to life.
Start by selecting vibrant, contrasting colors to make your sunburst pop. Mix each dye powder with warm water in separate squeeze bottles, shaking well to dissolve the powder completely.
Use gloves to protect your hands and work in a well-ventilated area. Label each bottle to avoid confusion during application. If you want softer colors, dilute your mixtures slightly. Remember, the concentration affects the intensity of your design.
Once your dyes are ready, set them aside on a protected surface, keeping the bottles upright to prevent spills.
Now that your colors are prepped, you’re all set for the next step—applying the dye to your fabric.
Apply the Dye to the Fabric
Now that your dyes are ready, it’s time to pick the colors that’ll make your sunburst pop.
You’ll want to use specific techniques to apply the dye evenly while controlling how much dye soaks into the fabric.
This balance is key to creating vibrant, sharp patterns without any unwanted bleeding.
Choosing Dye Colors
Although selecting dye colors might seem straightforward, choosing the right shades can dramatically enhance your sunburst tie-dye design.
You’ll want to think about contrast and harmony to make those sunburst patterns pop. Start by imagining how colors blend where they overlap. Bright, complementary colors often create striking effects, while analogous colors offer a softer look.
Here are some tips to guide your color choices:
- Pick 3-4 colors to avoid overwhelming the design.
- Use bold primary colors for a classic sunburst effect.
- Include a lighter shade for highlights and dimension.
- Consider the fabric color as it affects the dye’s final appearance.
Choosing your dyes thoughtfully guarantees your sunburst shines with vivid, eye-catching brilliance.
Applying Dye Techniques
Before you start applying dye, make certain your fabric is securely twisted and bound to create those signature sunburst patterns.
Use squeeze bottles to apply the dye directly onto the fabric folds, targeting specific sections to build vibrant contrast. Work carefully, applying dye to the raised areas while leaving some white space for crisp highlights.
Rotate the fabric as you go to guarantee even coverage and avoid oversaturating any one spot. Remember to wear gloves to protect your hands and work on a covered surface to prevent stains.
Apply dye in layers if needed, allowing colors to blend naturally where they meet. Once you’ve finished, double-check for any missed spots to achieve a balanced, eye-catching sunburst effect.
Managing Dye Saturation
When you apply the dye, pay close attention to saturation levels to guarantee the colors stay vibrant without bleeding together. Too much dye can cause colors to run, while too little leaves dull patches.
To manage saturation effectively, follow these tips:
- Apply dye evenly, using a squirt bottle for precise control.
- Avoid over-saturating one area; let the fabric absorb dye gradually.
- Use separate bottles for each color to prevent unwanted mixing.
- Blot excess dye gently with a paper towel if you notice pooling.
Let the Dye Set and Rinse
Since the dye needs time to fully absorb, you’ll want to let your sunburst tie-dye sit for at least 6 to 8 hours.
Keep your fabric wrapped in plastic or place it in a sealed bag to maintain moisture and prevent the colors from fading or bleeding. This waiting period allows the dye to bond with the fibers, ensuring vibrant, long-lasting colors.
After the waiting time, remove the rubber bands carefully and rinse your fabric under cold water.
Start rinsing with the fabric still folded to avoid colors mixing too much, then unfold and continue rinsing until the water runs clear. This process removes excess dye and stops the color from transferring later.
Be thorough but gentle to preserve your bold sunburst design.
Dry and Display Your Finished Design
Although the rinsing process removes excess dye, you’ll want to let your fabric dry completely to lock in the vibrant sunburst colors.
Allow your fabric to dry fully after rinsing to secure those bright, vibrant sunburst colors.
Lay your garment flat or hang it in a well-ventilated area to air dry. Avoid direct sunlight to prevent fading. Once dry, your design will be ready to show off!
To make sure your sunburst tie-dye looks its best:
- Use a drying rack or hangers to maintain shape
- Avoid using a dryer immediately, as heat can dull colors
- Iron the fabric on low heat if needed, with a cloth barrier
- Wash separately in cold water for the first few washes
Now, your bright, bold sunburst design is ready to impress!
Frequently Asked Questions
Can I Use Natural Dyes for Sunburst Tie-Dye?
You can definitely channel Mother Nature’s palette by using natural dyes for sunburst tie-dye. Just remember, they might offer subtler shades, so you’ll need patience and creativity to achieve that vibrant, bold look you want.
How Do I Fix Dye Stains on My Skin?
If you’ve got dye stains on your skin, scrub gently with soap and warm water. You can also try rubbing alcohol or a paste of baking soda and water to lift stubborn stains without irritating your skin.
What Safety Precautions Should I Take When Handling Dye?
Handling dye is like taming a colorful beast—wear gloves to protect your skin, work in a well-ventilated area to avoid fumes, and keep your workspace covered. Don’t forget old clothes; stains love to linger!
Can Sunburst Tie-Dye Be Done on Synthetic Fabrics?
You can dye synthetic fabrics, but colors won’t be as vibrant as on cotton. You’ll want to use special dyes made for synthetics, like disperse dye, and follow their instructions carefully for the best results.
How Long Does the Color Typically Last After Washing?
Colors can cling courageously for months, but they’ll gradually grow gloomy after many washes. If you want vibrant visuals, you’ll need to wash with care, cold water, and gentle detergents to keep hues happy and hearty.
- Step-by-Step Sunburst Tie-Dye for Bright, Bold Designs - July 13, 2025
- The Ultimate Comparison: All Tie-Dye Techniques Explained - July 13, 2025
- How to Choose the Right Technique for Your Tie-Dye Vision - July 13, 2025


