Start by prepping a plain white cotton shirt, keeping it damp for better dye absorption. Pinch the center to form a cone and secure it with rubber bands evenly spaced for your bullseye rings. Mix your fiber-reactive dyes in squeeze bottles, then carefully apply colors from the center outward. Wrap the shirt in plastic and let it set for 6-8 hours. Rinse gently, wash separately, and air dry. Keep going to discover tips for perfect color vibrancy and care.
Table of Contents
Key Takeaways
- Start with a damp, plain white cotton shirt to ensure optimal dye absorption.
- Pinch the center to form a cone and secure with rubber bands at intervals to create concentric rings.
- Mix dyes in squeeze bottles and apply colors from center outward, using steady pressure to avoid bleeding.
- Wrap the dyed shirt in plastic and let it set for 6-8 hours or overnight in a warm place.
- Rinse under cold water while tied, then wash separately in cold water and air dry away from sunlight.
Gathering Materials and Preparing Your Shirt
Before you plunge into the dyeing process, you’ll need to gather all the essential materials and prepare your shirt properly.
Start with a plain white cotton shirt—cotton absorbs dye best and gives vibrant results. You’ll need fiber-reactive dyes in your chosen colors, rubber bands, squeeze bottles for precise application, gloves to protect your hands, and a plastic table cover or garbage bags to keep your workspace clean.
Don’t forget a large plastic bag or plastic wrap to let the shirt set after dyeing. Before dyeing, wash your shirt to remove sizing or chemicals that might block dye absorption. Keep it damp but not soaking wet when you start the process.
Preparing well guarantees your bullseye pattern comes out bright and defined.
Folding and Securing the Fabric for the Bullseye Pattern
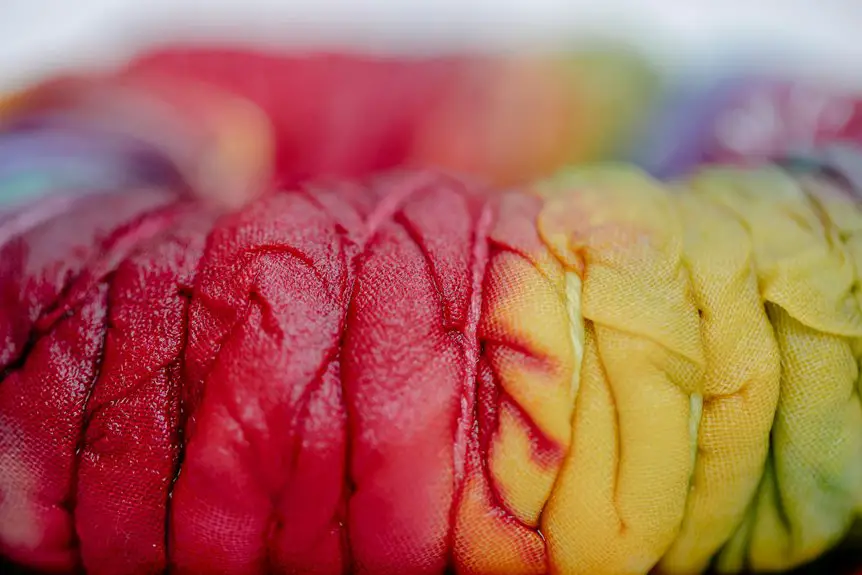
Once your shirt is damp and ready, you can start shaping it into the bullseye pattern. Pinch the center where you want the bullseye to start, then pull the fabric upward into a cone shape. Next, secure this cone with rubber bands at intervals to create rings. Each band divides the shirt into sections for distinct dye patterns.
Here’s a simple way to visualize the folds and bands:
| Step | Action | Visual Cue |
|---|---|---|
| 1 | Pinch center | Cone shape forms |
| 2 | Pull fabric upward | Tall cone stands |
| 3 | Wrap rubber band at base | Bottom ring created |
| 4 | Add bands along cone length | Multiple bullseye rings |
This folding method guarantees clear, concentric circles for the bullseye design.
Mixing and Applying the Dye Colors
Three vibrant dye colors can bring your bullseye pattern to life.
Begin by mixing each dye powder with water in separate squeeze bottles according to the package instructions. Shake well to guarantee the dye is fully dissolved.
Next, lay your secured fabric on a protected surface. Apply the first color to the center circle by squeezing the dye gently, saturating it without oversaturating. Move outward, applying the second color to the middle ring, then finish with the third color on the outer ring.
Place fabric on a protected surface and apply dye from center to outer rings with gentle, even pressure.
Use steady, even pressure to maintain clean divisions between colors. Avoid letting the colors bleed excessively into one another to keep your bullseye crisp.
Remember to wear gloves and work quickly for the best results.
Setting the Dye and Waiting Time
After applying the dye, you’ll need to set it properly to guarantee vibrant, long-lasting colors.
Start by wrapping your shirt tightly in plastic wrap or placing it inside a sealed plastic bag. This traps moisture and heat, which helps the dye bond with the fabric.
Then, let your shirt sit for at least 6 to 8 hours, or ideally overnight. The longer you wait, the deeper and more vivid the colors will become.
Keep the wrapped shirt in a warm place, away from direct sunlight. Avoid unwrapping it too soon, as this can cause uneven dye setting.
Once the waiting time is over, you’re ready to move on to rinsing and washing to reveal your bold bullseye design.
Rinsing, Washing, and Drying Your Finished Shirt
Although your shirt looks vibrant now, you’ll need to rinse it carefully to remove excess dye without dulling the colors.
Start by rinsing the shirt under cold running water while it’s still tied, keeping the folds intact to preserve the pattern. Once the water runs mostly clear, untie the shirt and rinse thoroughly until no more dye washes out.
Next, wash your shirt separately in cold water with a mild detergent to prevent color bleeding. Avoid using bleach or fabric softeners, as they can affect the dye.
Finally, dry your shirt either by air-drying it flat or hanging it up. Avoid direct sunlight to keep the colors bright.
Once dry, your bullseye tie-dye shirt is ready to wear and show off!
Frequently Asked Questions
Can I Use This Technique on Other Fabrics Besides Cotton?
You can definitely use the bullseye tie-dye technique on other fabrics, but keep in mind natural fibers like rayon, silk, or hemp absorb dye better than synthetics. You’ll get brighter, longer-lasting colors on those materials.
How Do I Fix Dye Stains on My Hands or Workspace?
Think of your hands and workspace as a canvas; when dye stains appear, scrub gently with soap and baking soda or use a stain remover. Act quickly—like a knight defending the domain, you’ll conquer those stubborn marks!
What Are the Best Color Combinations for a Vibrant Bullseye?
For a vibrant bullseye, you’ll want contrasting colors like bright red with yellow, electric blue with lime green, or hot pink paired with orange. These combos really pop and make your design stand out beautifully.
Can I Reuse Leftover Dye for Another Project?
Leftover dye is like a fading sunset—don’t waste it! You can absolutely reuse it for smaller projects, but colors might be less vibrant. Just store it properly and stir well before dyeing again.
How Long Will the Colors Remain Bright After Multiple Washes?
You’ll notice colors stay bright for about 20-30 washes if you rinse cold and avoid harsh detergents. Over time, fading happens, but proper care helps maintain vibrant hues longer than you’d expect.

- The Difference Between Fiber Reactive and All-Purpose Dyes - July 13, 2025
- How to Create a Rainbow V-Pattern Tie-Dye - July 13, 2025
- Tie-Dye for All Seasons: Holiday-Themed Techniques - July 13, 2025


