Start by gathering your dyes, gloves, rubber bands, and a plastic-covered workspace. Choose a natural fabric like cotton and pre-wash it to remove any sizing. Crumple the dry fabric loosely to create random folds, securing it lightly. Apply dye colors carefully into the creases, balancing light and dark hues for depth. Wrap it up and let the dye set for several hours. After rinsing and air-drying, your fabric reveals rich marbled patterns. Keep exploring for tips to perfect your design.
Key Takeaways
- Pre-wash natural fiber fabric and ensure it is dry for optimal dye absorption and even color results.
- Loosely crumple fabric into a mound with random folds, securing lightly to create varied layers for a marbled pattern.
- Apply dye gently with squeeze bottles, targeting folds and creases, using contrasting colors for depth and a marbled effect.
- Wrap the dyed fabric in plastic and let it set at room temperature for 6 to 24 hours to enhance color richness.
- Rinse fabric in cold water until clear, wash separately with mild detergent, and air dry to preserve vibrant marbled patterns.
Gather Your Materials
To get started with your crumple tie-dye project, gather all the essential materials you’ll need.
First, pick your dye colors—liquid or powder dyes work well, but make sure you have gloves to protect your hands. You’ll need squeeze bottles to apply the dye precisely.
Prepare rubber bands or plastic wrap to secure your fabric later. A plastic table cover or garbage bags will protect your workspace from stains.
Don’t forget a large plastic bin or bucket for soaking your fabric in soda ash solution if you want vibrant colors. Have old towels or paper towels ready for cleanup.
Finally, wear an apron or old clothes to avoid accidental stains. With these materials ready, you’ll be set to create your marbled crumple tie-dye masterpiece.
Choose Your Fabric
Selecting the right fabric is essential for achieving vibrant colors and lasting results in your crumple tie-dye project. Natural fibers absorb dye better and produce richer patterns. Cotton is a popular choice, but you can experiment with others for unique effects. Avoid synthetic fabrics as they don’t hold dye well.
Here’s a quick guide to help you pick the best fabric:
| Fabric Type | Best For |
|---|---|
| Cotton | Bright, bold colors |
| Rayon | Soft feel, vibrant shades |
| Linen | Earthy tones, textured look |
| Polyester | Not recommended, poor absorption |
Choose a light-colored or white fabric to guarantee your colors pop. Pre-washing your fabric removes sizing and helps the dye bond better. Now you’re ready to create your marbled masterpiece!
Prepare Your Workspace
Now that you’ve chosen the perfect fabric, it’s time to get your workspace ready. Find a flat, sturdy surface where you can comfortably work without worrying about spills.
Cover the area with plastic sheeting, old newspapers, or a disposable tablecloth to protect it from dye stains. Make certain you have ample ventilation, as some dyes can have strong fumes.
Gather all your materials—dye bottles, gloves, rubber bands, and spray bottles—within easy reach to keep your workflow smooth. Wear old clothes or an apron to avoid ruining your outfit.
Keep paper towels or rags handy for quick cleanups. By organizing your space thoughtfully, you’ll guarantee a safer, more efficient tie-dye experience with less mess and stress.
Pre-Wash and Dry the Fabric
Before you start crumpling your fabric, make sure to pre-wash it to remove any sizing or dirt that could block the dye.
Use a mild detergent without fabric softeners to keep the fibers ready to absorb color.
After washing, dry your fabric completely, either by air-drying or using a dryer, so the dye sets evenly.
Importance of Pre-washing
Although it might seem like an extra step, pre-washing your fabric is crucial to remove any sizing, dirt, or oils that could prevent the dye from absorbing evenly.
If you skip this, your dye may blotch or fade unevenly, ruining the marbled effect you’re aiming for. Pre-washing also loosens the fibers, allowing the dye to penetrate deeper and last longer.
After washing, make sure your fabric is completely dry before starting the crumple tie-dye process; damp fabric can alter how the dye spreads and sets.
Taking this simple precaution guarantees that your colors come out vibrant and your design remains sharp.
Choosing the Right Detergent
Since the detergent you choose affects how well your fabric absorbs dye, picking the right one is essential. You want a detergent that cleans thoroughly but won’t leave residues that block dye absorption.
Follow these tips when selecting your detergent:
- Use a mild, fragrance-free detergent to avoid chemicals that interfere with dye bonding.
- Avoid fabric softeners or detergents with added conditioners—they coat fibers and reduce dye uptake.
- Choose a detergent designed for natural fibers if you’re using cotton or rayon, as these work best for tie-dye.
Pre-washing with the right detergent removes oils, dirt, and sizing, setting the stage for vibrant, even colors.
Once washed, make sure your fabric is clean and ready for the next step.
Drying Techniques Before Dyeing
Once you’ve thoroughly pre-washed your fabric, drying it properly guarantees the dye adheres evenly and vividly.
Start by removing excess water—squeeze gently or use a clean towel to blot. Avoid wringing, as it can distort the fabric’s texture.
For best results, let your fabric air dry completely on a flat surface or hang it in a well-ventilated area. If you’re short on time, a dryer set to low heat works, but be careful to prevent shrinkage.
A fully dry fabric absorbs dye more consistently, preventing blotchy or uneven patterns. Remember, damp fabric can dilute colors and blur your marbled effect.
Taking these drying steps seriously guarantees your crumple tie-dye turns out sharp, vibrant, and beautifully patterned every time.
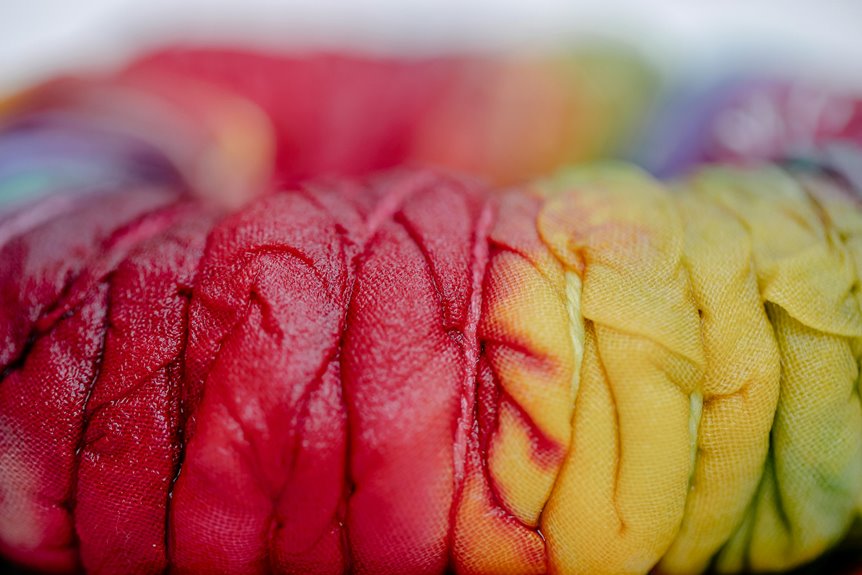
Crumple the Fabric for the Marbled Look
Start by loosely gathering your fabric into a crumpled mound, focusing on random folds and creases. This irregular texture is key for achieving the marbled effect. As you crumple, keep these points in mind:
Begin by loosely crumpling fabric with random folds to create the essential texture for a marbled dye effect.
- Avoid tight bunching: Too much compression reduces dye penetration, dulling the pattern.
- Create varied layers: Different fold depths capture dye unevenly, enhancing contrast.
- Secure lightly if needed: Use rubber bands or string to hold the shape without flattening it.
Mix Your Dye Colors
Choose vibrant dye shades that catch your eye and prepare your solutions according to the instructions.
When mixing colors, be careful to combine them thoughtfully to avoid muddy results.
This step sets the tone for your final design’s brightness and clarity.
Choosing Vibrant Dye Shades
Although selecting dye colors might seem straightforward, mixing your own vibrant shades lets you create truly unique tie-dye patterns.
To make your crumple tie-dye pop with marbled effects, focus on these key points:
- Choose complementary colors – Pair colors opposite each other on the color wheel to enhance contrast and vibrancy.
- Incorporate varying intensities – Mix lighter and darker shades of the same color to add depth and dimension.
- Experiment with unexpected blends – Combine unusual hues like teal and magenta for eye-catching results.
Preparing Dye Solutions
Now that you’ve picked your vibrant dye shades, it’s time to mix your dye solutions properly to bring those colors to life. Start by wearing gloves to protect your hands and use separate containers for each color. Follow the package instructions for water temperature and dye-to-water ratio to guarantee vibrant results. Stir each solution until the dye is fully dissolved.
Here’s a quick guide to get you started:
| Dye Color | Mixing Ratio (Dye:Water) |
|---|---|
| Red | 1 tsp : 1 cup |
| Blue | 1 tsp : 1 cup |
| Yellow | 1 tsp : 1 cup |
| Green | 1 tsp : 1 cup |
| Purple | 1 tsp : 1 cup |
Keep your solutions ready for the next step—applying the dye to your fabric!
Combining Colors Carefully
When you mix your dye colors, think about how they’ll blend on your fabric to create new shades without becoming muddy. You want vibrant, distinct colors that complement each other. Here’s how to combine colors carefully:
- Plan Your Palette: Choose colors that mix well, like blues with purples or yellows with oranges. Avoid mixing colors directly opposite on the color wheel, as they can turn brown or gray.
- Test Small Areas: Before applying dye broadly, test blends on a scrap fabric piece to see how colors interact.
- Apply Strategically: Use separate squeeze bottles for each color and apply dyes in sections. Allow some overlap but avoid saturating the same spot with too many colors.
Apply the Dye to the Crumpled Fabric
Grab your dye bottles and start applying colors directly onto the crumpled fabric, making sure to reach into the folds for vibrant, uneven patterns. Use a gentle squeeze to prevent oversaturation in one spot. Rotate the fabric as you go to cover all visible areas, prioritizing contrast for that marbled effect. Remember, uneven application enhances the design’s depth.
| Color Choice | Area to Apply | Tips |
|---|---|---|
| Bright hues | Outer folds | Apply sparingly for pop |
| Dark tones | Deep creases | Adds depth and contrast |
| Light shades | Raised fabric areas | Creates highlights |
This method guarantees a lively, textured look unique to your project.
Let the Dye Set Properly
Although you’ve applied the dye thoroughly, you’ll need to let it set properly to confirm the colors fully absorb and develop their vibrancy.
Here’s how to do it effectively:
- Wrap the fabric: Cover your dyed fabric with plastic wrap or place it inside a plastic bag to keep it moist. This prevents the dye from drying out and allows it to penetrate the fibers deeply.
- Let it rest: Leave the wrapped fabric undisturbed at room temperature for 6 to 24 hours. The longer it sets, the richer the colors become.
- Avoid heat or direct sunlight: Keep the fabric away from heat sources and sunlight during this time to prevent uneven dye setting and fading.
Following these steps confirms your crumple tie-dye develops a vivid, marbled effect that lasts.
Rinse and Wash the Dyed Fabric
Now that the dye has set, you’ll want to start by rinsing your fabric under cold water to remove excess dye without fading the colors.
Next, wash it separately using a gentle cycle and mild detergent to keep your vibrant design intact.
Following these steps guarantees your crumple tie-dye stays bright and lasts longer.
Initial Rinse Techniques
After the dye has set, you’ll want to rinse your fabric thoroughly to remove excess color without disturbing your design.
Start by rinsing the fabric under cold running water gently. This helps lock in the dye and prevents colors from bleeding.
Next, switch to lukewarm water to loosen any remaining dye particles trapped in the folds.
Finally, rinse until the water runs mostly clear, signaling that the excess dye is washed away.
Here’s a simple three-step approach for your initial rinse:
- Rinse under cold water to set the color and minimize bleeding.
- Use lukewarm water to release trapped dye.
- Continue rinsing until the water is nearly clear.
This careful rinsing preserves your marbled effect while prepping your fabric for the next wash.
Proper Washing Methods
Once you’ve rinsed the fabric until the water runs clear, it’s time to wash it properly to remove any remaining dye and set the colors permanently. Use cold water and a mild detergent to avoid fading. Wash the fabric separately for the first few washes to prevent color transfer. Avoid bleach and fabric softeners, as they can damage the dye and fabric.
| Step | Action | Tip |
|---|---|---|
| 1 | Rinse with cold water | Until water runs clear |
| 2 | Apply mild detergent | Use gentle, dye-safe soap |
| 3 | Hand wash or gentle cycle | Protects fabric integrity |
| 4 | Separate from other laundry | Prevents color bleeding |
| 5 | Air dry or low heat dryer | Preserves vibrant colors |
Following these steps helps your crumple tie-dye last longer and stay vibrant.
Dry and Inspect Your Finished Piece
Although your crumple tie-dye piece looks vibrant and exciting straight from the dyeing process, you’ll need to dry it completely before checking for any uneven spots or areas that might need touch-ups.
Follow these steps to guarantee the best results:
- Lay your fabric flat or hang it in a well-ventilated area away from direct sunlight to prevent fading.
- Allow it to air dry thoroughly; avoid using a dryer as heat can affect the dye’s vibrancy.
- Once dry, closely inspect your piece for any areas that look patchy or less saturated.
Taking the time to dry and inspect guarantees your marbled effect looks balanced and ready for wearing or gifting.
This careful approach helps you catch any imperfections early for a polished final look.
Tips for Enhancing Your Crumple Tie-Dye Designs
If you want your crumple tie-dye to stand out even more, consider experimenting with layering colors or adding subtle details.
Start by applying lighter colors first, then layer darker shades on top to create depth and complexity. Use a spray bottle for fine misting to blend colors softly or dab with a sponge for texture variations.
Don’t hesitate to incorporate metallic or neon dyes for unexpected highlights. After dyeing, try using fabric markers or bleach pens to emphasize patterns or add small designs.
Remember, less is often more—subtle enhancements can elevate your piece without overwhelming the marbled effect.
Finally, always test new techniques on scraps before applying them to your main project to guarantee you get the desired results every time.
Frequently Asked Questions
Can Crumple Tie-Dye Be Done on Synthetic Fabrics?
You can try crumple tie-dye on synthetic fabrics, but results vary since synthetic fibers don’t absorb dye like natural ones. You’ll want to use fabric-specific dyes designed for synthetics to get vibrant, lasting colors.
How Long Does the Dye Setting Process Take for Best Results?
When Sarah left her dyed shirt wrapped for 8 hours, the colors really popped. You should let the dye set for at least 6 to 8 hours, or even overnight, to guarantee the best, long-lasting results.
What Types of Dyes Work Best for Crumple Tie-Dye?
You’ll find fiber reactive dyes work best for crumple tie-dye, especially on cotton. They bond well with fabric, giving vibrant, lasting colors. Procion MX dyes are a popular choice you can trust for bright results.
Can I Reuse Leftover Dye Colors for Another Project?
Don’t toss that leftover dye—it’s like liquid magic waiting for a second life! You can absolutely reuse it for another project, just remember the colors might be less vibrant but still totally usable and fun to work with.
How Do I Fix Uneven Dye Spots or Bleeds?
You can fix uneven dye spots by gently scrubbing with a damp cloth or using diluted dye to touch up areas. For bleeds, try soaking in a vinegar solution to set colors and prevent further spreading.