Starting on your journey into DIY fabric projects can be both fulfilling and an important way to express creativity. Before you begin, it's vital to get familiar with essential sewing tools like high-quality needles, sharp fabric scissors, and a dependable sewing machine. Starting with simple hand sewing projects will help you build foundational skills, setting the stage for more complex tasks. Have you ever wondered how to select the right fabric for your project or which basic stitches you'll need to master first? These initial steps are just the beginning of what's possible in the world of fabric crafting.
Key Takeaways
- Start with simple hand sewing projects to practice basic stitches and techniques.
- Choose light to medium-weight fabrics for ease of handling and sewing.
- Use essential tools like sharp fabric scissors, measuring tape, and a seam ripper.
- Practice basic machine sewing on easy DIY clothing items and fabric crafts.
- Optimize your workspace with proper lighting and organization for efficient sewing.
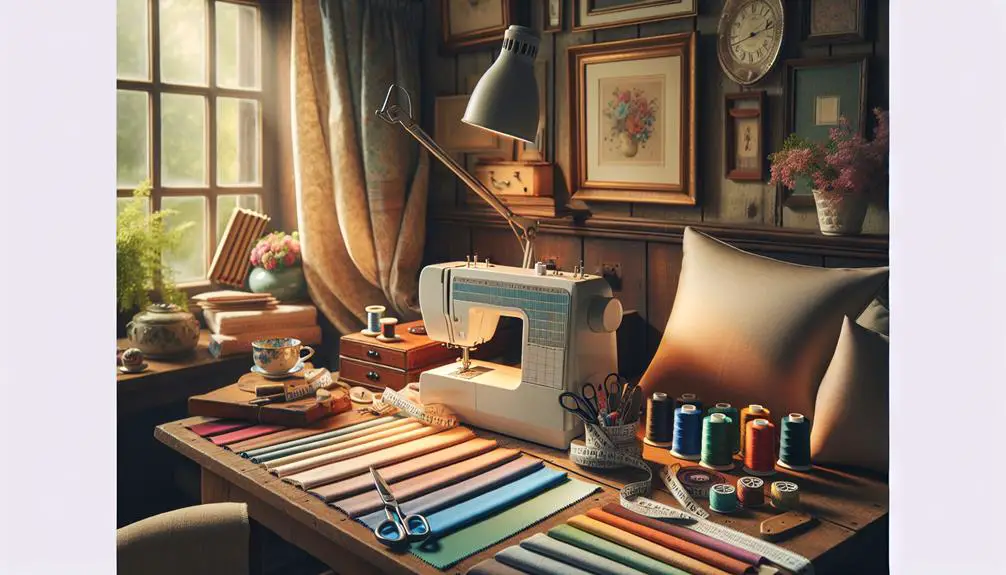
Essential Sewing Tools
To get started on your DIY fabric projects, you'll need a few essential sewing tools to make the process smoother and more efficient. One of the most critical investments you'll make is a quality sewing machine. A reliable sewing machine not only speeds up your work but also guarantees precision and durability in your stitches. Look for a model with adjustable stitch settings, automatic thread cutting, and a user-friendly interface to elevate your sewing experience.
Don't underestimate the importance of a good seam ripper. Mistakes are inevitable, especially when you're aiming for perfection. A seam ripper allows you to quickly and cleanly remove stitches without damaging your fabric. Opt for one with an ergonomic handle for better control and comfort during extended use.
Additionally, invest in sharp fabric scissors dedicated solely to cutting fabric. Using them on other materials will dull the blades and compromise accuracy. A measuring tape, pins, and a pin cushion will round out your toolkit, making sure you can measure and secure your fabric precisely.
Choosing the Right Fabric
Selecting the appropriate fabric is crucial for the success of your DIY project, as it directly affects the final appearance and texture of your creation. The first step is understanding fabric weights. Light fabrics like cotton and linen are excellent for summer clothing and curtains, while medium-weight fabrics like denim and twill are suitable for more structured items such as jackets and cushions. Heavy fabrics like canvas and wool are perfect for upholstery and outerwear.
Equally important is color coordination. Choosing harmonizing colors can make or break your project. Consider the color wheel: analogous colors (those adjacent) create a cohesive look, while contrasting colors (opposite) add liveliness and intensity. This attention to detail guarantees that your end product is visually pleasing.
Here's a quick reference table to assist you in selecting the appropriate fabric:
| Fabric Type | Weight | Best Uses |
|---|---|---|
| Cotton | Lightweight | Summer clothing, curtains |
| Denim | Medium-weight | Jackets, cushions |
| Canvas | Heavyweight | Upholstery, outerwear |
Basic Sewing Stitches
Now that you've got the right fabric, let's talk about essential sewing stitches.
Start with the running stitch for basic seams, use the backstitch for extra durability, and master hemming for clean finishes.
These techniques will set the foundation for all your DIY fabric projects.
Running Stitch Technique
Often considered the foundation of hand sewing, the running stitch is a simple yet essential technique you'll use in many DIY fabric projects. Mastery of this stitch opens the door to a variety of creative possibilities, from embroidery embellishments to quilting patterns.
To start, thread your needle and tie a knot at the end of the thread. Push the needle through the fabric from the back, pulling it until the knot catches. Then, move the needle forward a small distance and push it back through the fabric. Repeat this process, maintaining even spacing to create a neat appearance. Consistency is key to achieving professional results.
Running stitches are perfect for creating creative designs on your fabric. They can outline shapes or add texture, making them ideal for embroidery embellishments. You can also employ running stitches in patchwork projects, connecting fabric pieces to form cohesive quilting patterns.
Whether you're mending a tear or crafting a decorative piece, the running stitch is versatile and reliable.
Experiment with different thread colors and stitch lengths to customize your projects. The more you practice, the more proficient you'll become, laying a strong foundation for your DIY fabric endeavors.
Backstitch for Durability
For projects requiring extra strength and durability, the backstitch is an essential technique you can't overlook. This stitch is perfect for areas that will withstand significant wear and tear, such as seams and joints. Unlike the running stitch, which can easily come undone, the backstitch creates a tight, secure line of stitching that rivals the strength of machine sewing.
To execute a backstitch, thread your needle and knot the end of your thread. Begin by pushing the needle through the fabric from the underside. Take a small stitch backward, then bring the needle up a stitch length away from your starting point. Insert the needle back into the endpoint of the first stitch, and repeat. This overlapping method ensures each stitch is reinforced, giving your project the durability it needs.
While the backstitch is primarily functional, it can also be adapted for decorative stitching. By using contrasting thread or incorporating it into intricate designs, you can add both strength and visual appeal to your fabric projects.
Mastering the backstitch will elevate your sewing skills, making your creations not only beautiful but also long-lasting.
Hemming and Finishing
Hemming and finishing your fabric projects not only gives them a polished look but also prevents fraying and wear over time. Mastering these techniques is essential for creating professional-grade pieces.
Start with fabric edging, which involves folding the fabric's raw edge inward twice and stitching it down. This method is both straightforward and effective for a clean finish.
For those looking to enhance their projects, consider incorporating decorative techniques. Adding a decorative stitch along the hem can transform a basic edge into a unique, eye-catching detail. Experiment with different thread colors and stitch patterns to match your project's aesthetic.
Creative hemming can also involve unconventional finishes. For example, you might use a bias tape to encase the raw edge, offering a contrasting border that stands out. Another option is the rolled hem, which gives a delicate, professional look perfect for lightweight fabrics like silk or chiffon.
Don't hesitate to blend these methods. Combining a clean fabric edging with decorative techniques can result in a hem that's both functional and stylish.
Cutting and Measuring Fabric
Accurate cutting and measuring of fabric are crucial steps to guarantee your DIY project turns out perfectly. Mastering fabric cutting techniques and measuring tips ensures your pieces align flawlessly. Begin by laying your fabric on a flat, clean surface. Use a see-through ruler and tailor's chalk to draw precise lines. Precision cutting is easier with a rotary cutter and a cutting mat. Always measure twice and cut once to avoid mistakes.
Here's a quick guide to help you achieve precise measurements and cuts:
| Task | Tools Needed | Tips |
|---|---|---|
| Measuring Fabric | Measuring tape | Measure twice for precision. |
| Marking Fabric | Tailor's chalk, ruler | Use faint, erasable markings. |
| Cutting Straight Lines | Rotary cutter, mat | Maintain consistent pressure. |
| Cutting Curves | Fabric scissors | Cut slowly and follow the line. |
| Checking Accuracy | Square ruler | Ensure accurate right angles. |
For precise measurements, keep your measuring tape taut but not stretched. When cutting, apply even pressure with your rotary cutter to maintain neat edges. If using scissors, make lengthy, smooth cuts to avoid uneven edges. Practice these techniques to elevate your DIY fabric projects from good to exceptional. Remember, precision is crucial to a professional finish.
Simple Hand Sewing Projects
When starting with simple hand sewing projects, you'll need to learn basic stitch techniques and gather essential sewing tools.
Once you're equipped, you can easily tackle fabric repairs at home.
Let's explore these steps to get you sewing confidently in no time.
Basic Stitch Techniques
Mastering a few basic stitch techniques will empower you to tackle simple hand sewing projects with confidence and ease. Whether you're just starting out or refining your skills, understanding these fundamental stitches is essential. Let's plunge into some essential techniques that will elevate your sewing game.
First, focus on needle threading suggestions. Make sure you're using a needle with an eye large enough for your thread, and snip the thread at an angle to make threading easier.
While sewing machines offer speed, hand sewing gives you control and precision, making it invaluable for delicate projects.
Next, get comfortable with knot tying methods. A secure knot is the foundation of any hand-sewn project. Learn the double knot for added security and practice making knots that sit flush against the fabric.
Precision in stitching is key. Here are five basic stitches to master:
- Running Stitch: Ideal for basting, gathers, and simple seams.
- Backstitch: Perfect for seams requiring strength and durability.
- Whipstitch: Great for hemming and closing seams.
- Slip Stitch: Invisible finish for hems and linings.
- Blanket Stitch: Decorative edge for blankets and appliques.
Essential Sewing Tools
Now that you've mastered the basic stitches, let's discuss the vital sewing tools you'll need for straightforward hand sewing projects. To begin, you'll require a quality set of needles. Select a range of sizes to cater to different fabric thicknesses. Sharp, top-notch needles will enhance the smoothness and accuracy of your stitches.
Subsequently, invest in sharp fabric scissors. Blunt scissors can damage your fabric and complicate the cutting process. A petite pair of embroidery scissors is also useful for detailed cuts.
Do not underestimate the significance of a seam ripper. Errors are inevitable, and a seam ripper enables you to remove stitches cleanly without harming the fabric. This tool swiftly becomes essential.
Although a sewing machine isn't obligatory for hand sewing projects, owning one can expedite specific tasks, such as preparing lengthy seams or strengthening edges. Nonetheless, for many straightforward projects, hand stitching will be sufficient.
Lastly, keep a measuring tape, tailor's chalk, and a pin cushion nearby. These tools guarantee that your measurements are precise and your fabric remains secure as you sew.
With these crucial tools in your sewing kit, you'll be well-prepared to tackle a variety of hand sewing projects with assurance and accuracy.
Easy Fabric Repairs
Don't let small tears or loose hems discourage you; simple hand sewing repairs can save your favorite garments. Mastering a few quick fixes and hidden mending techniques will give you the confidence to tackle any minor fabric mishap.
Whether it's a ripped seam, a dangling hem, or a tiny hole, you can address these issues with minimal effort and maximum impact.
Consider these easy and effective methods:
- Invisible stitch: Ideal for repairing small tears without leaving a trace. This hidden mending technique guarantees your fabric looks as good as new.
- Whip stitch: Perfect for securing loose hems or closing up seams. It's a versatile stitch that provides durability.
- Fabric patches: Use these for larger holes or worn-out areas. You can sew them on or use no sew solutions like iron-on patches for a quick fix.
- Darning: A classic method for repairing small holes, particularly in knit fabrics. It involves weaving threads to cover the damaged area.
- Hem tape: An excellent no sew solution for fixing hems. Simply iron it on for a secure, clean finish.
Beginner Machine Sewing Projects
Whether you're new to sewing or need a refresher, beginner machine sewing projects are a fantastic way to build your skills and confidence. Start with simple DIY clothing items like a basic skirt or a pair of pajama pants. These projects allow you to practice straight stitching, hemming, and working with patterns. Choose fabrics that are easy to handle, like cotton or linen, to make the process smoother and more enjoyable.
In addition to DIY clothing, consider diving into fabric crafts. Projects like tote bags, zipper pouches, and fabric bookmarks aren't only practical but also great for honing your sewing techniques. These items often require skills like installing zippers, creating seams, and adding decorative touches, which are essential for more complex projects down the line.
DIY Home Decor Ideas
Elevate your living space with simple and stylish DIY home decor projects that showcase your sewing skills. Transforming your home doesn't have to be complicated or expensive. By embracing techniques like fabric painting and no sew projects, you can add a personal touch to every room.
Consider these creative ideas to inspire your next project:
- Upcycled furniture: Give an old chair or ottoman a fresh look with new upholstery. Choose a vibrant fabric, and use your sewing skills to breathe new life into tired pieces.
- Creative wall art: Create unique fabric wall hangings. Stretch an eye-catching fabric over a wooden frame or hoop to make an instant statement piece.
- Fabric painting: Personalize plain cushions or curtains with fabric paint. Use stencils or freehand designs to add color and flair.
- No sew projects: Make stylish pillow covers, table runners, and curtains without a single stitch. Use fabric glue or iron-on adhesive for a quick and professional finish.
- Throw blankets: Design cozy and custom throw blankets. Choose coordinating fabrics and sew them together, or opt for a no-sew fleece blanket with knotted edges.
Each of these projects allows you to apply your sewing talents while making your home uniquely yours.
Personalized Gift Creations
After transforming your home with DIY decor, why not use those same sewing skills to create personalized gifts that friends and family will cherish? Handmade gifts have a unique touch that store-bought items just can't replicate. Start with custom embroidery to add intricate designs to your creations. You can personalize anything from handkerchiefs to pillowcases, making each piece truly one-of-a-kind.
Fabric painting is another excellent technique for adding a splash of color and creativity to your gifts. Imagine the joy of your loved ones unwrapping a tote bag or apron adorned with a hand-painted design made just for them. It's a simple way to make everyday items extraordinary.
Monogrammed accessories, like towels or robes, are a classic yet thoughtful gift option. Adding initials or names provides a personalized touch that's both elegant and functional.
For something even more special, consider creating personalized quilts. Use different fabrics that reflect the recipient's personality or hobbies, and you'll have a keepsake they'll treasure forever.
Tips for Successful Projects
To guarantee your DIY fabric projects turn out beautifully, focus on careful planning and attention to detail. The key to success lies in thoughtful fabric selection and meticulous project planning. Start by choosing the right fabric for your project—consider its weight, texture, and durability to make sure it suits your needs.
When planning your project, break it down into manageable steps. Sketch your design, measure twice to cut once, and always pre-wash your fabric to prevent future shrinkage. This preparation minimizes the risk of project mistakes and makes troubleshooting easier if issues arise.
Here are some essential tips to keep in mind:
- Choose Quality Tools: Invest in sharp scissors, a reliable sewing machine, and good quality thread. These will make your work smoother and more precise.
- Use Proper Lighting: Adequate lighting helps you see details clearly, reducing the likelihood of errors.
- Stay Organized: Keep your workspace tidy and your materials sorted. An organized space enhances focus and efficiency.
- Test Stitches: Before sewing your final piece, test your stitches on a fabric scrap to make certain the tension and stitch length are perfect.
- Patience Is Key: Rushing leads to mistakes. Take your time to make sure each step is done correctly.
Frequently Asked Questions
How Do I Properly Care for and Maintain My Sewing Machine?
To properly care for your sewing machine, follow a maintenance schedule, use effective cleaning techniques, and guarantee proper storage. Familiarize yourself with troubleshooting tips to address issues quickly and keep your machine running smoothly.
What Are Some Common Beginner Mistakes to Avoid in DIY Fabric Projects?
Don't commit a faux pas like choosing the wrong fabric selection. Be sure you're mindful of your sewing machine settings; improper adjustments can wreak havoc. Master these, and you'll avoid common beginner mistakes and craft like a pro.
How Can I Store and Organize My Fabric and Sewing Supplies Efficiently?
For efficient fabric storage and sewing supplies management, use clear bins or labeled drawers. Pegboards and wall-mounted organizers keep tools accessible. Invest in shelf dividers and rolling carts for flexible solutions, ensuring a well-organized workspace.
What Are the Best Resources for Learning Advanced Sewing Techniques?
To master advanced sewing techniques, you should attend sewing workshops and explore online tutorials. Invest in thorough sewing books and follow specialized YouTube channels. These resources will elevate your skills to a professional level.
How Do I Create My Own Sewing Patterns From Scratch?
Creating your own sewing patterns from scratch is like painting on a blank canvas. Start with pattern drafting basics, measure precisely, and consider garment construction principles. Practice often, and soon you'll master the art of custom designs.