You’ll find that tie-dye techniques range from classic spirals, bullseyes, and crumple styles to advanced methods like Japanese shibori and ice dyeing, each offering unique textures and patterns. Ombre dyeing delivers smooth color fades, while stencils and discharge dyeing add graphic details. Combining these approaches lets you create vibrant, one-of-a-kind designs. Keep exploring to discover how each technique works and how mixing them can elevate your fabric art to the next level.
Key Takeaways
- Classic tie-dye includes spiral, crumple, and bullseye patterns, focusing on fabric manipulation and rubber band sectioning for vibrant color effects.
- Advanced Shibori techniques use folding, binding, and clamping to create intricate Japanese resist-dyed patterns like Kanoko and Itajime.
- Ice dyeing applies powdered dyes over melting ice for natural gradients and soft color transitions without harsh lines.
- Ombre dyeing involves controlled dipping and gradual color immersion to achieve smooth fades and layered color transitions.
- Stenciling and discharge dyeing add graphic detail by applying shapes or removing color, enhancing tie-dye visual complexity.
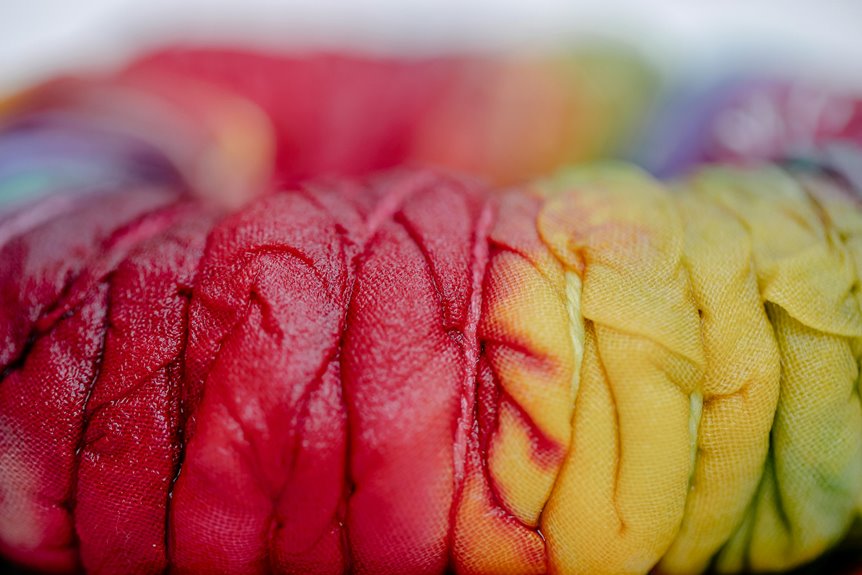
Classic Spiral Tie-Dye Technique
The classic spiral tie-dye technique lets you create vibrant, swirling patterns with just a few simple steps.
Start by laying your fabric flat and pinching the center where you want the spiral to begin. Twist the fabric around that point until it forms a tight, flat spiral shape. Secure the spiral with rubber bands, dividing it into sections like pizza slices.
Lay fabric flat, pinch the center, twist into a spiral, and secure with rubber bands like pizza slices.
Next, apply different dye colors to each section, letting them blend slightly where they meet. Make sure to saturate the fabric well for rich colors.
After dyeing, wrap your piece in plastic and let it set for several hours. Finally, rinse out the excess dye and wash your fabric.
You’ll be left with a stunning, classic spiral pattern that’s perfect for any project.
Shibori: Japanese Resist Dyeing Methods
Now, you’ll explore Shibori, a traditional Japanese resist dyeing method known for its intricate fabric folding techniques.
You’ll learn how these styles create unique patterns by carefully manipulating the fabric before dyeing.
Get ready to try folding and binding methods that make Shibori stand out.
Traditional Shibori Styles
Several traditional Shibori styles offer unique ways to create intricate patterns through Japanese resist dyeing methods.
When you try Kanoko Shibori, you’ll bind small sections with thread, resulting in dotted, circular designs.
Arashi Shibori involves wrapping fabric around a pole and compressing it tightly, creating diagonal, rain-like patterns.
With Kumo Shibori, you pinch and bind fabric in tight folds, producing spider-web or pleated effects.
Nui Shibori uses stitching to gather fabric, allowing you to shape detailed, linear patterns before dyeing.
Finally, Itajime Shibori folds and clamps the fabric between shapes, preventing dye penetration and forming geometric motifs.
Each style requires patience and precision, but once you master them, you’ll create stunning, one-of-a-kind tie-dye pieces that celebrate centuries of Japanese artistry.
Fabric Folding Techniques
Building on the detailed binding and stitching methods of Shibori, fabric folding techniques offer another way to control dye placement and pattern formation. When you fold your fabric in precise ways—like accordion pleats, triangles, or squares—you create layers that resist dye where they overlap.
This method lets you craft sharp, geometric patterns without needing complex stitching or binding. For example, the Itajime technique uses folding combined with clamping between shapes to produce symmetrical designs. You simply fold, clamp, then dye, and the covered areas remain untouched, revealing crisp contrasts.
Ice Dyeing for Unique Color Blending
How does ice dyeing create such mesmerizing blends of color? You start by placing crushed ice over your twisted or folded fabric. As the ice melts slowly, it carries powdered dye down through the fabric in unpredictable patterns.
This gradual process lets colors blend naturally, creating soft gradients and unique textures you won’t get with traditional wet dyeing methods. You don’t have to worry about exact placement—ice dyeing embraces randomness, making each piece one-of-a-kind.
Plus, the melting ice controls dye absorption, preventing harsh lines and encouraging smooth shifts between hues. If you want eye-catching, dreamy effects with minimal effort, ice dyeing is a perfect choice.
Melting ice gently guides dye, creating seamless color transitions and effortless, dreamy patterns.
Just prepare to be surprised by the organic, flowing designs that emerge from this cool technique.
Crumple or Scrunch Tie-Dye Style
You’ll start the crumple tie-dye style by bunching your fabric into a tight, random mound.
When applying color, focus on layering different shades to highlight the texture created by the scrunching.
Keep in mind that fabric choice greatly affects the final look, with natural fibers absorbing dye more vividly.
Crumple Technique Basics
Although it may seem simple, the crumple technique creates vibrant, random patterns by scrunching your fabric into a loose mound before applying dye. You don’t need to fold or tie the fabric precisely, just gather it loosely to let colors blend organically. This method is perfect if you want a textured, abstract look without strict patterns.
| Step | Action | Tip |
|---|---|---|
| 1 | Lay fabric flat | Use pre-washed cotton |
| 2 | Scrunch into a mound | Keep it loose for varied texture |
| 3 | Apply dye randomly | Don’t oversaturate |
| 4 | Let sit & absorb dye | Cover with plastic to retain moisture |
| 5 | Rinse & dry | Rinse until water runs clear |
Color Application Tips
When applying color in the crumple or scrunch tie-dye style, using multiple shades can create a dynamic, layered effect that brings your design to life.
To get the best results, follow these color application tips:
- Apply dye in small amounts to highlight the fabric’s texture.
- Use contrasting colors next to each other for bold patterns.
- Saturate some areas heavily and leave others lighter for depth.
- Rotate the fabric as you dye to avoid color pooling.
- Let colors overlap slightly to create natural blending.
These tips help you achieve vibrant, unique patterns that emphasize the crumple technique’s organic feel.
Remember to work quickly and enjoy the unpredictability—each scrunch tie-dye piece is one of a kind!
Fabric Choices Impact
Fabric choice plays an essential role in how your crumple or scrunch tie-dye design turns out, affecting both color vibrancy and pattern definition.
Natural fibers like cotton and rayon absorb dye more evenly, resulting in brighter, more vivid colors and distinct patterns. If you pick synthetic fabrics such as polyester, you might notice duller hues and less pronounced texture because the dye doesn’t penetrate as well.
Also, consider fabric weight; lightweight materials crumple easily, creating intricate, delicate patterns, while heavier fabrics hold bulkier scrunches, producing bolder, more textured effects.
Before you start, pre-wash your fabric to remove any chemicals that could interfere with dye absorption.
Choosing the right fabric guarantees your scrunch tie-dye project pops with vibrant colors and striking patterns, making your design truly stand out.
Bullseye Pattern Creation Steps
To create a classic bullseye pattern, you’ll start by pinching the fabric at the center point where you want the design to radiate.
Next, you’ll pull the fabric upward, forming a cone shape. Secure the cone with rubber bands spaced evenly along its length. These bands create the distinct rings of the bullseye.
Pull the fabric into a cone and secure with rubber bands to form the bullseye’s signature rings.
When dyeing, apply different colors to each section between the bands for a vibrant effect.
Here’s a quick step-by-step:
- Pinch fabric center and pull upward
- Twist into a cone shape
- Place rubber bands at intervals
- Apply dye between bands
- Let it set, then rinse and dry
This method guarantees bold, circular patterns with clear color separation every time.
Ombre Dyeing for Gradient Effects
After mastering the bullseye pattern, you might want to explore techniques that create softer, more gradual color shifts. Ombre dyeing is perfect for this.
To achieve that smooth gradient, start by soaking your fabric in water, then gently dip the cloth into the dye bath. The key is to control how deep and how long you immerse each section—the deeper and longer, the darker the color.
Slowly pull the fabric out to let the dye fade naturally toward the top. You can repeat this process with multiple colors for a layered effect.
Remember to work quickly and evenly to avoid harsh lines. Ombre dyeing lets you create elegant changes that give your tie-dye projects a fresh, modern look.
Using Stencils and Discharge Dyeing
Although traditional tie-dye relies on vibrant colors, using stencils and discharge dyeing lets you add striking patterns and contrasts to your designs.
Stencils help you create crisp, repeatable shapes, while discharge dyeing removes color to reveal the fabric’s original tone or a lighter shade. You’ll find these methods perfect for detailed, graphic looks.
Here’s what you need to know:
- Use freezer paper or plastic sheets for stencil durability.
- Apply discharge paste carefully to avoid bleeding.
- Always test discharge on a fabric scrap first.
- Work on 100% cotton for best discharge results.
- Combine stencils with tie-dye for layered effects.
Frequently Asked Questions
Which Fabrics Work Best for Tie-Dye Projects?
You’ll get the best tie-dye results on natural fibers like cotton, rayon, and silk. These fabrics absorb dye well, giving you vibrant colors. Avoid synthetic materials since they don’t hold dye as effectively.
How Do You Set Dye to Prevent Fading?
Think of setting dye like sealing a letter; once you seal it, the message stays safe. You can prevent fading by soaking your tie-dye in soda ash before dyeing and rinsing in cold water after, locking in colors.
Can Tie-Dye Be Done With Natural Dyes?
Yes, you can definitely do tie-dye with natural dyes! You’ll use plants, fruits, or veggies for color, and fix the dye with mordants like alum to make your colors vibrant and long-lasting. Give it a try!
What Safety Precautions Should Be Taken When Tie-Dyeing?
Better safe than sorry—wear gloves and old clothes to protect your skin and fabrics. Work in a well-ventilated area, avoid inhaling powders, and keep dyes away from food and eyes to stay safe while tie-dyeing.
How Do You Care for Tie-Dyed Garments After Washing?
You should wash tie-dyed garments separately in cold water to prevent color bleeding. Use a gentle detergent, avoid bleach, and air-dry them to maintain vibrancy. Don’t wring or twist to keep the fabric intact.