When selecting the right materials, creating your artwork, and preparing your fabric, you'll find that each step in heat transfer printing is essential for achieving a professional result. Choosing high-quality transfer paper and inks ensures your designs are vibrant and durable. Crafting your artwork with precision using user-friendly software tools sets the stage for a flawless transfer. Properly prepping the fabric, including pre-washing and ironing, lays the foundation for a smooth application. Understanding these initial steps is just the beginning; there's more to uncover about the intricacies of the transfer process and the final touches that make your design stand out.
Key Takeaways
- Choose high-quality transfer paper compatible with your heat press and select pigment-based or dye-based inks based on desired color and durability.
- Design artwork using software with intuitive tools, ensuring images are at least 300 dpi for sharpness and vivid color reproduction.
- Pre-wash and iron the fabric to remove residues and ensure a smooth surface for the transfer process.
- Set the heat press to the correct temperature, apply consistent pressure, and allow the transfer to cool before removing the backing paper.
- Inspect the final print for imperfections, gently wash to remove any residue, and air dry the fabric to preserve colors.
Choosing the Right Materials
Selecting the right materials is crucial because it directly impacts the quality and durability of the heat transfer print on fabrics. Start by choosing high-quality transfer paper that matches your heat press specifications. This guarantees that the heat and pressure are evenly distributed, resulting in a flawless transfer. Don't skimp on this; inferior paper can lead to subpar results and wasted efforts.
Next, consider your ink options. Pigment-based inks are excellent for fabric printing due to their fade-resistant properties. They're especially durable when used with a heat press, providing vibrant, long-lasting colors. Alternatively, dye-based inks offer a broader color range but may not be as long-lasting. Choose the ink that best suits your project's needs.
Fabric selection is equally important. Cotton and polyester blends are popular choices. Cotton offers a natural, breathable feel, while polyester provides durability and vibrant color reproduction. Always pre-wash your fabrics to remove any residues that could impede the transfer process.
Designing Your Artwork
When designing your artwork, start by selecting the appropriate design software that suits your needs.
Confirm your images are optimized for quality to prevent any loss in detail during the transfer process.
Choosing Design Software
To create stunning heat transfer designs, you need robust design software that matches your artistic vision and technical requirements. Start by evaluating software compatibility with your computer and printing hardware. Checking that your chosen program works seamlessly with your devices prevents frustrating technical hitches.
User-friendly interfaces are essential, especially if you want to streamline your workflow. Look for intuitive design tools that allow you to express your creativity without a steep learning curve.
Cost considerations shouldn't be overlooked either. While free software can be tempting, investing in a premium program often provides advanced features which elevate your designs. Evaluate whether the software offers a trial period or a tiered pricing model to gauge its value before committing financially.
Moreover, stellar customer support can be a game-changer. Reliable support ensures you can troubleshoot issues promptly and keep your projects on track.
Optimizing Image Quality
How can you secure your heat transfer designs look sharp and vibrant on fabric? Start with high image resolution; a minimum of 300 dpi secures crisp details. Next, focus on color correction. Accurately adjust colors so they remain true and vivid when transferred. Utilize software tools to enhance saturation and contrast, making your design pop.
Pay attention to temperature control and pressure distribution during the heat transfer process. Incorrect settings can lead to faded colors or incomplete transfers. Verify your heat press is calibrated correctly, and apply even pressure across the entire design.
Here's a quick reference table for optimizing your artwork:
| Step | Action | Benefit |
|---|---|---|
| Image Resolution | Use at least 300 dpi | Sharp, detailed designs |
| Color Correction | Adjust saturation/contrast | Vivid, true-to-life colors |
| Temperature Control | Calibrate heat press | Consistent color fidelity |
| Pressure Distribution | Ensure even pressure | No incomplete transfers |
| Software Tools | Utilize design software | Enhanced artwork quality |
Master these elements to elevate your heat transfer printing skills. By focusing on image resolution, color correction, and proper heat press settings, you'll create stunning, professional-quality designs every time.
Sizing and Scaling Artwork
Designing your artwork to fit perfectly on fabric starts with accurately sizing and scaling your images. First, measure the exact dimensions of the fabric area where your design will be placed. This guarantees your artwork isn't too large or small, maintaining a professional appearance. Use graphic design software like Adobe Illustrator or CorelDRAW to aid in scaling accuracy. These tools provide precise control over dimensions, helping you achieve the perfect fit.
Next, consider the context of your artwork placement. For instance, a logo on a t-shirt pocket requires different scaling than a full-front design. Visualize how your design will look by creating mock-ups. This practice helps you identify any adjustments needed before the final print.
Remember, the resolution of your image is vital. Higher resolutions prevent pixelation when scaling up. Aim for a minimum of 300 DPI (dots per inch) to retain clarity. Finally, maintain consistency in your design elements. Uniform scaling of text and images preserves the integrity of your artwork, ensuring a cohesive look.
Mastering these steps will enhance your heat transfer printing projects, giving you confidence in your artwork's precision and placement.
Preparing Your Fabric
Before you start heat transfer printing, you need to select the appropriate fabric type.
Make sure to pre-wash the fabric to eliminate any chemicals or dirt, and iron out any wrinkles.
These steps guarantee the best results and longevity for your print.
Choosing Fabric Type
When selecting the appropriate fabric for heat transfer printing, it's important to think about the material's composition and weave to achieve the best outcomes. Fabrics like cotton, polyester, and blends are excellent choices because they offer a smooth surface for the transfer to adhere to. The fabric weight and texture play significant roles; lighter fabrics often work better for intricate designs, while heavier fabrics can handle bolder prints. A smooth texture guarantees the transfer adheres evenly, reducing the risk of peeling or cracking.
Assessing the colorfastness and durability of your fabric is also essential. Colorfast fabrics retain their hue after multiple washes, guaranteeing your design remains vibrant over time. Durable fabrics withstand the heat and pressure involved in the transfer process without degrading. This is particularly important for garments that will see frequent use and laundering.
Opting for high-quality fabric ensures your heat transfer print looks professional and lasts longer. Don't compromise on these aspects if you aim for excellence in your finished product. Always test a small sample to verify how well the fabric handles the heat transfer process before committing to larger projects.
Pre-Washing the Fabric
Pre-washing your fabric is vital to remove any residues and prevent shrinkage after the heat transfer process. Skipping this step can lead to uneven transfers and compromised designs. You want your fabric to be in best condition, and that starts with proper fabric care.
First, follow the washing instructions specific to your fabric type. Different materials have distinct requirements, and adhering to these guarantees minimal fabric shrinkage and better results. Use a mild detergent and avoid fabric softeners, as they can leave residues that affect the transfer process. Cold or warm water is usually best, but always check the label.
Here's a quick guide to help you:
| Fabric Type | Washing Instructions |
|---|---|
| Cotton | Cold water, mild detergent |
| Polyester | Warm water, no fabric softener |
| Blends | Follow care instructions on label |
Pre-treatment considerations are essential. After washing, let the fabric air dry or tumble dry on low heat. This step ensures any remaining residues are eliminated and prepares the fabric for a smooth transfer. Remember, meticulous preparation leads to flawless results. So, take the time to prepare your fabric properly—it's a small step that makes a significant difference.
Ironing Out Wrinkles
Once your fabric is clean and dry, it's time to iron out any wrinkles to guarantee a smooth surface for heat transfer. Start by setting your iron to the appropriate temperature based on your fabric type. Proper temperature control is crucial for fabric care; too hot, and you might scorch the material; too cool, and stubborn wrinkles won't budge.
Place the fabric on an ironing board and smooth it out with your hands. Begin ironing from one end to the other in steady, even strokes. Pay attention to seams and edges, as these areas tend to hold wrinkles more stubbornly. If you encounter persistent creases, lightly mist the area with water before ironing again.
While ironing, avoid common mistakes such as lingering too long on one spot, which can cause shiny patches or even burn marks. Also, make sure the iron's soleplate is clean to prevent transferring any residue onto the fabric.
If you notice any wrinkles after ironing, don't hesitate to go over the area again. A smooth, wrinkle-free surface is essential for the best results in heat transfer printing. By mastering these steps, you'll ensure your fabric is perfectly prepped for the next phase of your project.
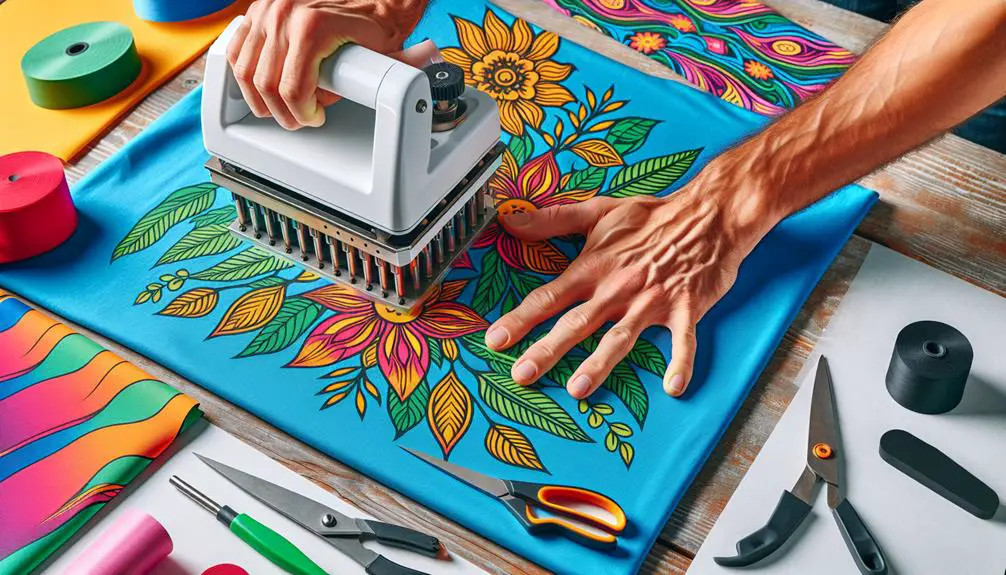
Printing the Transfer
To start printing the transfer, make certain the design is properly aligned and ready for application. Accurate transfer alignment is essential for achieving a professional look. Double-check that your design is centered and straight on the fabric. This precision guarantees that the final product meets your high standards.
Next, set your heat press to the correct temperature settings. Different materials require specific temperatures, so refer to the transfer paper instructions for best results. Typically, you'll need a range between 350°F to 375°F, but double-check to ensure accuracy.
Now, let's discuss the pressing technique. Lower the heat press smoothly and apply consistent pressure across the entire design. This ensures that the heat and adhesive distribute evenly. Maintain the pressure for the recommended time, usually around 10-15 seconds, depending on the transfer paper and fabric type.
After pressing, the cooling process is vital. Lift the heat press and let the transfer cool down before peeling off the backing paper. This step helps the design set properly and prevents smudging or lifting. Be patient and allow it to cool completely to secure a clean, crisp transfer.
Applying the Heat
Now that your transfer is properly printed and cooled, it's time to apply the heat with precision and care. You'll need to focus on temperature control and adhere to safety precautions to secure a flawless result. A heat press is ideal for even heat distribution, but a heat gun can also be used for smaller, intricate designs.
First, set your heat press to the recommended temperature for your specific transfer paper and fabric. Generally, this ranges from 300°F to 375°F. Always double-check the settings to avoid damaging the fabric or the transfer.
Place the fabric on the heat press, cover it with parchment paper, and press down. If you're using a heat gun, move it evenly over the transfer, maintaining a steady distance. Always follow safety precautions to avoid burns or other injuries.
Tool
Usage Tips
Heat Press
Ensure even pressure and consistent temperature.
Heat Gun
Ideal for small areas and detailed designs.
Thermometer
Double-check the heat press temperature.
Heat-resistant Gloves
Protect your hands from burns.
Timer
Monitor the heating duration precisely.
Finishing Touches
After applying the heat, let the fabric cool completely before handling it to make certain the transfer sets properly. Patience at this stage is essential to avoid smudging or misalignment. Once cooled, carefully peel off the transfer paper.
Examine your work closely; this is where your color selection and positioning techniques will truly shine. Inspect the print for any imperfections. If you notice any areas where the transfer didn't adhere well, you might need to reapply heat. Confirm your temperature settings and pressure application are adjusted correctly for this touch-up. Too much heat or pressure can damage the fabric, while too little won't set the transfer properly.
Next, wash the fabric gently to remove any residue from the transfer paper. Turn the fabric inside out and use cold water to preserve the vibrancy of your colors. Avoid harsh detergents that could fade the print. After washing, let it air dry; high heat from a dryer can ruin your masterpiece.
Frequently Asked Questions
How Do I Troubleshoot Common Issues With Heat Transfer Prints?
To troubleshoot heat transfer prints, address color bleeding by guaranteeing proper pressure and temperature settings. For uneven transfers, check your fabric's pre-treatment and guarantee consistent application of heat and pressure across the entire design.
Can I Use Heat Transfer Printing on Non-Fabric Materials?
Yes, you can use heat transfer printing on non-fabric materials. It works on metal surfaces, glass materials, wood items, and plastic objects. Make sure you use the right transfer paper and temperature settings for best outcomes.
What Are the Best Types of Heat Press Machines for Beginners?
Finding the perfect heat press machine can feel like searching for a needle in a haystack. Compare brands like Cricut and PowerPress. Consider your budget and key features to make the best choice for beginners.
How Do I Care for Garments With Heat Transfer Prints?
To guarantee garment longevity and print durability, follow these washing instructions: turn the garment inside out, use cold water, and air dry. For fabric maintenance, avoid bleach and high heat to keep your prints looking fresh.
Is Heat Transfer Printing Environmentally Friendly?
Imagine a tree absorbing water; heat transfer printing's environmental impact can be similar. While traditional methods aren't perfect, you can adopt eco-friendly alternatives like water-based inks and recycled materials for more sustainable and responsible practices.