To create a shamrock tie-dye, start by folding your fabric diagonally into a triangle, then fold each section into leaf shapes to outline the shamrock. Pinch and secure these folds tightly with rubber bands to keep crisp edges. Apply green dye carefully on the folded sections for vibrant leaves while avoiding oversaturation. Proper alignment is key for a clear shamrock design. If you want to master the full process, including dye application and finishing tips, keep exploring the steps ahead.
Key Takeaways
- Start by folding the fabric diagonally into a triangle to create a symmetrical base for the shamrock design.
- Fold each leaf section carefully to shape the shamrock leaves, ensuring points are aligned and edges are crisp.
- Pinch folds firmly and secure with rubber bands to maintain the shamrock shape during dye application.
- Use small rubber bands or string to tightly secure each fold, keeping the shamrock silhouette well-defined.
- Apply dye selectively on folded sections, avoiding oversaturation to enhance the shamrock pattern’s clarity and vibrancy.
Materials Needed for Shamrock Tie-Dye
To create your shamrock tie-dye, you’ll need a few essential materials. Start with a plain white cotton shirt or fabric, as cotton absorbs dye best and shows colors vividly.
Begin with a plain white cotton shirt for vibrant, true-to-color shamrock tie-dye results.
Choose quality fiber-reactive dyes in green shades to capture the shamrock’s spirit. You’ll also want rubber bands to secure your folds tightly, helping form clean patterns.
Don’t forget a pair of gloves to protect your hands from staining. A squeeze bottle or spray bottle will make dye application precise and manageable.
Have a plastic table cover or garbage bags ready to keep your workspace clean. Finally, prepare some plastic bags or wrap to cover your dyed fabric during the setting phase.
Once you gather these items, you’ll be set to create your shamrock tie-dye masterpiece.
Preparing Your Fabric for Folding
Before you start folding, pick a fabric that holds dye well, like cotton or rayon.
Make sure to pre-wash and dry your fabric to remove any sizing or chemicals that could affect the dye.
Finally, mark your fold lines lightly to guide your shamrock design.
Choosing Fabric Type
Fabric choice plays an essential role in achieving vibrant and well-defined shamrock tie-dye patterns.
You’ll want to select natural fibers like cotton, rayon, or linen because they absorb dye more effectively than synthetic fabrics. Cotton, especially 100% cotton, is the most popular option since it’s affordable and holds colors brilliantly.
Avoid polyester or blends with a high synthetic content, as these fabrics resist dye and may result in dull or uneven colors.
Additionally, consider fabric weight; medium-weight fabrics work best since they’re sturdy enough to hold folds yet flexible for precise shaping.
Choosing a light-colored fabric will help your shamrock design pop, so opt for whites or pastels.
Picking the right fabric sets you up for a successful and vibrant shamrock tie-dye project.
Pre-washing and Drying
Selecting the right material sets the stage, but getting your fabric ready means taking a few important steps.
Before you fold, always pre-wash your fabric to remove any sizing, dirt, or chemicals that might block dye absorption. Use a mild detergent and wash in cold or warm water, depending on the fabric’s care instructions. Avoid fabric softener, as it can create a barrier for the dye.
After washing, dry your fabric completely or leave it slightly damp—both work well for tie-dye. If you prefer damp fabric, it will absorb dye more easily and create sharper patterns. Just make certain it’s not soaking wet, or the colors may bleed too much.
Proper pre-washing and drying guarantee vibrant, lasting results in your shamrock tie-dye design.
Marking Fold Lines
Three clear fold lines will guide your shamrock tie-dye design and guarantee symmetry.
Begin by laying your pre-washed, dry fabric flat on a clean surface. Use a ruler or measuring tape to find the center, then lightly mark it with a washable fabric marker or chalk.
Next, create two more fold lines by folding the fabric in thirds or halves, depending on your shamrock pattern. Mark these lines clearly but gently, so they don’t leave permanent stains.
These fold lines act as your blueprint, ensuring each leaf of the shamrock is balanced. Taking time here saves you from uneven dye patterns later.
Once marked, you’re ready to fold along these lines precisely, setting the stage for a stunning, symmetrical shamrock tie-dye effect.
Basic Tie-Dye Techniques to Know
Now that your fabric is ready, you’ll want to master some essential folding methods to create sharp patterns.
Understanding how to apply dye evenly can make all the difference in your final design.
Let’s go over a few simple techniques that will set you up for success.
Essential Folding Methods
Although tie-dye may seem spontaneous, mastering a few essential folding methods will give you control over your design’s final look.
Start with the accordion fold by folding your fabric back and forth in a zigzag pattern—this creates sharp, repeating lines.
Next, try the spiral fold by pinching the center and twisting the fabric into a tight coil; this method is perfect for circular patterns like your shamrock design.
The bullseye fold involves pulling a section of fabric upward and securing it with bands at intervals, producing concentric rings.
Finally, the crumple fold lets you bunch the fabric randomly for a more organic, marbled effect.
Dye Application Tips
Once you’ve mastered folding techniques, applying dye thoughtfully will bring your shamrock design to life.
Start by choosing vibrant colors that contrast well to highlight the shamrock’s shape. Use squeeze bottles for precise control, applying dye directly onto the fabric folds to target specific areas. Avoid oversaturating, which can cause colors to bleed and blur your pattern. Instead, apply dye evenly but sparingly, letting it soak through for consistent coverage.
Remember to flip the fabric carefully and apply dye to both sides for balanced color. Protect your workspace and wear gloves to prevent staining.
Finally, wrap your dyed fabric in plastic to keep it moist, allowing the dye to set deeply and guarantee vivid, lasting colors. These tips will help your shamrock design pop beautifully.
Step 1: Folding the Fabric Into a Triangle
Start by laying your fabric flat on a clean surface, then fold it diagonally to form a perfect triangle. This initial fold is vital because it sets the foundation for your shamrock design. Be sure to smooth out any wrinkles or creases to guarantee even dye absorption.
Here’s how to get it just right:
- Align the corners carefully to create sharp edges.
- Press firmly along the fold to make a defined crease.
- Double-check that both sides match perfectly.
- Keep the fabric taut but not stretched to avoid distortion.
Taking your time here will make the next steps much easier and improve the overall look of your shamrock tie-dye. You’re off to a great start!
Step 2: Creating the Shamrock Leaf Shapes
Now that your fabric is folded into a triangle, you’ll start shaping the shamrock leaves by folding each leaf section carefully.
Make sure to align the points of the shamrock precisely to create a clear, defined pattern.
This step sets the foundation for your tie-dye design’s signature look.
Folding Leaf Sections
Three distinct folds will help you shape each shamrock leaf with precision. Start by folding the fabric section in half lengthwise to create a sharp crease.
Next, fold it again diagonally to form a triangle, which will give the leaf its pointed shape. Then, fold the triangle in half once more, narrowing the leaf’s tip for that classic shamrock look.
Follow these steps for each leaf section:
- Fold fabric lengthwise to form a crease.
- Fold diagonally to create a triangle.
- Fold the triangle in half for a pointed tip.
- Smooth out any wrinkles for crisp edges.
This method guarantees your shamrock leaves come out perfectly shaped, ready for the next step in your tie-dye project.
Aligning Shamrock Points
After folding each leaf section, you’ll align the pointed tips carefully to form the classic shamrock shape.
Lay the folded leaf sections flat, then bring their pointed ends together at the center. Make certain the tips meet evenly to create a symmetrical three-leaf pattern. Adjust as needed to avoid gaps or overlaps between the leaves.
Pinch the aligned points firmly so they stay in place during dyeing. This alignment is vital because it defines the shamrock’s recognizable silhouette on your fabric.
Take your time here—precise alignment guarantees your final design looks sharp and balanced. Once the points are perfectly positioned, secure the entire folded piece with rubber bands or string, focusing on maintaining the shamrock shape throughout the dye process.
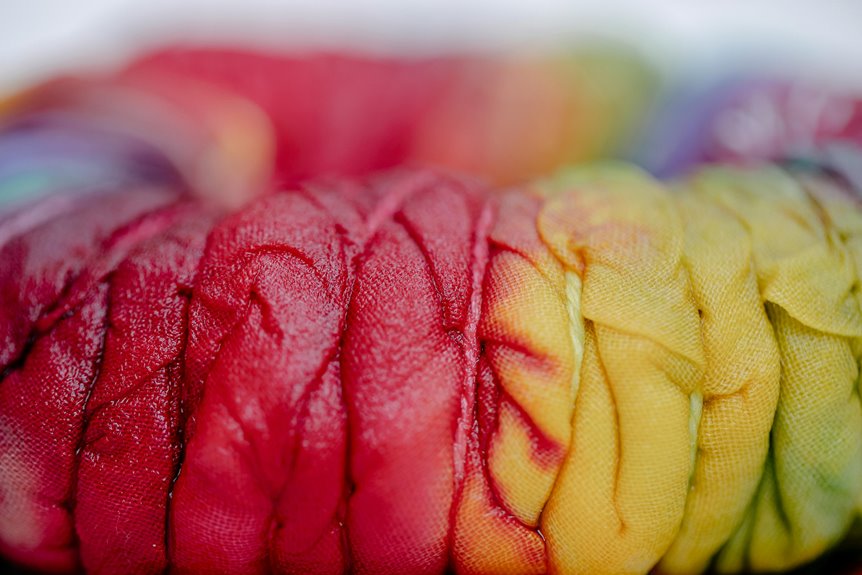
Step 3: Pinching and Securing the Folds
Once you’ve carefully folded the fabric into the shamrock shape, you’ll pinch the folds firmly to maintain crisp lines. This step is essential for the design’s sharp definition and helps prevent dye from bleeding into unwanted areas.
To secure your folds properly:
- Pinch each fold tightly at the center of the shamrock leaves.
- Use small rubber bands or strings to hold the folds in place without slipping.
- Double-check all points and edges to verify nothing is loose.
- Adjust any uneven folds to keep symmetry perfect.
Step 4: Applying Dye for Vibrant Colors
With your folds securely in place, you’re ready to bring your shamrock design to life through color. Start by preparing your dye in squeeze bottles for easy application.
Apply the dye directly onto the fabric, focusing on each section created by your folds. Use vibrant colors generously but avoid oversaturating to prevent bleeding between sections. Rotate the shirt as you work to guarantee even coverage.
Apply vibrant dye carefully to each folded section, rotating for even coverage without bleeding colors.
Consider applying dye to both sides for a richer look. Remember, the folds create natural barriers, so you can paint different colors side by side for a striking effect.
Once you’ve applied dye to all desired areas, gently press the fabric to help the dye penetrate deeper. This step sets the stage for a bold, eye-catching shamrock pattern.
Tips for Choosing Color Combinations
Choosing the right color combinations can make your shamrock tie-dye truly stand out. To create a vibrant and eye-catching design, consider these tips:
- Pick contrasting colors: Use shades that pop against each other, like green and purple, to highlight the shamrock shape.
- Stick to a theme: Choose colors that evoke a specific mood, such as earthy tones for a natural feel or bright neons for energy.
- Limit your palette: Using three to four colors prevents the design from looking too busy and keeps the shamrock recognizable.
- Test on scrap fabric: Before committing, try your combination on a small piece to see how the colors blend and react.
How to Set and Rinse Your Tie-Dye
After you finish applying the dye, you’ll need to set the colors properly to guarantee they stay vibrant and don’t wash out.
First, wrap your shirt tightly in plastic wrap to keep it moist and let it sit for 6 to 8 hours or overnight. This resting period allows the dye to bond with the fabric fibers.
When ready, carefully unwrap your shirt and rinse it under cold running water. Start rinsing while the shirt is still damp, removing the excess dye gently without scrubbing. Continue rinsing until the water runs mostly clear.
Next, wash your shirt separately in cold water with a mild detergent to lock in the color.
Finally, air dry or tumble dry on low heat, and your shamrock tie-dye is ready to wear!
Creative Ways to Use Your Shamrock Tie-Dye
Once you’ve mastered the shamrock tie-dye technique, you can showcase your vibrant creation in countless ways.
Transform your masterpiece into a statement piece that brightens your day and sparks joy. Here are some creative ideas to make the most of your shamrock tie-dye:
- Wear it proudly as a festive shirt or hoodie to celebrate St. Patrick’s Day with flair.
- Gift it to friends or family, sharing your handmade cheer and unique style.
- Turn it into a decorative pillow cover, adding a splash of color and luck to your living space.
- Use it as a vibrant tote bag, carrying your essentials with a personal, artistic touch.
These ideas help you enjoy your shamrock tie-dye beyond the craft, spreading happiness everywhere you go.
Troubleshooting Common Folding and Dyeing Issues
Why isn’t your shamrock tie-dye turning out as expected? Often, uneven dye patterns happen because the fabric wasn’t folded tightly or symmetrically.
Make sure you crease sharply and align edges precisely to get that iconic shamrock shape. If colors bleed into each other, it’s usually due to applying too much dye or not securing the fabric with rubber bands firmly.
Try using less dye and tighter bands next time. Faded colors? That could mean your dye wasn’t saturated enough or you rinsed too soon.
Let the dye set for at least 6-8 hours before washing. Finally, avoid using fabric softeners—they can dull colors.
With these tweaks, your shamrock tie-dye will look crisp and vibrant every time!
Frequently Asked Questions
Can I Use This Technique on Synthetic Fabrics?
You can try the technique on synthetic fabrics, but they don’t absorb dye as well as natural fibers. You’ll get lighter, less vibrant colors, so consider using fabric paints or special dyes designed for synthetics instead.
How Long Should I Let the Dye Set for Best Results?
Want vibrant colors that last? You should let the dye set for at least 6 to 8 hours, or even overnight if you can. This gives the dye time to fully bond with the fabric fibers for best results.
Is This Folding Method Suitable for Large Fabric Pieces?
You can definitely use this folding method on large fabric pieces, but it might be trickier to keep the folds tight and even. Just take your time and secure the fabric well before dyeing for the best results.
Can I Reuse Leftover Dye for Another Project?
You can definitely reuse leftover dye for another project, but it might be less vibrant. Just store it in an airtight container and shake well before using. Keep in mind, colors may vary slightly with reuse.
What Safety Precautions Should I Take When Tie-Dyeing?
Think of tie-dyeing as painting with fire—wear gloves, work in a well-ventilated space, protect your clothes, and keep dye away from your eyes. Don’t forget to wash hands thoroughly afterward to avoid stains and irritation.