To repair a rip in your corduroy, first examine the tear and trim any loose threads. Gather a matching thread and a sharp needle sized for thick fabric. Carefully align the torn edges, matching the corduroy ribs, then hand-stitch using a backstitch for strength. Consider reinforcing larger rips with an iron-on patch inside. After stitching, gently brush the area to blend the texture. Following these steps helps restore durability and appearance—there’s more to discover for perfecting this repair.
Key Takeaways
- Assess the tear size, fabric edges, and rib alignment before starting the repair to plan an effective restoration.
- Use a matching thread and sharp needle sized 80/12 or 90/14 to sew thick corduroy fabric securely.
- Align the corduroy ribs carefully and use backstitch or whipstitch with even tension to close the rip neatly.
- Reinforce larger tears with a matching fabric patch sewn or ironed on the inside for hidden durability.
- After sewing, gently brush the area to blend the repair and care for corduroy with gentle washing and air drying.
Assessing the Damage on Your Corduroy Fabric
Before you begin repairing your corduroy, take a close look at the rip to understand its size and severity.
Check if the fabric around the tear is frayed or if the rip is clean-cut. This helps you decide whether a simple patch or a more detailed stitch is necessary.
Notice if the rip runs along the corduroy’s ribs or crosses them, as that affects how you’ll align the fabric when fixing it.
Also, gently pull the fabric around the tear to see if the surrounding threads are weakened.
Identifying the extent of damage guarantees you plan your repair effectively and avoid further harm.
Being thorough now saves you time and effort later when you start mending your corduroy piece.
Gathering the Necessary Tools and Materials
Before you start repairing, make certain you have the essential sewing supplies on hand, like scissors, pins, and a sewing needle.
You’ll also want to find a fabric that closely matches your corduroy’s color and texture.
Finally, pick a thread that blends well and a needle suitable for thick fabrics to guarantee a neat repair.
Essential Sewing Supplies
To repair a rip in corduroy effectively, you’ll need a few essential sewing supplies that make the process smoother and your results more durable. Having the right tools guarantees clean stitches and a strong mend. Here’s a quick guide:
| Supply | Purpose | Tips |
|---|---|---|
| Needle | Hand sewing the rip | Use a sharp, thin needle |
| Thread | Matching or neutral color | Choose strong polyester thread |
| Scissors | Trimming loose threads | Use sharp, small embroidery scissors |
| Thimble | Protecting your finger | Helps push needle through thick fabric |
Keep these supplies handy before you start. They’ll help you work efficiently and restore your corduroy to a neat, wearable condition.
Corduroy Fabric Matching
When you’re ready to repair your corduroy, matching the fabric correctly plays an essential role in making the repair less noticeable.
Begin by finding a patch that closely resembles the color, texture, and wale width of your original corduroy. If you have scrap pieces from the same garment, those work best. Otherwise, check fabric stores or online suppliers for a similar match.
Pay close attention to the direction of the wale ribs since they need to align perfectly with your garment to blend seamlessly. Also, consider the weight and thickness to guarantee the patch doesn’t stand out or feel uncomfortable.
Taking time to select the right fabric now will make your repair look professional and extend your garment’s life.
Thread and Needle Selection
Selecting the right thread and needle is essential for a seamless corduroy repair. Using the proper tools guarantees your fix blends well and holds up over time.
For thread, choose a strong, durable option that matches your fabric’s color closely. For needles, pick one designed for heavier fabrics to avoid damaging the material.
Here’s what you need to focus on:
- Thread type: Opt for polyester or cotton-wrapped polyester for strength and flexibility.
- Thread color: Match as closely as possible to your corduroy’s shade to keep the repair discreet.
- Needle size: Use a sharp, heavy-duty needle, size 90/14 or 100/16, to easily pierce the thick fabric without causing snags.
With these choices, your repair will be both durable and visually neat.
Preparing the Rip for Repair
Before you start fixing the rip, take a close look to assess its size and shape.
Make sure to trim any loose threads around the tear to create a clean working area. This will help you achieve a smoother and more durable repair.
Assess Tear Size
Understanding the size of the tear is essential to planning an effective repair. Before you begin, take a close look at the rip to decide the best approach. Smaller tears might only need a simple stitch, while larger ones could require patching or reinforcement.
To accurately assess the tear size, follow these steps:
- Measure the length and width of the rip using a ruler or measuring tape.
- Examine how far the fabric edges have separated and if the corduroy ribs are damaged.
- Check if the tear affects seams or high-stress areas that might need extra support.
Knowing the tear’s dimensions helps you choose the right materials and repair techniques to restore your corduroy efficiently.
Trim Loose Threads
Start by carefully trimming any loose threads around the rip to create a clean working area. Use sharp fabric scissors to snip close to the edge without cutting into the fabric itself.
Removing these threads prevents further unraveling and makes the repair process smoother. Take your time to avoid accidentally enlarging the tear.
Once trimmed, gently brush away any small fibers or dust that might interfere with stitching or adhesive. This step also helps you clearly see the rip’s edges, allowing for more accurate alignment when you sew or patch it.
By tidying up the damaged area, you set yourself up for a neat, durable repair that blends well with the corduroy’s texture and pattern.
Don’t rush this essential prep work—it pays off in the final result.
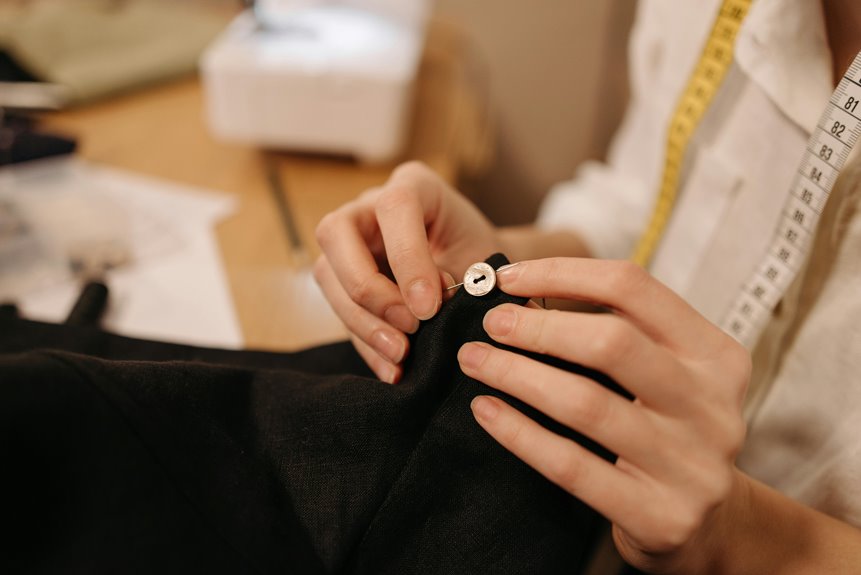
Choosing the Right Thread and Needle
Picking the right thread and needle can make all the difference when repairing a rip in corduroy. You want materials that blend well and hold up through wear. Here’s what to keep in mind:
- Thread type: Choose a polyester or cotton-wrapped polyester thread for strength and slight stretch, matching your fabric’s color closely to keep the repair discreet.
- Thread weight: Opt for a medium-weight thread (around 40wt) to balance durability without adding bulk.
- Needle size: Use a sharp needle sized 80/12 or 90/14. These sizes penetrate the thick corduroy layers without snagging or damaging the fabric.
Selecting the right combination guarantees your repair is secure and nearly invisible, setting you up for a smooth stitching process.
Techniques for Hand-Stitching Corduroy Rips
To hand-stitch a rip in corduroy effectively, you’ll want to use precise, small stitches that follow the fabric’s ridges to blend seamlessly.
Begin by aligning the torn edges carefully, making sure the ridges match up. Use a backstitch or a whipstitch for durability, stitching just inside the rip’s edge to prevent fraying. Keep your tension even to avoid puckering.
When you reach the end, secure your thread with a knot on the inside of the fabric to keep it hidden.
For wider rips, consider reinforcing the repair by stitching a patch behind the tear before closing it. Taking your time with these techniques guarantees your corduroy looks neat and stays strong after repair.
Using a Sewing Machine for Corduroy Repairs
While hand-stitching offers control and precision, using a sewing machine can speed up the repair process and provide strong, even stitches on corduroy.
To use your machine effectively, follow these steps:
- Choose the right needle and thread: Use a heavy-duty needle designed for thick fabrics and a polyester thread that matches your corduroy’s color.
- Set your machine to a straight stitch: A medium stitch length works best to avoid puckering and damage to the fabric’s ribs.
- Stabilize the fabric: Place a piece of lightweight interfacing behind the rip to support the fabric as you sew, preventing further tearing.
This approach guarantees clean, durable repairs without compromising the corduroy’s texture.
Reinforcing the Repair for Durability
After sewing the rip, you’ll want to reinforce the repair to guarantee it lasts through wear and washing.
Start by stitching over the seam once more, using a backstitch or zigzag stitch for extra strength. Focus on the edges of the rip, where stress tends to cause new tears.
If you have iron-on fabric patches, apply one on the inside of the garment; this adds a hidden layer of support without affecting the look.
For added durability, consider sewing a small patch of matching corduroy fabric over the repair on the inside, securing it with tight, even stitches.
Finally, press the area gently with an iron to set the stitches and smooth the fabric, ensuring your repair holds up over time.
Tips for Blending the Repair With Corduroy Texture
Even when you’ve reinforced the repair, matching the corduroy’s distinctive ridges can make your fix nearly invisible. To blend the repair seamlessly, focus on following the fabric’s texture carefully.
- Align the Pile: When sewing, make sure the corduroy’s ribs (wales) line up perfectly on both sides of the tear. This keeps the texture consistent.
- Use a Fine Needle: A thin needle creates smaller holes, preserving the fabric’s look and preventing noticeable disruption in the ridges.
- Brush the Fabric: After stitching, gently brush the area with a soft fabric brush or toothbrush to lift the pile and restore the corduroy’s natural texture.
Caring for Repaired Corduroy Garments
How you care for your corduroy garment after repair plays an essential role in maintaining its durability and appearance.
To keep your garment looking great, always wash it inside out on a gentle cycle with cold water. Avoid harsh detergents and fabric softeners that can damage fibers.
Wash corduroy inside out on a gentle cold cycle, avoiding harsh detergents and fabric softeners.
After washing, air dry your corduroy to prevent shrinking and fabric distortion. When ironing, use a low heat setting and press on the reverse side to protect the repair and pile.
Store your corduroy in a cool, dry place, avoiding overcrowding to prevent creases. Regularly brushing the fabric with a soft clothes brush helps maintain its texture.
Frequently Asked Questions
Can Corduroy Fabric Be Repaired if the Rip Is Very Large?
You can repair large rips in corduroy, but it’s trickier than smaller tears. You’ll need sturdy patches, precise stitching, and patience. If it’s too big, consulting a professional might save your fabric better.
Is It Possible to Repair Corduroy Without Visible Stitching?
You can repair corduroy without visible stitching by using fabric glue or iron-on patches. These methods bond the fabric discreetly, keeping the texture intact, so your repair won’t stand out or disrupt the corduroy’s look.
How Long Does a Typical Corduroy Repair Last?
You can expect a typical corduroy repair to last several months to years, depending on how often you wear and wash the item. Proper care and gentle handling will help your repair hold up longer.
Can Machine-Washing Damage a Repaired Corduroy Rip?
Don’t put all your eggs in one basket—machine-washing can stress a repaired corduroy rip, risking damage. You should use gentle cycles and cold water to protect the fabric and stitching, extending the repair’s life.
Are There Professional Services for Repairing Corduroy Rips?
You can find professional tailors and fabric repair services that specialize in fixing corduroy rips. They’ll use expert techniques to restore your garment’s look and durability, saving you time and ensuring quality results.