Are you struggling to create smooth curves in your designs or sewing projects? Look no further than the trusty French curve! This versatile tool can be used for everything from drafting patterns to shaping necklines and sleeves. But if you’re not familiar with how to use a French curve, it can be a bit intimidating.
In this article, we’ll walk you through the basics of understanding and using a French curve. We’ll cover how to choose the right curve for your project, prepare your workspace, hold and position the curve, and use it to create beautiful curves in your designs. Plus, we’ll share some tips and tricks to help you get the most out of this essential tool.
So grab your French curve and let’s get started!
Table of Contents
Understanding the French Curve
You’re gonna love using the French curve for your designs because it helps you create smooth, graceful curves with ease. The French curve is a tool used in fashion design and pattern drafting to create smooth curves without having to rely on a ruler or other straight edge.
The tool is named after its shape, which resembles the curve of a French arch. The French curve is made of flexible plastic or metal and comes in different sizes and shapes. It’s a versatile tool that helps you create all kinds of curves, from gentle curves to sharp angles.
The curves on the French curve are carefully calibrated to match the natural curves of the human body, making it an ideal tool for creating garments that fit well and flatter the body. To use the French curve, simply place it on your pattern or drawing and trace along the curve with a pencil or marker.
The French curve allows you to create smooth, flowing lines that are difficult to achieve with a ruler or other straight edge. With a little practice, you’ll be able to create precise, beautiful curves that transform your designs.
Choosing the Right Curve for Your Project
Selecting the perfect curve for your project can make all the difference in achieving precision and beauty in your design. When choosing a curve, consider the specific needs of your project.
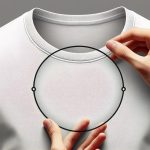
If you’re working on a garment with a lot of curves, like a dress or a coat, you may want to choose a French curve with more dramatic curves and angles. On the other hand, if your project has more subtle curves, like a shirt collar or a pocket, you may want to choose a French curve with more gentle curves and angles.
Another factor to consider when choosing a French curve is the size of your project. If you’re working on a large project, like a coat or a blanket, you may want to choose a larger French curve to ensure that your curves are smooth and even. If you’re working on a smaller project, like a shirt or a pillowcase, a smaller French curve may be more appropriate.
Consider the material you’re working with when choosing a French curve. If you’re working with a delicate or lightweight fabric, like silk or chiffon, you may want to choose a French curve with a softer edge to prevent snagging or tearing. If you’re working with a heavier or more structured fabric, like denim or wool, a French curve with a sharper edge may be more effective in achieving the desired shape.
Preparing Your Workspace
Before you start working on your project, it’s important to gather all the necessary materials. This includes your chosen drafting tools, paper, and any other supplies you may need.
Once you have everything, it’s time to set up your workspace. Make sure you have enough room to work comfortably and that you have good lighting.
Gathering Your Materials
Now that you’ve got all your materials together, it’s time to dive into the world of French curves and unleash your creativity!
The first thing you need to do is make sure you have a French curve. This is a tool that comes in all different sizes and shapes, so make sure you choose the one that works best for your project. You should also have a clear ruler, a pencil, and eraser handy.
Next, you’ll want to gather any other materials you might need for your project. This could include paper, fabric, or any other material you plan to use. Make sure you have a clean and flat workspace to prevent any accidents, and always make sure your materials are within reach.
With all your materials gathered, you’re ready to start using your French curve and creating beautiful designs!
Setting Up Your Workspace
Get ready to unleash your creativity by setting up a workspace that’s clean, organized, and free of distractions. Here are three things you can do to set up your workspace for using a French curve:
-
Clear your workspace of any unnecessary clutter. You want to have plenty of space to work with and not be distracted by piles of papers or tools that you don’t need. Make sure your workspace is clean and dust-free so that you can focus on your project without any interruptions.
-
Get all the materials you need ready before you start. This includes your French curve, pencils, erasers, rulers, and any other materials you might need. Having everything within reach will help you stay focused and not waste time looking for things.
-
Make sure you have good lighting. You want to be able to see your work clearly and not strain your eyes. If possible, position your workspace near a window so you can take advantage of natural light. If not, invest in a good desk lamp to ensure you have adequate lighting.
By following these steps, you’ll be ready to start using your French curve and create beautiful designs and patterns with ease.
Holding and Positioning the French Curve
To properly hold and position the French curve, grip it firmly but comfortably with your non-dominant hand. This will give you stability for making accurate curves and lines. Keep your hand relaxed to avoid affecting the smoothness of your curves.
Position the French curve on your paper where you want to make your curve. Hold it down with your non-dominant hand and guide your pencil along the curve with your dominant hand. Keep your pencil perpendicular to the French curve for the most accurate line.
As you become more comfortable with the French curve, you may find that you can make curves without holding it down with your non-dominant hand. It’s still important to keep a light grip on the curve for accuracy. Practice to make smooth and precise curves every time.
Using the French Curve to Create Curves
Achieving precise curves is essential in any design project, and the French curve can be a valuable tool when used properly.
To create curves using the French curve, start by positioning it on the paper so that it aligns with the points you want to connect. Make sure to hold the curve securely in place with one hand while using the other hand to draw the curve with a pencil or pen.
It’s important to remember that you can create different curves by adjusting the angle at which you hold the curve. Experiment with different angles until you find the one that produces the curve you want. Additionally, you can use the French curve to create more complex curves by combining different curves together.
For a cleaner and more precise curve, trace the curve lightly with a pencil first, and then go over it with a pen or marker once you’re satisfied with the curve. This will also give you the flexibility to adjust the curve if you need to make changes later on.
Overall, mastering the French curve takes practice, but with patience and persistence, you can create beautiful and accurate curves for your design projects.
Tips and Tricks for Using a French Curve
Now that you’ve learned how to use a French curve to create curves in your designs, it’s important to review your work to ensure accuracy. Practice makes perfect, so continue to improve your skills by experimenting with different techniques and designs.
Don’t be afraid to explore other design tools as well, such as a compass or ruler, to expand your creative possibilities.
Adjust the paragraph structure in the Input to logically group complete sentences on their own lines, with a double new line after.
Reviewing Your Work
Hey, take a step back and check out your design using a French curve for a smooth finish.
Once you’ve finished using the French curve to draw your curves and shapes, it’s important to take a moment to review your work.
Look at your design from different angles and distances to ensure that everything is smooth and flowing.
If you notice any bumps or inconsistencies, don’t worry! That’s what the French curve is for. Use it to make any necessary adjustments and smooth out your lines.
Don’t forget to also check for symmetry and balance in your design.
By taking the time to review and refine your work, you can be sure to achieve a polished and professional finished product.
Continuing to Improve Your Skills
To improve your design skills, you should keep practicing and experimenting with different techniques and styles. This will help you to become more comfortable and confident in your work, and allow you to develop your own unique style. Here are three tips to help you continue to improve your skills:
-
Take on new challenges: Don’t be afraid to try something new and challenging. Whether it’s a new type of project or a new tool, exploring new areas of design will help you to broaden your skill set and develop new ideas.
-
Seek feedback: Always be open to feedback from others, whether it’s from a mentor, colleague, or client. Critique can be tough to hear, but it’s essential to improving your work. Take constructive criticism and use it as an opportunity to grow.
-
Learn from others: Look to other designers for inspiration and guidance. Read design blogs, attend workshops, and engage with other professionals in the industry. Learning from others will help you to stay up-to-date on the latest trends and techniques, and can provide valuable insights into your own work.
Exploring Other Design Tools
If you want to elevate your design skills, it’s worth exploring various design tools to find what works best for you. While the French curve is a useful tool for creating curves and shapes, there are other tools that can also help you achieve your design goals. Here are some other design tools you may want to consider:
| Tool | Description | Use |
|---|---|---|
| Compass | A tool used for drawing circles and arcs. | Useful for creating circular designs or curved elements. |
| T-square | A straightedge tool used for drawing straight lines. | Useful for creating precise lines and angles. |
| Protractor | A tool used for measuring angles. | Useful for creating designs with specific angles or for ensuring accuracy in measurements. |
By incorporating these tools into your design process, you can expand your skillset and create more intricate and precise designs. Don’t be afraid to experiment with different tools and techniques to find what works best for you.
- How Does Ring Spun Cotton Affect Garment Fit and Shape Retention? - August 13, 2024
- What Are the Challenges in Producing Ring Spun Cotton? - August 13, 2024
- Is Ring Spun Cotton Suitable for Plus-Size Clothing? - August 13, 2024


