Ever wondered how you can achieve a perfect fit for your jeans without a trip to the tailor?
Tackling the task of taking in the waist of jeans through hand sewing might seem challenging at first, but fear not, as I will guide you through the essential steps to achieve a custom fit effortlessly.
From selecting the right tools to mastering the technique, every detail counts when it comes to altering your jeans to match your unique measurements.
So, are you ready to reveal the secrets of mastering this alteration and elevate your denim game to a whole new level?
Key Takeaways
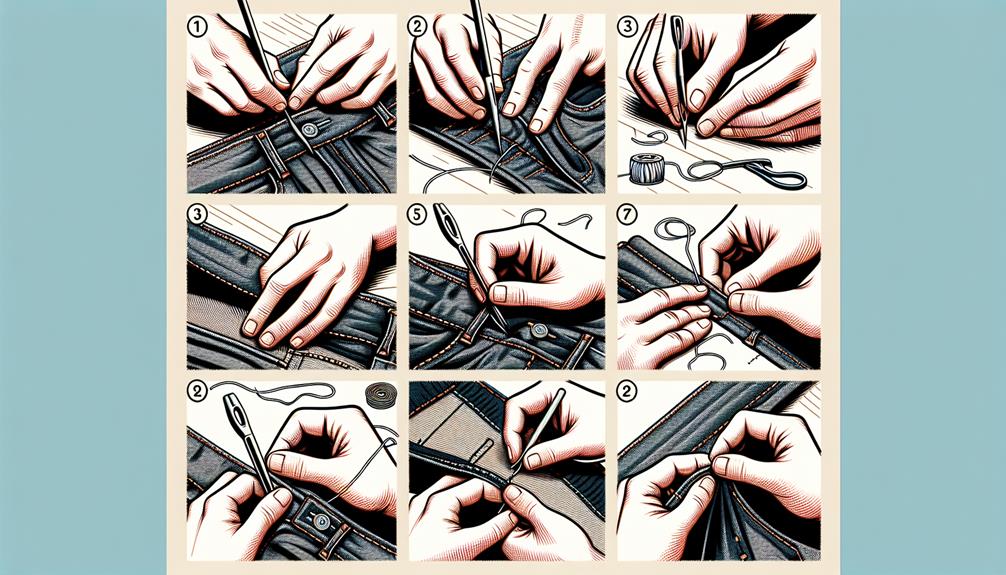
- Accurately assess and mark excess fabric for precise waistline alterations.
- Securely pin and stitch along marked lines for a well-fitted outcome.
- Trim excess fabric and reattach the waistband for a polished look.
- Test fit, make final adjustments, and maintain with proper care for lasting results.
Gather Necessary Materials
To gather the necessary materials for taking in the waist of jeans by hand, I recommend having Taylor's wax or a marker to mark the alteration on the back side of the jeans. These tools are essential for precisely outlining where the adjustments need to be made.
Additionally, you'll need a needle and thick thread for hand sewing the waistband. If thick thread is unavailable, ordinary thread can serve as a substitute, although it may not provide the same level of durability.
When selecting jeans for this alteration, opt for denim due to its sturdy nature and ability to hold the new seams securely. To make accurate stitching, creating clear V-shaped markings from the top to the bottom of the alteration area will help guide your hand sewing process, resulting in a tailored fit that enhances the overall look and comfort of your jeans.
Assess Fit of Jeans
After gathering the necessary materials, I carefully checked the waistband of the jeans to determine the amount of fabric that needed to be taken in for a better fit.
Evaluating the Fit of Jeans:
- Align Seams Properly: Make sure that the side seams of the jeans align correctly, and there's no excess fabric bunching at the back, which can indicate that the waist needs adjusting.
- Check for Gaps: Look for any gaps or gaping at the waist when trying on the jeans for fit. These spaces indicate that the waistband is too loose and requires alteration.
- Comfort and Fit: Pay attention to how the jeans feel around the waist. If they feel loose, slipping down, or uncomfortable, it's a sign that the waist needs to be taken in for a snug and flattering fit.
Evaluating the fit of the jeans is important to make sure that the alteration results in a comfortable and well-fitted pair without compromising the overall appearance.
Determine Amount to Take in
Considering the desired tightness for a tailored fit, it is essential to measure the excess fabric around the waist to determine the appropriate amount needed for alteration. To accurately determine the amount to take in, measurements must be precise. Taking in the waist by 1-2 inches is a common alteration for a more fitted look, but this can vary based on personal preference and the original fit of the jeans. Double-checking the markings before sewing is critical to make sure the correct amount is being taken in.
| Measurement Type | Amount to Take in (inches) |
|---|---|
| Excess Fabric | 1 inch |
| Desired Tightness | 2 inches |
| Total Adjustment | 1.5 inches |
| Final Fit Check | Make sure comfort |
| Stitching Precision | Critical |
Mark New Waistline
I measure my waist accurately, pinch the excess fabric, and then sew along the markings to achieve the perfect fit.
These steps are important in ensuring a symmetrical alteration and a professional finish to the jeans.
Following this process diligently will result in a tailored look that fits comfortably and looks great.
Measure Waist Accurately
To accurately measure the desired new waistline on the jeans, use a measuring tape and mark the line with Taylor's wax or a marker for clear reference. Here are three key steps to guarantee precision in measuring the waist accurately:
- Utilize a Measuring Tape: Measure the waist at the desired tightness level to determine the new waistline accurately.
- Mark with Precision: Make a clear and straight mark on the fabric using Taylor's wax or a marker to secure the alteration is done accurately.
- Double-Check Alignment: Before proceeding with alterations, double-check the marked line to ensure it's straight and aligned properly for a seamless adjustment.
Taking the time to measure the waist accurately will result in a well-fitted alteration for your jeans.
Pinch Excess Fabric
After accurately marking the new waistline on the jeans, the next step is to pinch the excess fabric at the back to determine the amount to be taken in.
This step requires precision and attention to detail. By gently pinching the fabric at the center back, I can assess how much excess material needs to be removed for a proper fit. It's important to maintain symmetry in the pinched areas on both sides to maintain balance in the alteration.
Once the excess fabric is pinched and marked, I can proceed with the sewing process, confidently knowing the exact adjustments needed for the new waistline.
This methodical approach guarantees a well-fitted result when altering the waist of the jeans.
Sew Along Markings
When adjusting the waist of jeans by hand, one should start by marking a new waistline on the inside using tailor's wax or a marker. This step is important in ensuring a precise alteration.
To sew along the markings effectively, follow these key steps:
- Symmetrical Marks: Place the marks symmetrically on both sides of the jeans for a balanced adjustment.
- Guiding V-Shape: Draw a V-shape from the top of the jeans down to the desired new waistline to guide the stitching process.
- Accuracy Check: Double-check the markings to guarantee precision and clarity before commencing the sewing process.
Following these steps meticulously will help achieve a well-fitted waistline on your jeans through hand sewing.
Remove Waistband
I carefully unpick the waistband stitches with a seam ripper, making sure not to damage the denim material.
Separating the waistband from the fabric requires patience and precision to avoid any unnecessary tears.
Unpick Waistband Stitches
To begin the process of removing the waistband from your jeans, carefully unpick the stitches using a needle or seam ripper.
- Precision is Necessary: Make sure each stitch is removed meticulously to prevent any damage to the denim fabric.
- Take Your Time: Rushing through this step may lead to unintended consequences, so proceed with patience.
- Track Stitches: Keep a close eye on the original stitching pattern to aid in reattaching the waistband accurately.
Separate Waistband From Fabric
Carefully using a seam ripper or small scissors, detach the waistband from the denim fabric to guarantee a clean separation.
Gently pulling apart the stitches connecting the waistband to the jeans is important; take care not to damage either the fabric or waistband during this process.
Work diligently around the entire waistline, removing the stitches that secure the waistband in place. Remember to keep track of the original stitching pattern and positioning of the waistband to aid in reattaching it accurately later on.
Once the waistband is successfully separated, proceed with adjusting the waistline of the jeans to achieve the desired fit before securely reattaching the waistband. This meticulous approach ensures a precise alteration for a perfect fit.
Carefully Detach Waistband Interfacing
Efficiently removing the waistband interfacing involves delicately cutting the connecting stitches to separate it from the jeans. To master this step, follow these key points:
- Use the Right Tools: Employ a seam ripper or small scissors to precisely cut the stitches without harming the fabric.
- Handle with Care: Take your time to avoid accidental tears or cuts in the denim material.
- Maintain for Reattachment: Maintain the waistband and interfacing remain intact during the removal process for seamless reattachment later on.
Pin Excess Fabric
Securing the excess fabric with pins is an important step when preparing to alter the waistline of jeans by hand. Pinching the fabric at the waistline allows for a precise determination of the amount that needs to be taken in. To begin, carefully use pins to secure the excess fabric in place before starting the stitching process. Pin along the marked V-shape that indicates the alteration, making sure that the pins are tightly secured to prevent any shifting during sewing.
It is vital to double-check the pinned area for comfort and fit before proceeding with the sewing. This step guarantees that the jeans will fit properly once the alteration is complete. By securing the excess fabric with pins in a neat and organized manner along the marked line, you set yourself up for a successful alteration that results in a well-fitted pair of jeans. Remember, precision and attention to detail during this pinning process are key to achieving a professional-looking result.
Sew Along Marked Line
After pinning the excess fabric along the marked line, proceed to sew along the line on the backside of the jeans to create a gathered effect. This step is important in effectively taking in the waist of the jeans by hand.
Here's how to master this technique:
- Use a Needle and Thick Thread: Opt for a sturdy needle and thick thread to make sure the alteration is secure. Stitch in a criss-cross pattern across the back of the jeans for added strength.
- Tight and Close Stitches: Make sure your stitches are tight and close together to effectively reduce the waist size. This meticulous approach will guarantee a professional-looking alteration.
- Finish Neatly: Finish the stitching as close to the bottom as possible to maintain a seamless appearance. A well-executed finish will make sure that your jeans look as good as new.
Trim Excess Fabric
I carefully trim the excess fabric on both sides of the seam using sharp scissors, ensuring a smooth and clean finish without cutting the thread. It's important to cut close to the stitching but not too close to prevent unraveling. By removing the excess fabric evenly, the alteration will look professional and refined. This step not only reduces bulkiness but also enhances the overall fit of the jeans around the waist, providing a tailored look.
To ensure precision and accuracy in this process, it is vital to approach it with care and attention to detail. Here is a table summarizing the key points to remember while trimming the excess fabric:
| Trim Excess Fabric Tips | |
|---|---|
| Cut close to the stitching | Be cautious not to cut too close to avoid unraveling the seam |
| Trim evenly for a smooth finish | Remove excess fabric to reduce bulkiness and enhance fit |
Following these guidelines will help achieve a polished result in taking in the waist of jeans.
Reattach Waistband
Now, let's tackle the important step of reattaching the waistband to the jeans.
Sewing the waistband back on securely is essential to guarantee the alterations hold up over time.
After securing the stitches, we'll move on to the finishing touches for a polished final result.
Sewing the Waistband
To secure the waistband back onto the jeans, align the cut edges of the waistband with the corresponding edges of the jeans. When sewing the waistband, follow these essential steps:
- Use Matching Thread: Guarantee a seamless look by sewing with a matching thread color that blends well with the fabric.
- Secure Stitches: Maintain the integrity of the waistband by sewing with secure and evenly spaced stitches to avoid gaps or irregularities.
- Press for a Professional Finish: After reattaching the waistband, press it with an iron to achieve a crisp finish, eliminating any creases resulting from the alteration. This step enhances the overall appearance of the jeans and ensures a polished final product.
Securing the Stitches
Using a needle and thick thread, securely reattach the waistband by inserting the needle under it and creating small, tight stitches to hold it in place. When reattaching the waistband, ensure the stitches are evenly spaced, and pull the thread taut for a secure attachment. To aid in visualizing the process, refer to the table below outlining the steps involved:
| Step | Description |
|---|---|
| Insert needle under waistband | Position the needle beneath the waistband. |
| Pull thread through | Gently pull the thread through to the other side. |
| Create small, tight stitches | Make precise stitches to secure the waistband in place. |
| Ensure even spacing | Maintain consistency in the distance between stitches. |
| Knot thread inside waistband | Securely knot the thread inside to prevent unraveling. |
Following these steps meticulously will result in a professionally reattached waistband.
Finishing Touches
Securing the stitches in place, the next step involves meticulously aligning the edges of the fabric to reattach the waistband securely onto the altered area. To guarantee a professional finish when reattaching the waistband, follow these key steps:
- Align Edges: Match the edges of the waistband and the altered area perfectly to maintain a seamless look.
- Sew Carefully: Use a needle and thread to stitch the waistband back onto the jeans, making sure each stitch is secure and even.
- Test for Comfort: Before wearing the jeans, test the reattached waistband to guarantee it fits comfortably and securely.
Try on for Fit
After making adjustments to the waist of the jeans by hand, it's essential to try them on to guarantee a perfect fit.
When trying on the jeans, pay close attention to the snugness around the waistline. Make sure there are no gaps or excess fabric at the back, as this would indicate the need for further adjustments.
Test the comfort of the jeans by sitting, standing, and moving around to assess the alteration's feel. Look for any areas that may require additional tightening for a more tailored fit.
It's important that the waistband sits comfortably and securely without feeling overly tight or restrictive.
Make Final Adjustments
I carefully inspect the waistband for any remaining excess fabric to guarantee a smooth and comfortable fit. After making initial adjustments, it's important to confirm that the alterations are precise before finishing up the process.
- Trim Excess Thread and Fabric: Carefully trim any excess thread or fabric left from the alteration. This step not only enhances the overall appearance but also prevents fraying, maintaining a neat and professional finish.
- Test for Comfort: Wear the jeans and move around to test the comfort and fit of the adjusted waistband. It's crucial to confirm that the alterations provide the desired snugness without compromising comfort or mobility.
- Make Additional Adjustments if Necessary: If the fit isn't ideal, consider repeating the stitching process to further tighten the waistband. It's important to take the time to make additional adjustments now than to settle for a less-than-perfect fit later on.
Finish and Press Jeans
Pressing the stitched area with an iron after completing the alteration sets the stitches and creates a smooth finish. It's important to use a pressing cloth to protect the denim fabric from direct heat and potential damage.
Pressing both sides of the altered waistband is vital for achieving a professional and polished look in the final alteration. Be sure to carefully inspect the pressed area for any loose threads or uneven stitching that may require adjustment to guarantee a clean final result.
The act of pressing the altered waistband not only helps to maintain the shape and structure of the jeans but also provides a tailored appearance. By following these pressing techniques, you can elevate the overall finish of your altered jeans and showcase a neat and well-crafted modification.
Frequently Asked Questions
How Do You Make Jeans Waist Smaller by Hand?
To make jeans waist smaller by hand, I mark the area, stitch a criss-cross pattern, and guarantee symmetrical stitching for balance. Testing for comfort is essential before finishing the adjustment. Experimenting with different thread thicknesses can help customize the alteration.
How Do You Fix Jeans if the Waist Is Too Big?
To fix jeans with a too big waist, I'll mark and stitch a V-shape on both sides starting beside the belt loop. I criss-cross the thread securely across the back and tie knots near the belt loop for a perfect fit.
How Can I Reduce the Waist Size of My Jeans?
Reducing the waist size of jeans involves stitching a V-shape alteration with thick thread. Begin at the belt loop, criss-cross stitch down for security, tie knots near the loop, test for comfort, adjust as needed for fit.
How Do You Take in Pants by Hand?
To take in pants by hand, mark and stitch a V-shape alteration on the waist, ensuring symmetrical sides for comfort. Test the fit and adjust as needed. Secure knots inside for durability. It's important to check for a snug fit.