To make and sew upholstery piping like a pro, choose a sturdy fabric like cotton or linen and pair it with a thick cotton-covered cord. Cut fabric strips slightly wider than the cord, ideally on the bias for curves, then wrap and sew with a zipper foot close to the cord edge. Handle corners by pivoting or clipping seam allowances for smooth turns. Finish by neatly trimming and pressing seams for a clean, polished look. Keep going to master attaching piping and handling tricky curves flawlessly.
Key Takeaways
- Choose durable fabric and sturdy cord matching upholstery to ensure strong, well-shaped piping that complements the furniture design.
- Cut fabric strips on the bias, adding 1-1.5 inches to cord diameter plus 10% extra length for seams and flexibility around curves.
- Use a piping foot and heavy-duty needles on a sturdy sewing machine to stitch close to the cord edge for a neat, professional finish.
- Pivot carefully at corners and clip seam allowances on curves to maintain smooth, wrinkle-free piping contours.
- Finish by trimming excess fabric, securing ends inside seams, pressing gently, and inspecting for consistent stitching and alignment.
Choosing the Right Fabric and Cord for Upholstery Piping
When choosing fabric and cord for upholstery piping, you’ll want materials that combine durability with style.
Start by picking a fabric that matches or complements your upholstery—tightly woven cotton, linen blends, or even leather work well. Avoid flimsy or stretchy fabrics, as they won’t hold the piping’s shape.
For the cord inside, choose one that’s sturdy and maintains its roundness, like cotton-covered cording or polyester cord. The thickness of the cord affects the piping’s profile, so consider your project’s scale—thicker cords make bolder outlines, while thinner ones offer subtle accents.
Tools and Materials Needed for Making Piping
To make upholstery piping, you’ll need a few essential sewing tools like a zipper foot, scissors, and pins.
Picking the right fabric and cord is just as important as having the correct supplies on hand.
Let’s go over the materials and tools you’ll want to gather before you start.
Essential Sewing Tools
Creating quality upholstery piping requires having the right tools at your fingertips.
You’ll need a sturdy sewing machine capable of handling thick fabric layers and heavy-duty needles designed for upholstery. A piping foot is essential—it helps you sew close to the cord for a professional finish.
Sharp fabric scissors guarantee clean cuts, while a rotary cutter and cutting mat speed up precise fabric trimming. Don’t forget pins or clips to hold your pieces together securely. A measuring tape or ruler helps maintain accurate seam allowances.
Finally, a seam ripper is handy for quick corrections. With these essential tools, you’ll sew piping that’s neat, durable, and ready to enhance any upholstery project.
Fabric Choices for Piping
Although selecting the right fabric for your upholstery piping might seem straightforward, choosing materials that balance durability and style is key. You want something strong enough to handle wear but flexible enough to sew smoothly.
Cotton and linen are popular choices because they’re easy to work with and come in various prints and colors. For heavy-use items, consider canvas or upholstery-grade fabrics that resist abrasion. If you’re aiming for a polished look, satin or velvet can add elegance but may require more careful handling.
Keep in mind the fabric’s weight; too thick can bulk up the piping, too thin might fray. Always pre-wash and press your fabric to prevent shrinking or color bleeding after sewing. This guarantees your piping stays crisp and professional-looking.
Additional Supplies Required
Gathering the right tools and materials sets the foundation for making quality upholstery piping.
Besides your chosen fabric, you’ll need piping cord, which comes in various thicknesses—select one that matches your project. A piping foot for your sewing machine helps you stitch close to the cord for a professional finish.
Sharp fabric scissors or rotary cutters guarantee clean edges. You’ll also want pins or clips to hold the fabric and cord in place as you sew. A seam ripper comes in handy for adjustments.
Don’t forget a measuring tape or ruler to cut accurate strips and a fabric marker or chalk to mark your fabric.
Having these supplies ready will make the process smoother and your piping look polished and durable.
Measuring and Cutting Fabric Strips for Piping
Start by choosing the right fabric width to wrap around your cord snugly.
Then, calculate the length you’ll need by measuring your project and adding extra for seams.
Finally, use sharp scissors or a rotary cutter to cut clean, precise strips for smooth piping.
Selecting Fabric Width
How wide should your fabric strips be to create perfect upholstery piping? To get the right width, you need to take into account the diameter of your cording plus seam allowances. Typically, add about 1 to 1.5 inches total—half an inch on each side—to guarantee enough fabric wraps snugly around the cording.
For example, if your cording is ¼ inch thick, cut your strips about 1 to 1.75 inches wide. Keep in mind that thicker fabrics might need slightly wider strips for easier wrapping and sewing.
Also, cut strips on the bias (at a 45-degree angle) to allow flexibility around curves. Choosing the correct width guarantees your piping looks smooth and professional without excess bulk or tightness.
Calculating Strip Length
Once you’ve determined the fabric strip width, calculating the correct length becomes essential to guarantee your piping fits your project perfectly.
Start by measuring the perimeter of the area where the piping will go. Add a little extra to this measurement to allow for seam allowances and potential errors.
Keep in mind these key points:
- Measure twice for accuracy before cutting.
- Add about 10% extra length for seams and adjustments.
- Consider fabric pattern direction when measuring to avoid mismatched seams.
- Account for any curves or corners that may require additional fabric.
Cutting Techniques and Tools
Gather your tools carefully before cutting fabric strips for piping, as precision is key to achieving a professional finish.
Use a sharp rotary cutter or fabric scissors to guarantee clean edges. A self-healing cutting mat will protect your work surface and help guide straight cuts. Measure your fabric strips according to your previous calculations, adding a little extra length to account for seams.
Use a clear ruler or quilting ruler for accuracy, aligning it firmly on the fabric to avoid slipping. Cut slowly and steadily, maintaining consistent pressure to prevent jagged edges. Avoid using dull blades that can fray the fabric.
Wrapping the Cord With Fabric: Techniques and Tips
A crucial step in creating upholstery piping is wrapping the cord with fabric neatly and securely. This guarantees your piping looks professional and holds its shape over time.
To wrap effectively, start by cutting your fabric strips slightly wider than the cord diameter. Then, fold and press the fabric along the length for a crisp edge. As you wrap, maintain consistent tension to avoid puckering or looseness.
Here are some tips to keep in mind:
- Use a bias cut fabric strip for better flexibility around curves.
- Overlap fabric edges slightly to fully encase the cord.
- Apply light adhesive or pins temporarily to hold fabric in place.
- Keep your hands steady and work slowly for a smooth finish.
Mastering these will set you up perfectly for sewing the fabric around the cord neatly.
Sewing the Fabric Around the Cord Neatly
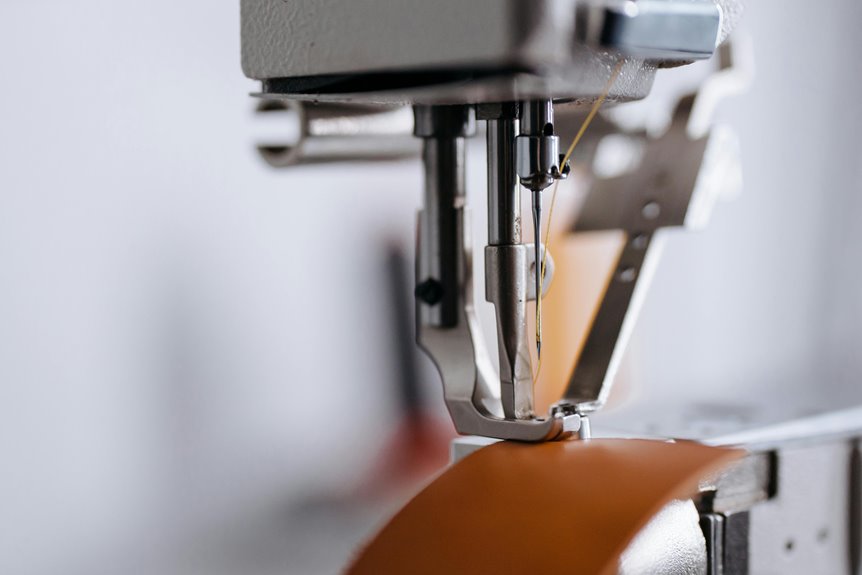
Start by positioning the wrapped cord under your sewing machine foot, aligning the fabric edges evenly to ascertain a tight, clean stitch. Use a zipper or piping foot for better control and sew close to the cord, catching both fabric edges. Maintain consistent speed and pressure to avoid puckering. Backstitch at the beginning and end for durability. Press the piping flat after sewing to set the stitches.
| Step | Tip |
|---|---|
| Position cord | Align fabric edges evenly |
| Select presser foot | Use zipper or piping foot |
| Stitch placement | Stitch close to cord edge |
| Sewing technique | Maintain steady speed |
| Finishing | Backstitch and press flat |
This method guarantees neat, professional piping for your upholstery projects.
Attaching Piping to Upholstery Projects
Three key steps will help you attach piping seamlessly to your upholstery project.
First, align the piping’s raw edges with the fabric’s seam allowance. Pin it carefully to keep it in place as you sew.
Second, use a zipper foot on your sewing machine to stitch close to the piping cord, guaranteeing a tight, clean finish.
Third, maintain an even tension to prevent puckering or stretching.
Keep these tips in mind:
- Match the piping color to your fabric for a polished look.
- Start sewing from the middle, working toward edges to control tension.
- Reinforce ends with backstitching to prevent unraveling.
- Press the seam allowance away from the piping for a smooth edge.
Following these steps guarantees your piping looks professional and durable.
Handling Corners and Curves With Piping
When you encounter corners and curves while attaching piping, careful handling guarantees a smooth, professional finish.
For inside corners, stop stitching right before the corner, leaving the needle down in the fabric. Lift the presser foot and pivot the fabric 90 degrees. Continue sewing along the next edge, easing the piping gently to avoid puckers.
On outside corners, clip the piping’s seam allowance to reduce bulk and allow it to bend sharply.
For curves, go slowly and ease the piping around the curve without stretching. You can also clip the seam allowance slightly on the inside of tight curves to help it lay flat.
Taking your time and making small adjustments assures your piping follows the shape perfectly without distortion.
Finishing Touches for a Professional Upholstery Look
Mastering corners and curves sets the foundation, but the final details truly elevate your upholstery project.
To give your piece that polished, professional look, focus on these finishing touches:
- Trim any excess piping fabric neatly to prevent bulk and unevenness.
- Secure piping ends inside seams or tuck them under to hide raw edges.
- Use a pressing cloth and iron gently to flatten seams without damaging the fabric.
- Double-check stitching for consistency and reinforce any weak spots.
These steps guarantee your upholstery piping looks clean and durable.
Taking the time to refine these details will make your project stand out, showcasing the skill and care you put into every stitch.
Frequently Asked Questions
Can Upholstery Piping Be Made Without a Piping Foot on the Sewing Machine?
You can definitely make upholstery piping without a piping foot. Just sew carefully, use a zipper foot instead, and guide the fabric slowly. It takes patience, but you’ll get professional-looking results without specialized tools.
How Do I Remove Old Piping From Vintage Furniture Safely?
Did you know 70% of vintage furniture restorers recommend gentle removal? You’ll want to carefully cut stitches with a seam ripper, avoid pulling fabric too hard, and keep tools close to prevent damage while removing old piping.
What Is the Best Way to Clean Fabric Upholstery Piping?
You should vacuum gently to remove dust, then spot clean with a mild detergent and water. Avoid soaking the piping, and always test a hidden area first to prevent color fading or fabric damage.
How Thick Should the Cord Inside Upholstery Piping Be?
You’ll want the cord inside upholstery piping to be about 1/4 inch thick for most projects. This size provides enough bulk to create a smooth, defined edge without making the piping too bulky or stiff.
Can Piping Be Used on Outdoor Furniture Upholstery?
Yes, you can use piping on outdoor furniture, but you’ll want to choose weather-resistant fabric and cord. Make sure the materials resist moisture, UV rays, and mildew to keep your upholstery looking great even outside.