To hand dye batik fabric, start with natural fibers like cotton or silk. Pre-wash and dry your fabric, then sketch your design. Use a canting tool or brush to apply hot wax over areas you want to resist dye. Dip the fabric carefully into your chosen dyes, allowing colors to absorb evenly. Once dyed, remove the wax with heat and clean the fabric. Keep the fabric out of direct sunlight to preserve its vibrant patterns. Learn the detailed steps to master this beautiful craft.
Key Takeaways
- Choose cotton or silk fabric, pre-wash and dry it to ensure proper dye absorption and wax adherence.
- Sketch your batik pattern on paper, then transfer it to fabric using bold, defined shapes for easier waxing.
- Apply hot wax with a canting tool or brush along the design lines, allowing wax to harden fully before dyeing.
- Dye fabric by immersing it slowly in a prepared dye bath, then rinse in cool water once desired color is achieved.
- Remove wax by ironing between absorbent paper, wash gently by hand, dry in shade, and iron on reverse side.
Understanding the Basics of Batik Fabric
To understand batik fabric, you need to know that it’s a traditional cloth made using a wax-resist dyeing technique. You apply hot wax to parts of the fabric to prevent dye from coloring those areas.
Batik fabric is made by applying hot wax to resist dye, creating unique patterns on cloth.
This method lets you create intricate patterns and designs with multiple colors by waxing and dyeing repeatedly. You’ll notice batik often features natural motifs like flowers, leaves, or geometric shapes, reflecting cultural stories and meanings.
The process creates a unique texture where wax lines remain visible, adding depth to the fabric. Once the dyeing is done, you remove the wax by boiling or scraping it off, revealing the final design.
Knowing these basics helps you appreciate batik’s art and prepares you for making your own hand-dyed fabric.
Gathering Essential Materials and Tools
Before you start, make sure you pick the right fabric—cotton or silk work best for batik.
You’ll also want to choose dyes that suit your design, whether they’re fiber-reactive or natural.
Finally, gather your essential tools like wax applicators, brushes, and dye containers to keep your process smooth.
Fabric Selection Tips
Choosing the right fabric plays a crucial role in achieving vibrant, long-lasting batik designs. You’ll want to pick natural fibers like cotton, silk, or rayon because they absorb dye beautifully and hold wax resist well.
Avoid synthetic fabrics since they often repel dye or don’t react predictably. Look for tightly woven fabrics to prevent dye bleeding and guarantee crisp patterns.
Pre-wash your fabric to remove sizing or chemicals that might interfere with dye absorption. Also, consider the fabric’s weight: lighter fabrics work well for scarves or clothing, while heavier ones suit home décor.
Dye Types Overview
Several dye types are essential for creating beautiful hand-dyed batik fabric, each offering unique effects and colorfastness.
Fiber-reactive dyes are popular because they chemically bond with natural fibers like cotton, giving you vibrant, long-lasting colors. Acid dyes work best on protein fibers such as silk and wool, producing rich, deep hues.
You might also explore natural dyes extracted from plants, roots, and insects for a more organic look, though they may require mordants to improve color retention. Direct dyes are easy to use but can fade faster over time.
Choose your dye based on the fabric type and the color intensity you desire. Understanding these options helps you achieve the perfect combination of durability and aesthetic for your batik projects.
Essential Application Tools
When you start working with hand-dyed batik fabric, having the right tools on hand makes all the difference.
These tools not only help you apply wax and dye accurately but also allow you to create intricate designs with ease. Gathering essential materials guarantees your process runs smoothly and your results look professional.
Focus on tools that offer control and flexibility.
Here are the must-have application tools:
- Canting (Tjanting) tool: For drawing fine wax lines and detailed patterns.
- Brushes: To apply wax over larger areas or add texture.
- Wax pot or double boiler: Keeps wax melted at a consistent temperature.
- Dye containers: Necessary for dipping fabric and mixing colors efficiently.
With these tools ready, you’ll be set to bring your batik designs to life.
Preparing Your Fabric for Dyeing
Before you start dyeing, choose a fabric that absorbs color well, like cotton or silk.
Make sure to pre-wash it to remove any finishes or dirt that might block the dye.
Also, prepare the fabric surface by smoothing and drying it properly to get the best results.
Selecting Appropriate Fabric
Although any fabric can technically be dyed, choosing the right material guarantees your batik colors come out vibrant and hold well. Natural fibers like cotton, silk, and rayon absorb dye better than synthetics, giving you richer, more consistent results.
You’ll want to pick fabrics with a tight weave to prevent dye bleed and make sure crisp patterns. Also, consider the fabric’s weight—lighter fabrics allow quicker dye absorption, while heavier ones offer durability. Avoid blends with too much polyester, as they resist dye and fade unevenly.
Keep these tips in mind when selecting fabric:
- Prioritize natural fibers for better dye absorption.
- Choose a tight weave for sharper designs.
- Match fabric weight to your project’s needs.
- Steer clear of high-synthetic blends for color longevity.
Pre-Washing Techniques
Proper pre-washing removes any sizing, dirt, or oils that could prevent your fabric from absorbing dye evenly. Start by soaking your fabric in warm water with a mild detergent for about 30 minutes. Rinse thoroughly to wash away residues and let the fabric air dry or dampen it before dyeing. This step guarantees your colors stay vibrant and consistent.
Here’s a simple checklist to guide your pre-washing:
| Step | Action | Purpose |
|---|---|---|
| Soak | Warm water + mild detergent | Remove sizing and dirt |
| Rinse | Cool water | Clear away detergent and oils |
| Dry or dampen | Air dry or keep damp | Prepare fabric for dye absorption |
Follow these steps carefully, and you’ll get the best results from your hand-dyed batik fabric.
Preparing Fabric Surface
Since dye adheres best to a clean, smooth surface, you’ll want to confirm your fabric is fully prepared for the dyeing process.
Start by inspecting the fabric for any wrinkles or creases that could block the dye’s penetration. Smooth out your fabric on a flat surface to ensure even dye absorption.
Next, lightly dampen the fabric; a slightly moist surface helps the dye spread more evenly without blotches. Finally, make sure your workspace is clean to avoid unwanted stains.
- Remove any loose fibers or lint by brushing the fabric gently.
- Iron the fabric to eliminate wrinkles and create a smooth surface.
- Lightly mist the fabric with water to aid dye absorption.
- Secure the fabric flat to prevent shifting during dyeing.
These steps ensure your fabric is primed for vibrant, consistent color.
Designing Your Batik Pattern
Before you start applying wax, you’ll want to create a clear and simple design that suits your fabric’s size and shape.
Begin by sketching your pattern on paper, considering how the shapes and lines will flow across the fabric. Keep in mind that intricate details might be challenging to wax, so opt for bold, defined shapes.
Next, transfer your design onto the fabric lightly with a pencil or fabric-safe marker, ensuring you have a guide to follow.
Think about symmetry and repetition if you want a balanced look, or go freeform for a more organic feel.
This step sets the foundation for your batik, so take your time to refine your design before moving on. Your clear pattern will help you execute the waxing process smoothly and create stunning results.
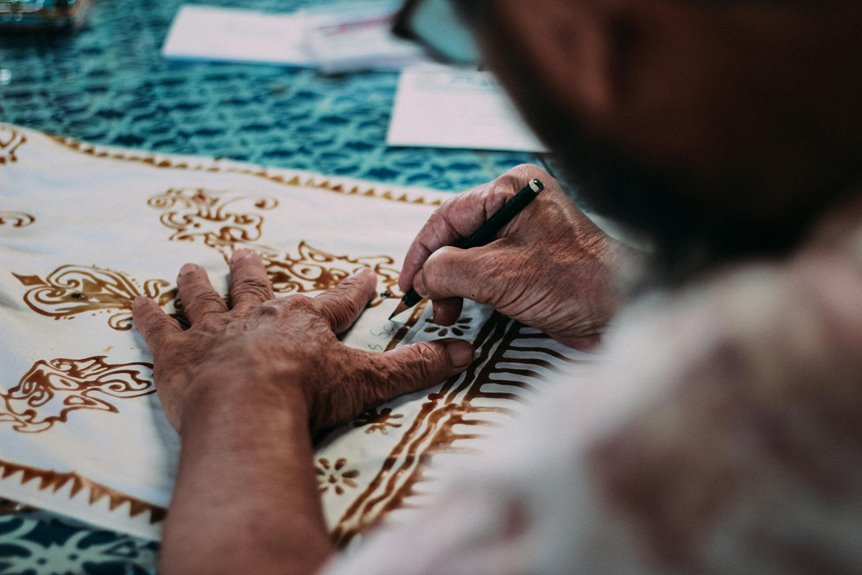
Applying Wax to the Fabric
When you start applying wax to your fabric, use a canting tool or a brush to trace over your design carefully. The wax acts as a resist, preventing dye from coloring those areas. Make certain the wax melts evenly and flows smoothly for clean lines.
Work steadily and avoid rushing to keep your pattern sharp. Remember, thicker wax lines create bolder contrasts, while thinner lines offer delicate detail.
Here’s what to keep in mind:
- Use heated wax, ideally around 65-70°C, for easy application.
- Test wax flow on scrap fabric before starting.
- Apply wax quickly but precisely to avoid drying or cracking.
- Allow wax to cool and harden fully before dyeing to maintain design integrity.
This method guarantees your batik’s beauty shines through every stage.
Choosing and Mixing Dye Colors
Once the wax has set firmly, you can start selecting and mixing your dye colors to bring your design to life.
Choose colors that complement each other and suit the mood you want for your fabric. Test small amounts first to see how they interact on your specific fabric.
Mixing dyes allows you to create custom shades; start with primary colors and gradually add small amounts of others until you reach your desired hue.
Remember, colors often appear lighter once dried, so adjust your mixes accordingly.
Keep your workspace organized and note your mixtures for consistency. Avoid overmixing to prevent muddy colors.
With careful selection and blending, your batik fabric will showcase vibrant, personalized colors that highlight your unique design.
Dyeing the Fabric Step-by-Step
Dyeing the fabric involves several key steps that guarantee your design comes to life with vibrant colors.
First, prepare your dye bath by mixing your chosen colors with water according to instructions.
Next, immerse the fabric slowly, allowing it to absorb the dye evenly. Keep the fabric moving gently to avoid blotches.
After achieving the desired shade, remove the fabric and rinse it in cool water to stop the dyeing process.
Remember to:
- Wear protective gloves to keep your hands safe from stains.
- Use a container large enough to let the fabric move freely.
- Test a small fabric corner to check color intensity.
- Work in a well-ventilated area to avoid inhaling fumes.
Following these steps guarantees your batik fabric turns out beautifully dyed.
Removing Wax and Finishing Touches
Three essential steps follow dyeing: removing the wax, rinsing the fabric, and applying the finishing touches.
First, melt the wax by placing your fabric between sheets of absorbent paper and ironing it on a low setting. The wax will transfer to the paper, gradually lifting from the cloth. Repeat with clean paper until no more wax appears.
Next, rinse your fabric in warm water to remove excess dye and soften the fibers. Avoid harsh scrubbing to preserve your design.
Finally, hang the fabric to dry in a shaded area to prevent fading. Once dry, you can gently press the fabric with a warm iron to smooth out wrinkles and enhance its vibrant colors.
These steps guarantee your batik fabric looks polished and ready for use.
Caring for Your Hand Dyed Batik Fabric
Although you’ve completed the dyeing and finishing process, caring for your hand dyed batik fabric properly guarantees it stays vibrant and lasts longer.
Treat your fabric gently to preserve its beauty and intricate patterns. Always wash it by hand in cold water with mild detergent to prevent colors from fading or bleeding. Avoid direct sunlight when drying; instead, air dry it in the shade. Iron the fabric on the reverse side using a low heat setting to protect the design.
Handle your batik fabric with care—hand wash cold, dry in shade, and iron inside out on low heat.
Here are some key care tips:
- Use cold water and gentle detergent for washing.
- Avoid wringing or twisting the fabric.
- Dry in shaded, well-ventilated areas.
- Store fabric away from direct sunlight and moisture.
Following these steps makes certain your batik fabric remains stunning for years.
Frequently Asked Questions
Can I Use Synthetic Fabrics for Batik Dyeing?
Wondering if synthetic fabrics work for batik dyeing? You might want to reconsider since synthetics don’t absorb wax and dye as naturally as cotton or silk. So, wouldn’t you prefer materials that give vibrant, lasting results?
How Do Weather Conditions Affect the Dyeing Process?
You’ll find humidity slows drying, causing colors to blend more, while heat speeds it up, sometimes fading dyes. Wind can dry fabric unevenly, so you’ll want to control your workspace’s temperature and airflow for best results.
What Safety Precautions Should I Take When Handling Hot Wax?
You should wear heat-resistant gloves and long sleeves to protect your skin from burns. Work in a well-ventilated area to avoid inhaling fumes, and keep a bowl of cold water nearby for emergencies.
Can Batik Techniques Be Combined With Other Fabric Art Methods?
You can definitely combine batik techniques with other fabric art methods like embroidery, painting, or stamping. This mix lets you create unique textures and designs, making your fabric art even more vibrant and personalized.
How Long Does Batik Fabric Typically Last Without Fading?
You wear vibrant colors, you cherish bold patterns, you treasure your batik fabric. Typically, it lasts years without fading if you care gently—avoid harsh washing, direct sunlight, and always store it in a cool, dry place.