To fold a mandala for tie-dyeing, first lay your clean cotton fabric flat and find its center by folding it in half vertically and horizontally. Pinch the center, then fold diagonally to form a triangle, folding again into smaller wedges for symmetry. Secure these folds tightly with medium-sized rubber bands placed evenly to keep the pattern crisp. Plan your dye colors carefully for vibrant results. Keep going to discover tips for perfect dye application and striking designs.
Key Takeaways
- Lay fabric flat on a clean surface and find the center by folding it vertically and horizontally, marking the intersection for symmetry.
- Fold the fabric diagonally into a triangle, then fold repeatedly to create wedge-shaped sections for radial symmetry.
- Align edges carefully and smooth wrinkles during folding to ensure even dye absorption and crisp mandala patterns.
- Secure folds tightly with medium-sized rubber bands placed evenly from the center outward to maintain shape and balance dye application.
- Plan dye colors and apply evenly to each wedge, saturating carefully and allowing dye to set before unfolding to reveal the mandala design.
Gather Your Materials
To get started with folding a mandala for tie-dyeing, you’ll need a few essential materials. Grab a flat surface to work on, like a clean table or countertop.
Start your mandala tie-dye by gathering materials and setting up a clean, flat workspace.
You’ll want a pair of sharp fabric scissors to make precise cuts if necessary. A ruler or measuring tape helps guarantee your folds are even and symmetrical. Have some fabric-safe markers or chalk handy to mark your folding lines or center points.
You’ll also need rubber bands or string to secure your folds tightly before dyeing. Finally, prepare your mandala template or a printed design to guide your folding pattern.
Having these materials ready will make the folding process smoother and more accurate, setting you up for a beautiful tie-dye mandala.
Choose the Right Fabric
Fabric quality plays an important role in how your mandala tie-dye turns out, so choosing the right one is essential.
Opt for natural fibers like cotton, rayon, or silk because they absorb dye better, resulting in vibrant, long-lasting colors. Avoid synthetic fabrics such as polyester, which don’t hold dye as well and can lead to dull or uneven patterns.
Make sure your fabric is pre-washed to remove any sizing or chemicals that might interfere with dye absorption. Pick a lightweight or medium-weight fabric for easier folding and sharper mandala designs.
Keep in mind that thicker fabrics may resist dye penetration and affect the intricacy of your pattern. Choosing the right fabric sets the foundation for a stunning mandala tie-dye project, so take time to select wisely.
Lay Out Your Fabric Flat
Before you start folding, make sure your fabric is made of a material that absorbs dye well, like cotton.
Lay it out on a smooth, clean surface to avoid wrinkles and creases. This will help you create crisp, even folds for your mandala design.
Choosing Fabric Material
Since the quality of your tie-dye depends heavily on the material, you’ll want to pick a fabric that absorbs dye well and holds vibrant colors.
Cotton is your best bet—it’s natural, breathable, and soaks up dye beautifully. Bamboo and rayon also work nicely if you want a softer feel.
Avoid synthetic fabrics like polyester or nylon; they resist dye and can leave your colors dull or patchy.
When choosing your fabric, consider its weight too—a medium-weight cotton works well for folding and creating crisp mandala patterns.
Also, pre-wash your fabric to remove any finishes that might block dye absorption.
Taking these steps guarantees your mandala tie-dye will look bright and last longer.
Preparing a Smooth Surface
To get started, lay your fabric out on a clean, flat surface with plenty of room to work. This step is essential because any wrinkles or bumps can distort your mandala design once folded and dyed.
Smooth the fabric gently with your hands, eliminating creases without stretching the material. A large table or countertop works best, but the floor can do if it’s clean and flat. Make certain the surface is dry to prevent unwanted dye spreading later.
If your fabric is slightly damp, let it air dry first for ideal folding. Taking the time to prepare a smooth surface guarantees your tie-dye mandala will have crisp, even lines and vibrant colors, helping your project turn out beautifully.
Find the Center Point of Your Fabric
Start by laying your fabric flat on a clean surface and smoothing out any wrinkles. To find the center point, fold the fabric in half vertically and align the edges carefully. Next, fold it in half horizontally and press the crease. The intersection of these folds marks the center. Pinch this spot to keep it visible for the next steps.
Use the table below to visualize the fabric and its center:
| Corner 1 | Side 1 | Corner 2 |
|---|---|---|
| Side 4 | Center | Side 2 |
| Corner 4 | Side 3 | Corner 3 |
This center point is essential for creating a balanced mandala design when tie-dyeing.
Fold the Fabric in Half Diagonally
Fold your fabric diagonally by bringing one corner to the opposite corner, creating a triangle. This step is essential because it sets the foundation for your mandala’s symmetry. Make sure the edges align neatly to avoid uneven folds. Smooth out any wrinkles or bubbles for a clean crease.
Here’s how to do it effectively:
- Lay your fabric flat on a clean surface.
- Pick up one corner and carefully fold it to meet the opposite corner.
- Align the edges precisely to form a sharp triangle.
- Press down along the fold to create a strong crease.
With this diagonal fold, you’re one step closer to a perfectly patterned mandala for your tie-dye project.
Fold the Triangle in Half Again
Now, fold your triangle in half again by aligning the edges carefully.
Make certain to press the crease firmly so it holds its shape.
Keep everything symmetrical to guarantee your mandala pattern turns out perfect.
Align Triangle Edges
Take the triangle you’ve created and bring the two longest edges together, folding it in half once more. Your goal here is to align the edges as neatly as possible to form a smaller, sharper triangle. This step guarantees your mandala pattern will be symmetrical when you dye it.
Here’s how to align the triangle edges properly:
- Hold the triangle steady on a flat surface.
- Match the two longest edges carefully, so they sit flush against each other.
- Adjust any uneven points or corners to prevent bulky folds.
- Check that all layers line up before moving to the next step.
Press Crease Firmly
Once the triangle edges are perfectly aligned, press down firmly along the crease to secure the fold. This step is essential because it keeps the fabric from shifting during the next fold.
Now, fold the triangle in half again by bringing the two pointed ends together. Make certain the edges match up evenly before pressing down once more.
Use your fingers to run along the new crease, applying consistent pressure to create a sharp, clean fold. A well-pressed crease helps maintain the mandala’s intricate design during dye application.
Don’t rush this part—taking your time guarantees your tie-dye pattern will be symmetrical and crisp. With the crease firmly set, you’re ready to move on to the next folding step.
Maintain Symmetrical Shape
Although the triangle already has a firm crease, folding it in half again sharpens the mandala’s symmetry. This step guarantees your tie-dye pattern will radiate evenly from the center.
Here’s how to maintain that perfect shape:
- Hold the triangle by its longest edge, aligning the two points carefully.
- Fold the triangle in half so the corners meet precisely, reinforcing the crease.
- Press firmly along the new fold to lock in the symmetrical shape.
- Check that all edges and points line up neatly for balanced dye application.
Create Additional Folds to Form Wedges
To shape your mandala into distinct wedges, start folding the fabric evenly along its centerline.
Once folded, bring the edges together to form a triangle or rectangle based on your desired wedge size. Continue folding the fabric by halving it repeatedly, ensuring each fold aligns neatly with the previous one.
This process creates multiple wedge-shaped layers, essential for the mandala’s radial symmetry in tie-dye patterns. Pay attention to keeping folds sharp and even; this helps maintain consistent color distribution.
As you fold, smooth out any wrinkles to avoid uneven dye absorption. Remember, the number of folds determines how many wedges your mandala will have, so fold accordingly to achieve your preferred design complexity.
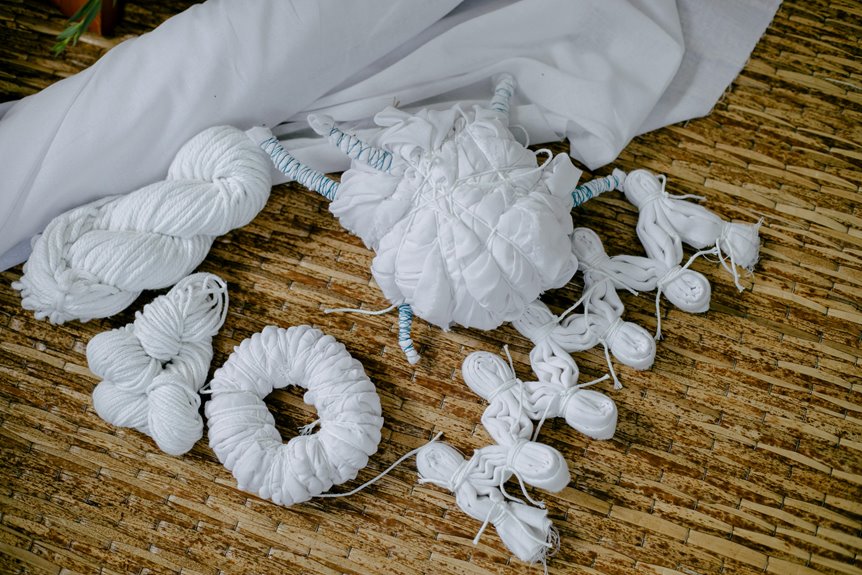
Secure the Folded Fabric With Rubber Bands
Choose rubber bands that fit snugly without cutting into the fabric to keep your folds secure.
Place them evenly around the mandala to guarantee balanced dye patterns.
This careful setup helps your design come out crisp and vibrant.
Choosing Right Band Size
Selecting the right size rubber bands makes a big difference in keeping your folded mandala secure during tie-dyeing. If the bands are too small, they might snap under pressure; too large, and they won’t hold the fabric tightly enough. Here’s how to choose the best fit:
- Use medium-sized bands for most mandala folds—they offer a strong grip without breaking.
- For thicker or multiple folds, opt for wider bands to guarantee everything stays snug.
- Avoid very thin bands; they can dig into the fabric and create unwanted creases.
- Keep extra bands on hand so you can adjust tension or replace any that snap during tying.
Picking the right band size helps maintain your mandala’s shape and guarantees vibrant, crisp dye patterns.
Placement for Balanced Tie-Dye
Once you’ve secured your mandala with the right rubber bands, focus on placing them evenly to guarantee balanced tie-dye patterns.
Position the bands at regular intervals around your folded fabric, making sure they’re tight enough to hold the folds firmly but not so tight that they damage the fabric. Even spacing helps the dye penetrate uniformly, creating symmetrical designs.
Start by placing a band at the center, then work outward, adding bands where the folds create natural segments. This approach assures each section absorbs dye consistently, enhancing the mandala’s radial symmetry.
Plan Your Dye Application
Before applying any dye, consider how the colors will interact and where you want them to appear on your mandala. Planning guarantees your design pops and colors blend harmoniously. Visualize your mandala’s sections and decide which hues suit each area best.
Here’s how to plan your dye application effectively:
- Choose a color palette that complements each other and fits your style.
- Assign colors to specific folds or sections to create balance.
- Think about color shifts and how overlapping dyes might mix.
- Use lighter colors first if you want vibrant results, saving darker dyes for later.
Taking the time to plan helps you avoid unwanted color muddiness and guarantees your mandala tie-dye turns out vibrant and striking.
Apply Dye to Each Section
Start by carefully applying dye to each section of your folded mandala, making sure to saturate the fabric evenly without oversaturating.
Use squeeze bottles or brushes to control the amount of dye, targeting each segment distinctly to maintain your planned design. Work systematically, moving from one section to the next, so you don’t miss any areas.
Remember, too much dye can cause colors to bleed, while too little may leave white spaces. If you want sharp contrasts, keep colors separated; for softer blends, allow slight overlap.
Rotate the fabric as needed to reach all folds easily. Take your time and apply the dye gently, ensuring it soaks through the folds without pooling.
This careful application will help your mandala pattern come out vibrant and precise.
Let the Dye Set and Dry
After applying dye to your mandala, you’ll want to let it set so the colors fully absorb and develop. Proper setting guarantees vibrant, long-lasting hues. Here’s what to do next:
- Wrap your mandala in plastic wrap or place it in a sealed plastic bag to keep the moisture in.
- Let it rest for 6 to 8 hours at room temperature, or overnight for deeper saturation.
- Avoid rinsing until the dye has fully set to prevent bleeding or dull colors.
- After the waiting period, unwrap carefully and air dry completely before washing.
Following these steps helps lock in the dye, giving your mandala crisp, vivid patterns ready for the next stage.
Unfold and Reveal Your Mandala Design
How do you bring your tie-dye mandala to life? Carefully, start by removing the rubber bands or strings holding your fabric together.
Unfold your mandala slowly to avoid smearing colors. As the layers separate, watch your unique pattern emerge, revealing the symmetry and vibrant hues you created.
Lay the fabric flat and let it dry completely if it’s still damp. This step guarantees the colors set well and won’t bleed in future washes.
Take a moment to appreciate the intricate design and any unexpected surprises. Your mandala now stands ready to brighten your wardrobe or space.
Frequently Asked Questions
Can I Use Synthetic Fabrics for Mandala Tie-Dye?
Sure, you can dye synthetic fabrics, but expect colors to cling like a clingy ex—faint and disappointing. You’ll want natural fibers for vibrant mandalas; synthetic’s just not the canvas your masterpiece deserves.
How Long Should I Wait Before Washing the Dyed Fabric?
You should wait at least 6 to 8 hours before washing your dyed fabric to let the dye set properly. For best results, wait 24 hours and rinse in cold water gently to preserve vibrant colors.
What Types of Dyes Work Best for Mandala Designs?
You’ll want fiber-reactive dyes since they bond well with cotton and produce vibrant colors. These dyes work best for detailed mandala designs, giving you sharp, bright patterns that last after washing and wear.
Can I Reuse the Rubber Bands for Multiple Projects?
You can reuse rubber bands if they’re still stretchy and undamaged. Just check for cracks or loss of elasticity. Using fresh bands guarantees tight folds and vibrant patterns, but reusing helps save money and reduce waste.
How Do I Fix Uneven Dye Patterns or Mistakes?
If your dye pattern looks uneven or has mistakes, you can try soaking the fabric in a bleach solution to lighten areas, then re-dye. Always test a small spot first and work in a well-ventilated area.