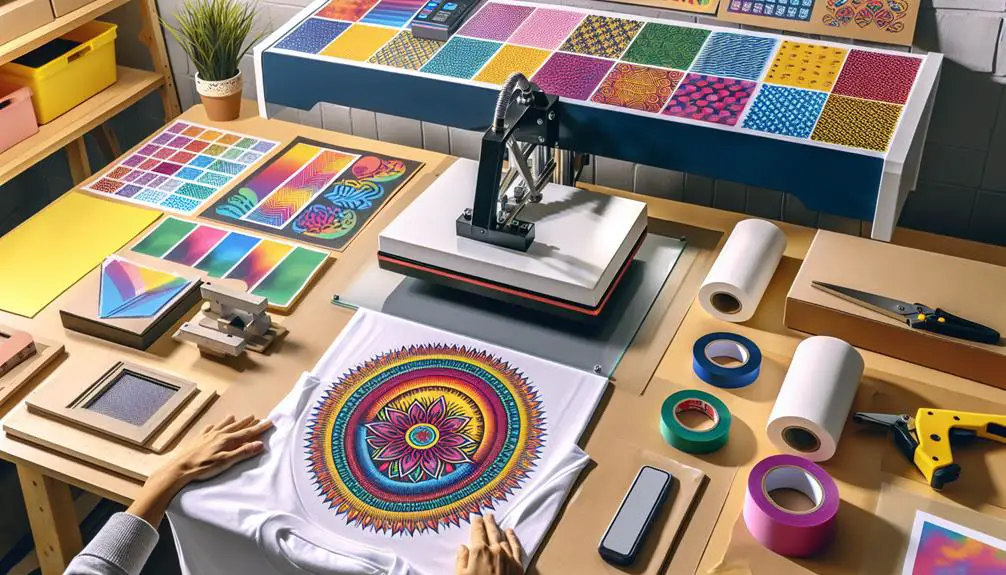
Heat transfer printing is a versatile way to create custom designs on various materials. You'll start by choosing the right type of heat transfer, whether it's vinyl, sublimation, inkjet, or laser transfer paper. Gather essential tools like a heat press or cutting machine, and don't forget safety gear. Design your artwork with software like Adobe Illustrator and prepare your materials carefully. Cutting and weeding your designs require precision. Set up your heat press with the correct temperature and pressure, then apply your design. For best results, follow proper post-press care and storage guidelines. Keep going to explore advanced tips and tackle common troubleshooting issues.
Key Takeaways
- Select the appropriate heat transfer paper based on printer type and fabric color for optimal results.
- Calibrate and maintain your heat press machine for consistent temperature and pressure settings.
- Master weeding techniques and use quality cutting tools for precision in intricate designs.
- Follow post-press care instructions, such as washing in cold water and air drying, to maintain print quality.
- Experiment with advanced techniques like layering and specialty vinyls for unique textures and designs.
Types of Heat Transfer Printing
When it comes to heat transfer printing, you'll find several types that each offer unique benefits and applications. Understanding these can elevate your projects and help you achieve professional results.
First, there's vinyl heat transfer, which uses heat to apply vinyl cutouts onto fabric. The application method is straightforward and offers excellent transfer quality, making it perfect for logos and text.
Next, sublimation printing is ideal for polyester and polymer-coated surfaces. This method uses special sublimation ink types that turn into gas under heat, bonding with the fabric for a vibrant, durable finish. However, it's crucial to note that sublimation isn't compatible with cotton.
Another popular type is inkjet transfer paper, which lets you print designs using an inkjet printer and then transfer them onto fabric with heat. The surface compatibility here is vast, but the transfer quality mightn't be as high as other methods.
Laser transfer paper works similarly but is used with laser printers, often offering better durability and color accuracy.
Each type of heat transfer printing has its strengths and is suited for different projects. Mastering these methods will ensure you select the right one, achieve the best transfer quality, and match the appropriate ink types to your surface compatibility needs.
Essential Materials and Tools
To get started with heat transfer printing, you'll need some key materials and tools.
First, make certain you have heat transfer paper that's suitable for your project.
You'll also need the right type of printing machine and some protective accessories to guarantee safety and quality.
Heat Transfer Paper
Choosing the correct heat transfer paper is crucial for making sure your designs come out vibrant and long-lasting. You'll need to take into account the type of printer you have, as different papers are designed for inkjet printers and laser printers. If you're using an inkjet printer, make sure to select a paper specifically made for it to avoid any smudging or dull colors.
When selecting heat transfer paper, pay attention to the fabric type you'll be working with. There are specific papers for light and dark fabrics, each formulated to deliver best results. For light fabrics, use a transparent paper that blends well with the material. For dark fabrics, opt for an opaque paper to make sure your design stands out.
Don't overlook washing instructions. High-quality heat transfer paper will come with guidelines on how to wash the garments to maintain the design's longevity. Typically, washing in cold water and turning the garment inside out will help preserve the print. Avoid using bleach and harsh detergents, as they can degrade the transfer.
Having the right heat transfer paper is a game-changer. It ensures your designs aren't only visually appealing but also durable, making your efforts worthwhile.
Printing Machine Types
Let's explore the different types of printing machines you'll need for heat transfer printing. The heart of your operation is the heat press. This machine uses heat and pressure to transfer your design onto the desired material. There are various heat press types, including clamshell, swing-away, and draw-style. Each type has its pros and cons, so choose one that fits your specific needs and workspace.
Another essential printing machine is the cutting machine. Devices like Cricut or Silhouette Cameo allow you to precisely cut your designs from heat transfer vinyl (HTV). For more complex or high-volume projects, you might consider a high-end plotter.
Maintenance tips are essential to ensure your machines run smoothly. Regularly clean your heat press to avoid residue buildup, and check for any wear and tear. Lubricate moving parts as needed, and make sure the heating elements maintain consistent temperatures.
For cutting machines, keep the blades sharp and replace them when they dull.
When troubleshooting issues, start by checking temperature settings, pressure adjustments, and verify even distribution. If you experience inconsistent results, recalibrate your machines and consult the user manual for specific guidance.
Proper maintenance and troubleshooting ensure you achieve professional-quality prints every time.
Protective Accessories Needed
You need a few important protective accessories to guarantee your heat transfer printing process is both safe and efficient. First and foremost, always wear heat-resistant gloves. These protect your hands from burns when handling the heat press, which can reach temperatures upwards of 400°F.
Safety goggles are another must-have. They shield your eyes from any unexpected debris or heat exposure.
Don't forget an apron made from flame-resistant material. This offers an extra layer of protection against accidental burns and heat exposure.
Proper ventilation is essential, so make sure your workspace has good airflow to avoid inhaling fumes from the heat transfer materials.
In terms of machine maintenance, you'll need a non-flammable cleaning solution for your heat press. Regular cleaning prevents residue buildup, ensuring your machine operates efficiently and safely.
Additionally, a silicone pad is a great investment. It distributes heat evenly and protects both the machine and your materials.
Designing Your Artwork
Creating your artwork is the first and most essential step in the heat transfer printing process. Start by mastering color theory to make sure your designs are visually appealing and harmonious. Understanding how colors interact and complement each other can notably enhance your final product. For instance, knowing which colors evoke certain emotions or how to create contrast can make your artwork stand out.
Next, immerse yourself in graphic design principles. Your design should be clean, balanced, and aligned with the message you want to convey. Use tools like Adobe Illustrator or Photoshop to bring your vision to life. Pay close attention to the resolution of your images; higher resolutions guarantee your artwork looks sharp and professional when printed.
Consider the type of fabric you'll be printing on, as this can impact how colors appear. Some fabrics may absorb ink differently, altering the final look of your design. Always visualize how your artwork will transfer onto the material.
Don't forget to keep your audience in mind. Whether you're designing for a client or personal project, your artwork should resonate with its intended viewers. With practice and attention to detail, you'll create stunning, professional-quality designs ready for heat transfer printing.
Preparing Your Materials
Gathering the right materials is crucial for a successful heat transfer printing project. Start by selecting high-quality heat transfer vinyl (HTV) or transfer paper that suits your design and fabric type. The material selection is vital because different materials require different heat press temperatures and pressure settings. For instance, cotton fabrics generally work well with standard HTV, while polyester might need a specific type of vinyl to avoid scorching.
Next, make sure your heat press machine is calibrated correctly. Double-check the heat press temperature settings to match the recommendations provided by the HTV or transfer paper manufacturer. This step is crucial to guarantee a perfect adhesion of the design without damaging the fabric. Too low a temperature can result in poor bonding, while too high can cause the material to melt or burn.
Prepare the fabric by washing and drying it beforehand to remove any chemicals or residues that might interfere with the transfer process. Lay out your fabric on a clean, flat surface, and pre-press it for a few seconds to eliminate any wrinkles and moisture. This preparation ensures a smooth and even application, setting you up for a flawless heat transfer printing experience.
Cutting and Weeding Designs
Now that your materials are ready, let's talk about cutting and weeding your designs.
You'll need the right cutting tools, and understanding weeding techniques is essential.
We'll also cover how to troubleshoot common issues to make sure everything goes smoothly.
Essential Cutting Tools
To achieve precise and clean designs in heat transfer printing, having the right cutting and weeding tools is vital. Start with a high-quality cutting machine, like a Cricut or Silhouette, which offers various cutting techniques and helps you achieve detailed patterns. These machines are essential supplies for anyone serious about mastering heat transfer printing.
Invest in precision tools like craft knives and cutting mats. Craft knives are perfect for intricate cuts, while cutting mats protect your workspace and maintain a smooth cutting surface. Always follow safety precautions: keep your fingers away from the blade and store knives properly when not in use.
Don't overlook weeding tools. A weeding hook or tweezers can make removing unwanted vinyl bits much easier. These tools are designed to handle the delicate process of lifting tiny pieces without tearing the main design. Precision and patience are key here, so take your time.
Lastly, consider a pair of sharp, high-quality scissors for quick trims and adjustments. Keep them clean and sharp to avoid jagged edges. With the right tools and techniques, you'll find cutting and weeding to be a smooth and rewarding part of your heat transfer printing process.
Weeding Techniques Explained
Mastering weeding techniques is essential for creating flawless heat transfer designs. Weeding involves removing excess vinyl from your cut design, and it requires precision and patience. Let's immerse ourselves in the key weeding tools, tips, advanced techniques, and tricks you need to know.
First, make sure you have the right weeding tools. A good weeding toolset typically includes a weeder, tweezers, and a lightbox. These tools help you see and remove tiny pieces without damaging your design.
Here are some tips and tricks to enhance your weeding skills:
- Use a lightbox: Placing your vinyl on a lightbox makes it easier to see cut lines.
- Start from the outside: Begin weeding from the outer edges and work your way inward to prevent accidental tearing.
- Reverse weeding: Apply transfer tape to your design first, then weed the excess vinyl. This technique is great for intricate designs.
- Keep your tools clean: Wipe your weeding tools regularly to maintain precision.
- Invest in quality vinyl: Higher quality vinyl weeds more easily and produces cleaner results.
Troubleshooting Common Issues
When dealing with common issues in cutting and weeding designs, identifying the root cause is crucial to apply effective solutions.
One of the most common mistakes isn't calibrating your cutting machine properly. If your cuts are too deep or too shallow, you'll struggle with weeding. Check your blade settings and perform a test cut to fine-tune the depth.
Another frequent problem is the type of material you're using. Not all vinyl behaves the same. Make sure you're using the correct settings for the specific vinyl type. If the vinyl isn't cutting cleanly, consider adjusting the speed and pressure.
Weeding can be tricky if your design is too intricate. Simplify complex designs or use a weeding tool to help. If tiny pieces keep lifting, try applying a bit of heat to the backing with a heat press to make the vinyl more pliable.
Lastly, if you're facing heat press issues, ensure your press is at the right temperature and has even pressure. Uneven pressure can cause parts of the design to lift during weeding.
Troubleshooting techniques and solutions will save you time and frustration, making your heat transfer printing process smoother and more enjoyable.
Heat Press Setup Guide
Setting up your heat press properly guarantees smooth and successful heat transfer printing every time. Start by mastering temperature control and regular heat press maintenance to make sure your machine operates at its best.
Accurate temperature settings are essential; too high, and you risk burning your materials, too low, and your transfers won't adhere well.
Next, prioritize safety precautions. Always use heat-resistant gloves and verify your workspace is clear of flammable objects. Familiarize yourself with your heat press operation manual to understand all the functions and settings.
Here's a quick checklist to guide you:
- Check the temperature settings: Confirm they match the requirements for the materials you're working with.
- Inspect the heat platen: Ensure it's clean and free of any residue or damage.
- Test pressure settings: Adjust according to the material thickness to guarantee even pressure.
- Warm-up time: Allow the press to reach the desired temperature before starting your project.
- Regular maintenance: Keep your machine in top condition by routinely checking for wear and tear and lubricating moving parts.
Application Techniques
Applying heat transfers effectively requires a few essential techniques to guarantee your designs come out perfectly every time. First, focus on proper application by confirming your heat press settings align with the type of transfer you're using. Different materials require specific temperatures, pressures, and times, so always refer to your transfer material's guidelines.
Next, let's talk about popular transfer methods. There are several to choose from, including vinyl, sublimation, and screen-printed transfers. For vinyl transfers, you'll need to weed out any excess material before pressing. With sublimation, the key is to use polyester or polymer-coated substrates for the best results. Screen-printed transfers often require a bit more pressure to confirm the ink adheres well to the fabric.
Before pressing, make sure your garment is free of wrinkles and moisture by pre-pressing it for a few seconds. This step ensures a smooth surface for your transfer. Position your design carefully, using heat-resistant tape if necessary, to keep it in place during pressing.
Post-Press Care and Maintenance
Now that you've completed your heat transfer printing, it's important to focus on post-press care and maintenance. Properly cleaning your printed materials and storing them correctly will guarantee they last longer and look their best.
Let's explore the best practices for both.
Cleaning Printed Materials
Properly cleaning your heat transfer printed materials is crucial for maintaining their quality and longevity. To maintain the vibrancy and integrity of your prints, you'll need to follow specific cleaning techniques and maintenance tips.
Here's how to do it effectively:
- Use cold water: Always wash your printed items in cold water. Hot water can lead to the ink fading and the fabric shrinking, potentially resulting in discoloration and ink smudging.
- Turn inside out: Prior to washing, invert your printed garments. This basic step reduces friction on the printed surface, preserving the vibrancy of the design.
- Mild detergent only: Choose a gentle, non-abrasive detergent. Harsh chemicals can degrade the ink, leading to eventual fading or peeling.
- Avoid bleach: Refrain from using bleach or bleach-based products. Bleach can result in significant discoloration and harm to both the fabric and the print.
- Air dry: Forego the dryer. High temperatures can cause prints to crack or peel. Instead, lay your items flat to air dry or utilize a clothesline.
Storage Best Practices
After printing, storing your heat transfer printed materials correctly guarantees they stay vibrant and undamaged. First, confirm proper ventilation in your storage area. Good airflow helps prevent moisture buildup, which can damage the prints.
Your storage space should also be well-organized. Group similar items together, and avoid stacking too many on top of each other to reduce pressure and potential deformation.
Climate control is essential. Maintain a consistent temperature and humidity level. Extreme conditions can cause colors to fade or prints to peel. Ideally, keep the temperature between 65-75°F and humidity around 40-50%. If your space isn't naturally stable, consider using dehumidifiers or air conditioners to regulate the environment.
Effective labeling techniques make it easy to find and manage your printed items. Use clear, waterproof labels that won't fade over time. Label boxes or shelves with item descriptions and dates to keep track of inventory and make sure older items are used first.
Troubleshooting Common Issues
Inevitably, you'll encounter some common issues in heat transfer printing, but troubleshooting them doesn't have to be overwhelming. One frequent problem is poor color blending. If your colors aren't blending smoothly, it might be due to incorrect pressure or uneven heating. Make sure you've got consistent pressure across the transfer and that your heat press is working properly.
Temperature control is also essential. If the temperature is too high or too low, your print quality will suffer. Always double-check your heat press settings and ensure they're suitable for the specific materials you're using.
Here are some other common issues and how to address them:
- Peeling Transfers: This usually happens if the adhesive hasn't bonded properly. Check your temperature and pressure settings, and ensure you're using the correct transfer paper for your material.
- Faded Prints: Often due to insufficient heat or time. Make sure your heat press is calibrated correctly and maintain consistent pressure.
- Scorch Marks: These can occur if the temperature is too high. Lower the temperature slightly and try again.
- Ghosting: This happens when the transfer paper shifts during the process. Use heat-resistant tape to secure the paper in place.
- Cracking: This is typically due to excessive pressure or an incorrect temperature. Adjust both settings to find the best balance.
Advanced Tips and Tricks
Ever pondered how to elevate your heat transfer printing skills to a professional level? Commence by mastering advanced techniques that can set your work apart.
One such technique is layering. By carefully aligning multiple layers, you can create intricate designs with depth and dimension.
Another key method is utilizing specialty vinyls, like glitter or holographic, which add unique textures and visual interest.
Creative applications are also vital. Experiment with mixed media, combining heat transfer prints with embroidery or screen printing. This blend can produce breathtaking, one-of-a-kind pieces. Don't be afraid to push the boundaries of traditional applications; think beyond t-shirts and explore items like shoes, bags, and even furniture.
Troubleshooting challenges is a critical part of achieving mastery. For instance, if you're dealing with peeling, verify that your heat press settings—temperature, pressure, and time—are spot on. Sometimes, a slight adjustment can make a world of difference. If colors appear faded, double-check the quality of your transfer paper and the fabric's compatibility.
Expert solutions often lie in the details. Keep a log of your projects and note what works and what doesn't. This practice will help you refine your process and consistently produce high-quality results.
Frequently Asked Questions
How Long Does the Heat Transfer Printing Process Take From Start to Finish?
You'll appreciate the time efficiency and production speed of heat transfer printing. From start to finish, the entire process typically takes about 10-15 minutes, making it an excellent choice for quick, high-quality results.
Can Heat Transfer Printing Be Done on Non-Fabric Materials?
You might be wondering if heat transfer printing works on non-fabric materials. Guess what? It does! You can successfully use it on metal surfaces and plastic materials, opening up a world of creative possibilities.
What Is the Average Lifespan of a Heat Transfer Printed Item?
The average lifespan of a heat transfer printed item is around 50 washes. Dye fading and wear resistance depend on the quality of materials and care. Proper washing and handling will greatly extend the item's durability.
Are There Any Environmental Concerns With Heat Transfer Printing?
Imagine a forest shrinking with every print. Heat transfer printing does have environmental impacts, including sustainability concerns. The process can produce waste and emissions, so it's vital to seek eco-friendly materials and methods.
How Do I Choose the Best Heat Transfer Paper for My Project?
To choose the best heat transfer paper for your project, consider the heat transfer paper types and heat transfer paper quality. Match the paper type to your fabric and guarantee high quality for vibrant, long-lasting prints.