You can master ombre and dip-dye styles by starting with 100% cotton fabric for vibrant colors and pre-washing to remove coatings. For ombre, wet your fabric and gradually dip the bottom into dye for a smooth gradient. Dip-dye involves controlling how deep and long your fabric stays in the dye to achieve even color shifts. Use rubber bands to secure fabric and wrap it after dyeing to retain moisture. Keep exploring for helpful tips on prepping materials and caring for your colorful creations.
Key Takeaways
- Use natural fibers like cotton for vibrant ombre and dip-dye results, pre-washing fabric to remove coatings.
- For ombre, wet fabric and gradually dip the bottom into dye to create a smooth color gradient.
- Control dipping depth and duration carefully in dip-dye to achieve even color transitions.
- Wrap dyed fabric in plastic to retain moisture and allow color to set before rinsing with cold water.
- Wash new tie-dye separately in cold water with gentle detergent to preserve vibrant ombre and dip-dye colors.
Understanding the Basics of Tie-Dye
Before you plunge into creating vibrant patterns, it’s important to understand the basics of tie-dye. Tie-dye is all about folding, twisting, and binding fabric to create unique designs.
When you apply dye to these bound sections, the areas resist color, forming distinct patterns. You’ll notice that the way you fold the fabric—whether spirals, stripes, or pleats—directly affects the final look.
The dye’s intensity depends on how long you leave it on and the concentration of the color. Also, the type of fabric matters; natural fibers like cotton absorb dye better than synthetic ones.
Essential Materials and Preparation
Before you start your tie-dye project, gather all the necessary tools and pick the right fabric for the best results.
Setting up your workspace properly will help keep things organized and mess-free.
Let’s go over what you’ll need and how to prepare.
Required Tools Overview
Gathering the right tools sets the foundation for a successful tie-dye project.
You’ll need squeeze bottles for precise dye application, gloves to protect your hands, and rubber bands to create distinct patterns.
Prepare a plastic surface or garbage bags to keep your workspace clean. Have plastic bags or plastic wrap ready to wrap your dyed fabric for setting the color.
A spray bottle filled with water helps blend colors smoothly, especially for ombre effects.
Don’t forget a bucket or large container for dip-dyeing—you’ll want enough room to submerge your fabric evenly.
Finally, keep paper towels or old rags handy for quick cleanups.
With these essentials, you’ll be well-equipped to plunge into creating stunning ombre and dip-dye designs.
Fabric Selection Tips
Once you have your tools ready, the next step is choosing the right fabric for your tie-dye project.
Natural fibers like cotton, rayon, silk, or hemp absorb dye better and produce vibrant colors. Avoid synthetic fabrics such as polyester, as they resist dye and result in dull patterns. Look for 100% cotton T-shirts, bedsheets, or tote bags for the best results.
Pre-wash your fabric to remove sizing or coatings that might block the dye. Don’t use fabric softener during washing since it can affect dye absorption. Choose lighter-colored fabrics to make your ombre or dip-dye effects pop.
If you want a smoother finish, pick tightly woven fabric. Proper fabric choice guarantees your design looks sharp and colors stay bright after washing.
Workspace Setup Guidelines
Although setting up your workspace might seem straightforward, organizing your materials and preparing the area properly guarantees a smooth tie-dye process.
First, choose a well-ventilated space with a flat surface covered by plastic or old newspapers to protect against stains. Gather essential materials: rubber gloves, squeeze bottles for dye, a bucket or large container for dipping, and clean water for rinsing.
Keep paper towels and plastic bags nearby for wrapping dyed fabric. Wear old clothes or an apron to avoid dye stains on yourself. Arrange your dyes in an accessible spot to work efficiently.
Pre-soak your fabric in a soda ash solution if recommended, and wring it out before dyeing. With these preparations, you’ll focus on creativity, not cleanup or interruptions.
Step-by-Step Guide to Ombre Tie-Dye
Before you plunge into the ombre tie-dye process, make sure you’ve prepared your fabric and dye colors.
Start by wetting your fabric and wringing out excess water; damp fabric absorbs dye evenly. Next, lay it flat or hang it for dye application.
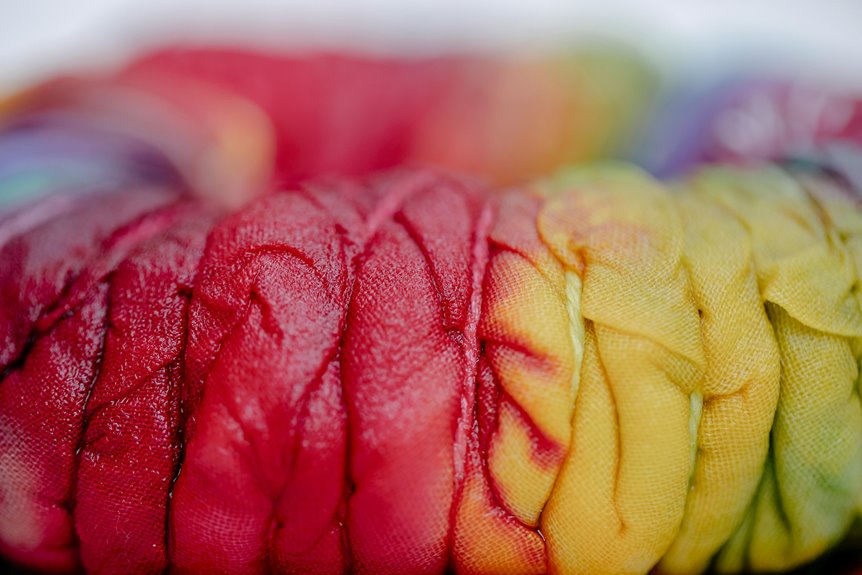
Gradually dip the fabric’s bottom into your dye bath, holding it for a few minutes. Slowly raise the fabric to create a gradient, letting the dye saturate more at the bottom and fade upward. For a smoother shift, you can dip multiple times, each time lifting slightly higher.
Once satisfied, wrap the fabric in plastic to keep it moist and let it sit for 6-8 hours.
Finally, rinse with cold water until clear, then wash and dry as usual.
How to Achieve the Perfect Dip-Dye Effect
To nail the perfect dip-dye effect, you’ll want to start by prepping your fabric so it absorbs color evenly.
Then, focus on your dye application technique, controlling how long and how deep you dip your fabric for smooth gradients.
With the right steps, you can create clean, vibrant color shifts every time.
Preparing Fabric Properly
When you prepare your fabric properly, you set the foundation for a flawless dip-dye effect. Start by washing your fabric to remove any sizing or chemicals that might block dye absorption. Don’t use fabric softener—it can create a barrier. Next, keep your fabric damp before dyeing; moisture helps the dye spread evenly. Finally, secure your workspace with plastic or old towels to control mess.
| Step | Why It Matters |
|---|---|
| Wash fabric | Removes chemicals for better dyeing |
| Avoid softeners | Prevents dye rejection |
| Keep fabric damp | Guarantees smooth, even color blending |
Proper prep assures your dip-dye looks vibrant and seamless every time.
Dye Application Techniques
Properly prepping your fabric sets you up for success, but applying the dye skillfully brings your dip-dye design to life.
Start by filling a container with your dye mixture. Slowly immerse the fabric’s edge into the dye, holding it there for a few minutes to let the color absorb. For a smooth gradient, gradually lift the fabric out in small increments, pausing briefly at each level. This controlled dipping creates the signature ombre fade.
Avoid rushing; the longer the fabric stays submerged, the deeper the color becomes. Rotate the fabric gently to guarantee even saturation.
Once you’ve achieved the desired depth, rinse the fabric in cold water to stop the dye process. Mastering this technique gives you precise control over your dip-dye’s final look.
Tips for Color Selection and Dye Application
Although choosing colors might seem straightforward, selecting the right hues and applying dye effectively can make all the difference in your tie-dye project.
Start by picking colors that complement each other; think about color theory—analogous shades create harmony, while contrasting colors add pop. Keep your fabric type in mind since natural fibers absorb dye better.
When applying dye, use consistent pressure and avoid oversaturating to prevent muddy blends. For ombre styles, gradually build color intensity by dipping longer or layering dye.
In dip-dye projects, control the depth and duration each section is submerged to achieve crisp shifts. Always test your colors on a small fabric piece first to see how they react.
With thoughtful color choices and careful application, your tie-dye will truly stand out.
Caring for Your Tie-Dye Creations
To keep your tie-dye looking vibrant and fresh, you’ll need to handle it with care from the start.
Always wash your new tie-dye separately in cold water to prevent colors from bleeding onto other clothes. Use a gentle detergent, avoiding bleach or harsh chemicals that can dull the colors.
When drying, air dry your garment or use a low heat setting in the dryer to preserve the dye. Avoid direct sunlight for prolonged periods, as UV rays can fade the vibrant hues.
If you want to keep your tie-dye looking bright longer, turn your clothes inside out before washing.
Following these simple steps will guarantee your ombre and dip-dye styles stay bold and beautiful wear after wear.
Frequently Asked Questions
Can I Use Natural Dyes for Ombre and Dip-Dye Styles?
You can definitely use natural dyes for ombre and dip-dye styles. They offer beautiful, earthy tones, though colors might be less vibrant and require longer soaking times. Don’t forget to experiment with fabric types for best results!
How Long Do Tie-Dye Colors Typically Last on Fabric?
You’ll enjoy vibrant colors for months, you’ll notice fading after many washes, and you’ll want to treat the fabric gently. To keep your tie-dye bright, wash in cold water and avoid harsh detergents or bleach.
Are There Eco-Friendly Alternatives to Chemical Dyes?
You can use eco-friendly alternatives like natural dyes from plants, fruits, and vegetables. They’re biodegradable and non-toxic, so you won’t harm the environment while still creating vibrant, unique colors on your fabric.
Can I Tie-Dye Synthetic Fabrics Like Polyester?
You might think synthetic fabrics like polyester resist dye, but with disperse dyes and heat, you can successfully tie-dye them. It’s a bit trickier, yet mastering this expands your creative possibilities considerably.
What Safety Precautions Should I Take When Dyeing at Home?
You should wear gloves and old clothes to protect your skin and fabrics. Work in a well-ventilated area, avoid inhaling fumes, and keep your workspace covered to prevent stains. Always follow dye instructions carefully.