To create custom stencils for bleach tie-dyeing, start by choosing simple, bold designs that won’t blur with bleach spread. Use sturdy stencil sheets and a sharp craft knife on a cutting mat for precision. Secure your stencil to clean, dry fabric using painter’s tape or spray adhesive. Apply bleach lightly with gloves and work in a ventilated area for safety. After bleaching, rinse promptly to stop the process. Keep your stencil clean and flat for reuse. Learning these basics will prepare you to master creative, crisp bleach tie-dye patterns.
Key Takeaways
- Use durable stencil sheets or adhesive vinyl and a sharp craft knife on a cutting mat for precise stencil cutting.
- Choose simple, bold designs with connected shapes to prevent bleach spreading and maintain clarity in patterns.
- Prepare stencils by printing high-contrast black-and-white designs and test-cutting for weak points before final use.
- Secure stencils firmly on clean, dry fabric and apply bleach carefully with gloves in a well-ventilated area.
- Rinse fabric promptly after bleaching, clean stencils immediately, and store them flat or hanging to preserve reuse quality.
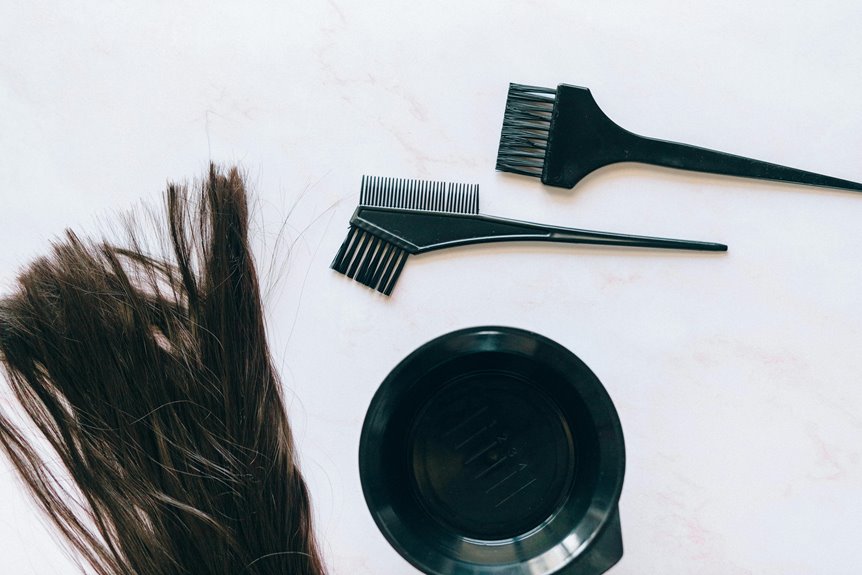
Essential Materials for Making Bleach Tie-Dye Stencils
To create effective bleach tie-dye stencils, you’ll need a few essential materials that guarantee clean lines and vibrant designs.
Start with stencil sheets or adhesive vinyl, which provide a sturdy base for your patterns. A sharp craft knife or precision cutting tool helps you carve detailed shapes without tearing the material.
Begin with stencil sheets or adhesive vinyl for durability, and use a sharp craft knife for precise, clean cuts.
Make certain you have a cutting mat to protect your surfaces and guarantee smooth, safe cuts. Painter’s tape or spray adhesive keeps the stencil firmly in place on your fabric, preventing bleach from seeping under edges.
Finally, gather gloves and a plastic drop cloth to protect your hands and workspace from bleach spills. Having these materials ready sets you up for crisp, professional-looking bleach tie-dye stencils every time.
Choosing the Right Design for Your Stencil
How do you pick the perfect design for your bleach tie-dye stencil? Start by thinking about what excites you—your stencil should reflect your personality or the message you want to share.
Keep in mind that simpler designs usually work better because bleach spreads slightly, so fine details might blur. Choose something that balances creativity with clarity. Imagine the impact your design will have once the bleach does its magic.
Consider these emotional triggers when selecting your design:
- A symbol that inspires confidence or joy
- A pattern that sparks nostalgia or comfort
- An image that expresses your unique style
- A motif that celebrates a cause or belief
Preparing Your Design for Stencil Cutting
Now that you’ve picked your design, it’s time to prepare it for stencil cutting.
Focus on selecting clear, bold elements that will hold up well during the cutting process.
You’ll also want to optimize your design by simplifying details and connecting shapes to guarantee clean, easy cuts.
Selecting Design Elements
Before you start cutting your stencil, you’ll want to choose design elements that balance simplicity with impact.
Keep in mind that intricate details may not translate well when bleach interacts with fabric, so focus on bold shapes and clear lines.
Think about the emotion you want your design to evoke and how it will resonate on your chosen material.
Consider how each element contributes to the overall story or vibe.
- Use shapes that feel dynamic and alive to inspire energy.
- Incorporate symbols or motifs that stir nostalgia or joy.
- Choose patterns that invite curiosity and exploration.
- Emphasize contrasts that highlight your message clearly.
Optimizing for Cutting
Once you’ve settled on bold, clear design elements, it’s time to prepare them for cutting. Start by simplifying your design—remove intricate details that won’t translate well into stencils.
Convert your image to a high-contrast black and white format to clearly define the areas to cut. Make certain all shapes are connected to avoid loose pieces falling out when you cut.
Use vector graphic software to create clean, sharp lines that your cutting tool can easily follow. Consider the size of your stencil; too small, and details get lost; too large, and it becomes unwieldy.
Finally, test your design by printing it out and cutting a rough version with scissors to spot any weak points before using your cutting machine or blade. This prep guarantees a smooth cutting process and a crisp stencil.
Best Tools for Cutting Custom Stencils
You’ll want the right tools to cut your custom stencils cleanly and accurately.
Choosing blades and cutters that suit your stencil material makes the process smoother and safer.
Always follow safety tips to protect yourself while working.
Essential Cutting Tools
Choosing the right cutting tools makes all the difference when crafting custom stencils for tie-dyeing. You want tools that offer precision, control, and comfort to bring your designs to life effortlessly.
Here are some essential cutting tools you’ll want in your kit:
- X-Acto Knife: Perfect for intricate details and sharp edges.
- Self-Healing Cutting Mat: Protects surfaces and guarantees smooth cuts.
- Precision Scissors: Great for quick, clean snips on simpler shapes.
- Tweezers: Helps remove tiny stencil pieces without tearing.
Using these tools, you’ll feel more confident and creative. Each cut will be cleaner, making your bleach tie-dye designs pop with professional flair.
Don’t settle for dull blades or makeshift cutters—they slow you down and ruin your stencil’s potential.
Material Compatibility Tips
Although different stencil materials demand specific cutting tools, knowing which tools work best with each type can save you time and frustration.
For paper or cardstock stencils, a sharp craft knife or X-Acto knife gives you clean, precise cuts. If you’re working with thicker materials like Mylar or plastic sheets, use a heavy-duty utility knife or a rotary cutter to slice through without tearing.
For intricate designs on delicate materials, consider small scissors or a precision cutting machine like a Cricut. Avoid dull blades—they’ll cause jagged edges and ruin your stencil.
Matching your tool to the material guarantees crisp edges and durability, making your bleach tie-dye projects look professional and vibrant every time. Choose wisely to keep your workflow smooth and your stencils flawless.
Safety Precautions
Using the right cutting tools not only improves your stencil’s quality but also keeps you safe during the process.
When working with sharp blades or scissors, you want to prevent accidental cuts or injuries. Always choose tools designed for precision and safety, like self-healing cutting mats and ergonomic blades. Keep your workspace tidy to avoid slips or distractions.
Here’s what you should have on hand:
- A sharp, reliable craft knife with a comfortable grip
- A sturdy, self-healing cutting mat to protect surfaces and fingers
- Safety gloves to shield your hands from accidental nicks
- Proper lighting to see every detail clearly
Techniques for Cutting Stencils With Precision
When you want crisp, clean edges on your tie-dye designs, mastering precise stencil cutting is essential.
Start by choosing a sharp craft knife or precision cutting tool; dull blades cause jagged lines. Secure your stencil material on a cutting mat to prevent slips. Use a ruler or straight edge for geometric shapes, guiding your blade steadily without rushing.
For curves or intricate details, rotate the stencil rather than the blade, maintaining control. Light, multiple passes cut better than one deep cut, reducing mistakes. Keep your hand steady and take breaks if needed to maintain focus.
Clean your blade frequently to avoid tearing the stencil. With practice, your cuts will be sharp, allowing your bleach tie-dye patterns to stand out beautifully.
Tips for Positioning and Securing Stencils on Fabric
Three key steps help you position and secure stencils on fabric for flawless tie-dye results.
First, plan your design placement by folding or marking the fabric lightly with a washable pencil.
Next, align your stencil carefully, ensuring it’s straight and centered where you want the pattern.
Finally, secure the stencil firmly to prevent shifting during application.
To keep your creative flow smooth and your design sharp, try these tips:
- Use low-tack adhesive spray for easy removal without damage
- Employ painter’s tape on stencil edges for extra hold
- Work on a flat, stable surface to avoid fabric wrinkles
- Smooth fabric gently before securing to prevent bubbles
These steps help you create crisp, beautiful bleach tie-dye patterns every time.
Applying Bleach Safely and Effectively With Stencils
Once your stencil is perfectly in place, it’s time to carefully apply bleach to bring your design to life.
Wear gloves and work in a well-ventilated area to protect yourself from fumes. Use a spray bottle or a small sponge to apply bleach evenly over the stencil, avoiding excess that can seep underneath and blur your design.
Apply in light layers for better control and to prevent fabric damage. Keep a clean cloth nearby to quickly blot any bleach that spreads beyond the stencil edges.
Allow the bleach to lighten the fabric for several minutes, checking frequently to achieve your desired effect.
Once done, rinse the fabric immediately with cold water to stop the bleaching process and preserve your crisp, striking pattern.
Caring for and Reusing Your Custom Stencils
Although custom stencils add a unique touch to your tie-dye projects, their lifespan depends on how well you care for them. To keep your stencils in great shape, clean them immediately after use to prevent bleach residue buildup.
Handle them gently to avoid tears or warping, especially if you use delicate materials like paper or thin plastic. Store them flat or hanging in a dry place to maintain their shape and prevent damage. With proper care, you can reuse your stencils multiple times, making your creative process both enjoyable and sustainable.
Here’s how to care for your stencils:
- Rinse thoroughly with cold water right after bleaching
- Pat dry with a soft cloth, avoiding harsh rubbing
- Store in a labeled folder or container for easy access
- Inspect before reuse, repairing small tears promptly to extend life
Frequently Asked Questions
Can I Use Custom Stencils on Other Dyeing Techniques Besides Bleach Tie-Dye?
You can definitely use custom stencils with other dyeing techniques like fabric painting or screen printing. Just make sure the stencil material suits the dye or paint you’re using to get crisp, clean designs every time.
How Do Different Fabric Types Affect Bleach Stencil Results?
Different fabrics react uniquely to bleach; natural fibers like cotton absorb bleach well, giving sharp designs, while synthetics may resist or discolor unevenly. You’ll want to test fabrics to see how your stencil results vary.
What Are Common Mistakes to Avoid When Making Bleach Stencils?
You shouldn’t use flimsy materials that soak bleach or overly intricate designs that bleed. Avoid poor adhesion, uneven cutting, and rushing the drying process. These mistakes’ll ruin your stencil’s sharpness and the final bleach effect.
Can I Create Multi-Layered Designs With Custom Bleach Stencils?
You can definitely create multi-layered designs with custom bleach stencils. Just make sure each layer dries fully before applying the next to prevent smudging. Align layers carefully for crisp, detailed results that really stand out.
How Long Does Bleach Take to Set When Using Stencils?
Bleach begins bleaching boldly in about 5 to 10 minutes, but you’ll want to watch carefully. Depending on fabric and strength, it can take up to 15 minutes. Don’t delay—rinse promptly to prevent damage.