To create a custom padded fabric iPad sleeve, start by measuring your iPad carefully, including extra space for padding and seams. Choose durable outer fabric and soft padding for protection, then cut pieces with seam allowances. Layer and pin the fabrics with padding inside, sew three sides, and add your preferred closure like a zipper or Velcro. Finish by turning it right side out and pressing flat for a snug fit. Keep going to find out how to perfect every step.
Key Takeaways
- Measure your iPad precisely and add ½ inch for seam allowances and padding thickness to ensure a proper fit.
- Choose durable outer fabric like canvas or denim, and soft padding such as fleece or quilt batting for protection and style.
- Cut fabric and padding pieces with seam allowances, layering outer fabric, padding, and lining fabric carefully before pinning.
- Sew outer shell by stitching three sides, attach the lining with a seam allowance, then turn right side out and topstitch.
- Add closures like a zipper, Velcro, or button, sewing securely for easy access and ensuring a snug, protective fit.
Gather Your Materials and Tools
To create your custom iPad case, you’ll need a few essential materials and tools. Start with durable fabric for the outer layer—canvas or denim works well.
Choose soft, padded material like fleece or quilt batting for protection. You’ll also need a lining fabric to give it a neat finish.
Grab a sewing machine or a needle and strong thread if you prefer hand sewing. Don’t forget scissors for cutting fabric, pins to hold pieces together, and a measuring tape or ruler for straight lines.
A zipper or Velcro strip will keep your iPad secure inside the case. Finally, have a fabric marker or chalk handy to mark your cutting lines clearly.
With these ready, you’re set to start crafting your custom iPad case.
Measure Your Ipad for Accurate Sizing
Once you have your materials ready, the next step is to measure your iPad carefully to guarantee the case fits perfectly.
Use a ruler or measuring tape to record the height, width, and thickness of your device. Write down these dimensions precisely, as even a small error can make your case too tight or too loose.
Measure your iPad’s height, width, and thickness precisely to ensure a perfect-fitting case.
Remember to allow extra space for the fabric and padding thickness—add about half an inch to each measurement for a comfortable fit.
Also, consider how you want the case to close; if you plan to include a flap or zipper, factor that into your measurements.
Accurate sizing now saves you from adjustments later, ensuring your custom case offers both protection and style tailored exactly to your iPad.
Choose the Right Fabric and Padding
You’ll want to pick a fabric that’s both durable and stylish to protect your iPad.
Think about how much padding you need—foam, fleece, or quilted layers each offer different levels of cushioning.
Choosing the right combination will keep your device safe and looking great.
Fabric Types Overview
Selecting the right fabric and padding plays a crucial role in creating a durable and stylish custom iPad case. You want a fabric that balances protection, aesthetics, and ease of sewing. Cotton canvas offers sturdiness and a classic look, while neoprene provides excellent shock absorption with a sleek finish. Felt is soft and lightweight but less protective, and denim adds rugged durability with a casual vibe.
| Fabric Type | Key Features |
|---|---|
| Cotton Canvas | Durable, easy to sew, classic |
| Neoprene | Shock-absorbent, water-resistant |
| Felt | Soft, lightweight, minimal bulk |
| Denim | Strong, casual, rugged |
Choose a fabric that suits your style and daily use, ensuring your iPad stays safe and your case looks great.
Selecting Padding Materials
After picking the perfect fabric, it’s time to focus on padding materials that provide the right balance of protection and comfort for your iPad case.
You want something that cushions against bumps but doesn’t add unnecessary bulk. Foam padding is a popular choice—it’s lightweight, flexible, and absorbs shock well. You could also consider batting, which is softer and gives a plush feel, though it offers less impact resistance.
For extra sturdiness, combine a thin foam layer with batting. Avoid materials that are too stiff, as they can make your sleeve bulky and less portable.
Always test your padding by pressing down to verify it springs back, maintaining protection. Choosing the right padding keeps your iPad safe while making your custom sleeve enjoyable to carry.
Cut Fabric and Padding Pieces
Start by carefully measuring your iPad to determine the exact dimensions for both the fabric and padding pieces.
Add about ½ inch to each side for seam allowances and ease when cutting. Use a ruler and fabric chalk or a washable marker to mark these dimensions on your chosen fabric and padding materials.
Cut two fabric pieces—one for the outer layer and one for the lining—matching the adjusted size. Then, cut the padding slightly smaller to avoid bulk at the seams, trimming about ¼ inch from each edge.
Make certain all pieces are flat and smooth before cutting to guarantee clean, straight edges. Keep these pieces organized and ready for the next step, where you’ll prepare them for sewing.
Prepare the Fabric Pieces for Sewing
Now that you’ve cut your fabric and padding, it’s time to get your pieces ready for sewing.
Choose the right fabric types for durability and style, then measure and cut each piece carefully.
Finally, layer your fabric and padding to provide the perfect protection for your iPad case.
Choosing Fabric Types
Selecting the right fabric types plays an essential role in creating a durable and stylish custom iPad case. You’ll want a fabric that balances protection and aesthetics.
For the outer layer, consider sturdy materials like canvas, denim, or upholstery fabric—they resist wear and tear well. For the inner lining, soft cotton or fleece works great to cushion your iPad without scratching the screen.
Adding a layer of foam or batting between these fabrics boosts padding and shock absorption. Avoid overly stretchy or slippery fabrics, as they can be tricky to sew and may not hold the case’s shape.
Measuring and Cutting
Before you cut any fabric, measure your iPad carefully to confirm the case will fit perfectly. Use a ruler or measuring tape to note the height, width, and thickness. Add about half an inch on all sides for seam allowances and ease.
Next, decide how many fabric layers you want, then mark your measurements on each fabric piece with a fabric chalk or pencil. Cut two identical rectangles—one for the outer fabric and one for the lining. If you’re including padding later, cut that piece the same size as well.
Make certain your cuts are straight and precise to guarantee clean sewing lines. Double-check measurements before cutting to avoid mistakes. Accurate measuring and cutting set the foundation for a neat, well-fitting iPad case.
Layering for Padding
After cutting your fabric pieces accurately, it’s time to layer them for padding to add protection and structure to your iPad case.
Start by laying your outer fabric piece flat, right side down. Next, place the padding material—like quilt batting or foam—on top, ensuring it covers the entire surface evenly.
Finally, position the lining fabric on top, right side up, creating a fabric sandwich.
Here’s a quick layering checklist:
- Outer fabric (right side down)
- Padding material centered
- Lining fabric (right side up)
Make sure all layers align neatly and smooth out any wrinkles or folds.
Pin them together to keep everything in place while you sew. This layering sets the foundation for a sturdy, cushioned sleeve.
Sew the Padding to the Outer Fabric
While ensuring your iPad case offers both protection and style, you’ll want to carefully sew the padding to the outer fabric to keep everything securely in place. Start by aligning the padding evenly on the wrong side of the outer fabric. Use pins or fabric clips to hold the layers steady as you sew. Stitch close to the edges first, then quilt through the padding with simple straight lines or a grid pattern. This prevents the padding from shifting inside the case and gives a professional finish.
| Step | Action | Tip |
|---|---|---|
| 1 | Align padding | Smooth out wrinkles |
| 2 | Pin layers | Use plenty of pins |
| 3 | Sew carefully | Backstitch at ends |
Assemble the Outer Shell of the Case
Once you’ve securely sewn the padding to the outer fabric, you can start assembling the outer shell of your iPad case.
First, line up the two outer fabric pieces with the padded sides facing each other.
Next, pin the edges together to keep the fabric in place while sewing.
Finally, sew around three sides, leaving one side open for inserting the iPad later.
Here’s a quick checklist:
- Align fabric pieces with padding inside.
- Pin all edges except the opening side.
- Sew along pinned edges, reinforcing corners for durability.
This forms the sturdy exterior of your case, protecting your device.
Make sure your seams are strong to withstand daily use before moving on to the inner lining.
Create and Attach the Inner Lining
Cut the inner lining fabric to match the dimensions of your outer shell, ensuring a snug fit inside the case.
Lay the lining fabric flat, then place the assembled outer shell on top, right sides facing each other. Pin the edges together carefully to keep the layers aligned.
Sew around the perimeter with a ½-inch seam allowance, leaving a small gap on one side for turning the case right side out.
After stitching, clip the corners to reduce bulk and turn the case right side out through the gap.
Press the edges flat with an iron, folding in the seam allowance at the opening.
Finally, topstitch around the entire edge close to the seam to close the gap and secure the lining firmly in place.
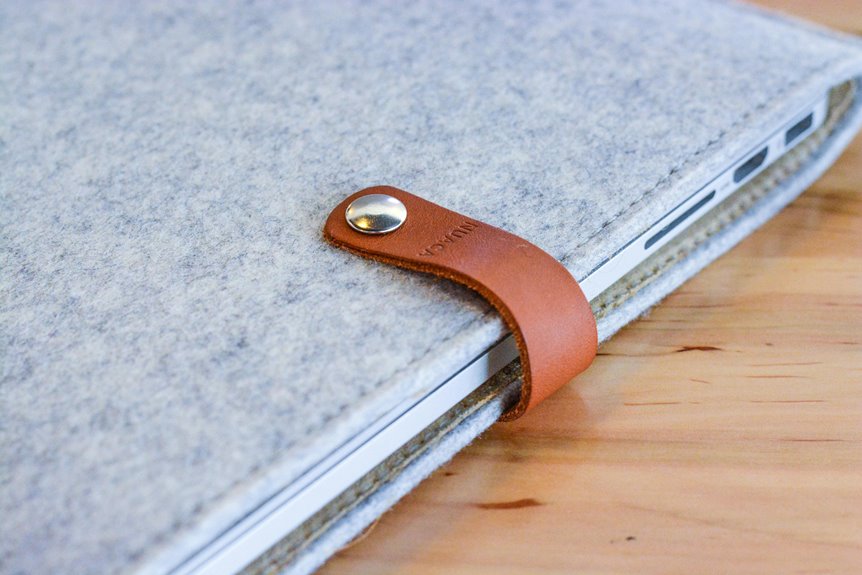
Add Closure Options: Zipper, Velcro, or Button
Now it’s time to choose the best closure for your iPad case—zipper, Velcro, or button—all have their perks.
Think about how secure and easy to use you want it to be.
Once you’ve picked, I’ll guide you through installing it neatly and securely.
Choosing the Right Closure
You have three popular closure options to evaluate for your custom iPad case: zipper, Velcro, and button. Choosing the right one depends on your priorities for convenience, security, and style.
- Zipper: Offers a secure, snug fit and keeps your iPad completely enclosed. It’s great if you want maximum protection but requires more sewing skill.
- Velcro: Easy to attach and detach, making it super convenient. It’s less secure than a zipper but perfect for quick access.
- Button: Adds a charming, handmade look and can be simple to sew. However, it mightn’t hold the case as tightly as the other options.
Consider how often you’ll open the case and how secure you want it before deciding.
Installing Closure Mechanisms
Deciding on the closure type sets the stage for installing it securely on your custom iPad case.
If you’re using a zipper, align it carefully along the top edge, pin it in place, then sew slowly to avoid puckering.
For Velcro, cut matching strips and stitch one side to the flap and the other to the body, making sure they meet perfectly when closed.
Buttons require sewing the button on the body and adding a loop or buttonhole on the flap, so it fits snugly.
Whichever closure you pick, double-check its placement before sewing to verify smooth opening and closing.
Take your time here—secure installation will keep your iPad safe and make your case look professionally finished.
Sew the Final Edges and Finish Seams
Begin by carefully aligning the edges of your iPad case to secure a clean, professional finish.
Pin or clip the layers together securely to prevent shifting while sewing.
Next, sew around the perimeter using a straight stitch, leaving a consistent seam allowance.
To guarantee durability and a neat appearance, follow these steps:
- Backstitch at the beginning and end of your seam to lock stitches in place.
- Trim excess seam allowance close to the stitching, but be careful not to cut the thread.
- Finish seams with a zigzag stitch or serger to prevent fraying and add strength.
Turn the Case Right Side Out and Press
After securing and finishing your seams, it’s time to turn your iPad case right side out. Gently pull the fabric through the opening you left, being careful not to stretch or distort the edges.
Use your fingers or a blunt tool to push out the corners neatly, ensuring they’re crisp and well-defined. Once the case is fully reversed, lay it flat on your ironing board.
With your iron set to a fabric-appropriate temperature, press the case carefully. Focus on smoothing out any wrinkles and setting the seams for a polished look.
Take your time to avoid scorching the fabric or padding. Pressing now helps your case maintain its shape and makes it easier to work with in the next steps.
Test the Fit and Make Final Adjustments
Once you’ve pressed the case, slip your iPad inside to test the fit. It should slide in easily but feel snug enough to protect your device.
If it’s too tight or loose, don’t worry—you can make final adjustments. Follow these steps:
- Check the seams and edges for any tight spots or excess fabric causing bulk.
- Pinch and trim small amounts of fabric or batting if the fit is too loose, then resew the affected seams.
- If it’s too tight, unpick the seams slightly and add a small strip of fabric or reduce the batting thickness before resewing.
Frequently Asked Questions
Can I Use Waterproof Fabric for Better Protection?
You can definitely use waterproof fabric to boost your iPad case’s protection. It keeps moisture out effectively, but make sure to add padding inside for shock absorption and durability. You’ll create a sturdy, protective sleeve this way.
How Do I Clean and Maintain the Fabric Case?
You should spot clean your fabric case with a mild detergent and cold water, then air dry it. Avoid machine washing to keep padding intact, and regularly check for wear to maintain its protective quality.
What Are Alternative Padding Materials for Lightweight Cases?
You don’t want your case to feel like a brick! Try memory foam, felt, or even quilt batting—they’re ultra-light but protect your iPad like a cozy cloud. You’ll love how easy it feels to carry!
Can This Sleeve Design Be Adapted for Other Devices?
You can definitely adapt this sleeve design for other devices. Just adjust the dimensions and padding thickness to fit your gadget snugly, ensuring protection while keeping it lightweight and functional for your specific needs.
How Long Does the Entire Sewing Process Typically Take?
They say, “Rome wasn’t built in a day,” and neither is a perfect sleeve. You’ll spend about 2 to 3 hours sewing, cutting, and padding, depending on your experience and the complexity of your design.