You can create stunning advanced tie-dye patterns by trying techniques like the mandala spiral, where you twist and section fabric for vivid symmetry, or the bullseye with a twist that adds a spiral effect to classic rings. Experiment with crumple dye art for unique randomness, striped ombre for smooth gradients, or ice dyeing for organic designs. Geometric shapes with tape give sharp lines, and galaxy tie-dye captures cosmic colors. Keep exploring, and you’ll uncover even more exciting styles and tips.
Key Takeaways
- Create mandala spirals by twisting fabric tightly and dividing into sections for multi-color dye application.
- Use ice dyeing for organic, slow-melt patterns by covering fabric with ice and powdered dye.
- Achieve geometric designs with painter’s tape to form clean shapes like triangles or stripes before dyeing.
- Combine dark bases with cosmic colors and white highlights to mimic galaxy patterns.
- Experiment with folding techniques like accordion pleats for striped ombre or bullseye twists for layered colors.
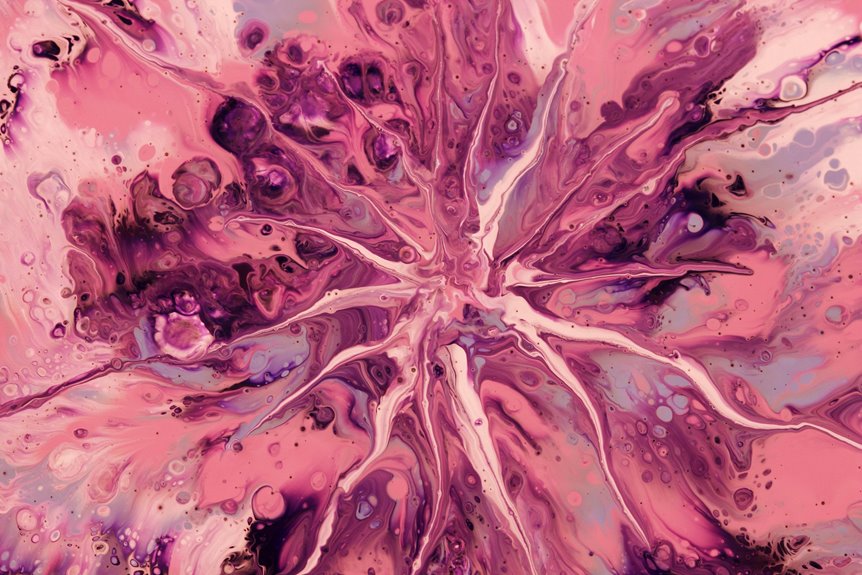
Mandala Spiral Technique
Anyone interested in creating vibrant, eye-catching designs will find the Mandala Spiral Technique both fun and rewarding.
To start, lay your fabric flat and pinch the center where you want your spiral to originate. Twist the fabric tightly in a circular motion, allowing it to coil naturally into a spiral shape. Secure the spiral with rubber bands, dividing it into six or eight sections.
Apply different dye colors to each section, working carefully to keep colors vivid and distinct. Let the dye set according to the instructions, then rinse and dry your fabric.
The result is a stunning, symmetrical spiral resembling a mandala, perfect for shirts, scarves, or home décor. This technique’s precision and color blending make it a standout choice for advanced tie-dye projects.
Bullseye With a Twist
You’ll want to pick layered colors that pop and complement each other for your Bullseye With a Twist.
Mastering the right folding techniques sets the foundation for this pattern’s unique look.
Then, apply your dye carefully to keep those crisp, vibrant rings sharp and defined.
Layered Color Selection
When layering colors for a bullseye pattern with a twist, choosing hues that contrast yet complement each other makes your design pop. Start with a bold base color, like deep blue or vibrant red, to anchor the design.
Then, select a lighter or brighter shade for the inner rings, such as yellow or lime green, to create visual interest. Avoid colors that blend too closely, or your bullseye will lose definition.
You can also experiment with unexpected combinations—like pairing warm oranges with cool purples—to add depth. Remember to take into account the fabric’s absorbency, as some colors may bleed or muddy when layered.
Folding Techniques Explained
Although the bullseye pattern may seem straightforward, mastering the folding technique with a twist requires careful steps to achieve sharp, distinct rings.
Start by pinching the fabric’s center point where you want your bullseye. Pull it upward into a cone shape, then fold the cone in an accordion style, making narrow, even folds.
Now, here’s the twist: before securing, rotate the folded cone slightly to create a spiral effect within the bullseye. Use rubber bands to tightly bind the folds at intervals along the cone.
This method compresses the fabric to resist dye, forming crisp, layered circles with a dynamic twist. Taking your time to fold evenly and secure firmly guarantees your pattern stands out with precision and artistic flair.
Dye Application Tips
Applying dye to your bullseye with a twist pattern requires careful attention to color placement and saturation. Start by choosing contrasting colors to highlight the spiral effect.
Use a squeeze bottle for precise application, ensuring each section gets enough dye without oversaturating. Apply dye slowly along the folds, allowing colors to blend slightly at the edges for a smooth change. Avoid pooling dye, which can cause muddiness.
Rotate the fabric as you go to maintain even coverage and keep the spiral defined. Remember to wear gloves and protect your workspace.
After dyeing, wrap the fabric tightly in plastic to keep it moist and let the colors set. This careful approach will help your bullseye with a twist pattern pop with vivid, crisp spirals.
Crumple Dye Art
Crumple dye art transforms fabric into a vibrant mosaic of colors by scrunching it into irregular folds before applying dye. You start by bunching your fabric tightly without any specific pattern, then spray or drip your chosen dyes over the textured surface. This randomness creates unique blends and spots of color, giving your piece a lively, organic look. Remember to use gloves and work over a protected area to catch any dye drips.
| Step | Tip |
|---|---|
| Scrunch | Make tight, uneven folds |
| Dye Application | Use multiple colors for depth |
| Coverage | Apply dye sparingly at first |
| Protection | Wear gloves, cover workspace |
| Drying | Let air dry completely |
This method’s unpredictability makes every piece one-of-a-kind.
Striped Ombre Effect
To create a striking Striped Ombre Effect, you’ll want to carefully pick colors that blend smoothly from light to dark.
Mastering the right folding techniques is key to achieving clean, even stripes.
Let’s walk through the best color combos and folding steps to get your design just right.
Color Selection Tips
Anyone aiming to create a striped ombre effect should focus on selecting colors that blend smoothly while maintaining distinct stripes.
Choose hues that shift naturally, like blues fading into purples or oranges into reds. Avoid colors that clash harshly, as they can disrupt the ombre’s flow.
Consider using shades within the same color family for a subtle gradient or contrast complementary colors for a bold look.
Remember, the key is balance: each stripe should stand out but still flow into the next.
Test your colors on a small fabric swatch to see how they interact when wet and dry. This step guarantees your final design looks vibrant and polished without muddying the stripes or losing the ombre’s gradual fade.
Folding Techniques Guide
Choosing the right colors sets the stage, but how you fold your fabric will shape the striped ombre effect.
Start by laying your fabric flat, then fold it accordion-style into long, even pleats. Make sure each fold is crisp and consistent in width to create clean stripes.
Next, fold the pleated fabric in half or thirds, depending on the size you want your stripes to be. Secure the folds tightly with rubber bands at regular intervals. The bands will resist the dye, forming distinct stripes.
When you apply the dye, focus on gradient application—darker hues near the edges, fading inward—to enhance the ombre look.
Once dyed and dried, unfold carefully to reveal beautifully striped ombre patterns that highlight your precise folding technique.
Ice Dyeing Method
Although ice dyeing might seem unpredictable at first, it offers you a unique way to create vibrant, organic patterns on fabric.
You start by scrunching your fabric on a rack, then cover it with a layer of ice. As the ice melts, the dye powder you’ve sprinkled over it dissolves slowly, flowing and blending naturally. This slow process lets colors bleed and mix in unexpected, beautiful ways.
You don’t control every detail, but that’s what makes each piece one-of-a-kind. Make sure to use fiber-reactive dyes and natural fibers for the best results.
Once the ice melts completely, you let the fabric sit to absorb the dye, then rinse and wash it carefully. Ice dyeing is perfect when you want bold, unpredictable effects with minimal effort.
Shibori-Inspired Patterns
When you explore Shibori-inspired patterns, you tap into a centuries-old Japanese technique that emphasizes folding, twisting, and binding fabric to create striking designs.
Start by folding your fabric accordion-style or twisting it into spirals, then secure it tightly with string or rubber bands. These methods resist dye in specific areas, producing intricate, organic patterns.
Fold fabric accordion-style or twist into spirals, then bind tightly to create beautiful, intricate dye-resist patterns.
Experiment with different folding techniques—like triangular pleats or circular gathers—to achieve varied effects. Use indigo or other deep dyes for authentic results, but feel free to mix colors for a modern twist.
Remember, the tighter you bind, the more defined the white lines will be. After dyeing, rinse thoroughly and dry flat.
With patience and practice, you’ll create unique Shibori-inspired pieces that blend tradition and creativity beautifully.
Geometric Shapes With Tape
Moving from the organic curves of Shibori-inspired patterns, you can create sharp, clean lines by incorporating geometric shapes with tape. This method lets you control where the dye touches, producing bold and modern designs.
Start by stretching your fabric flat, then apply painter’s tape to form triangles, squares, or stripes. Make sure the tape edges are pressed firmly to avoid dye bleeding. Once dyed and dried, peel off the tape to reveal crisp shapes.
Here’s how to get started:
- Use painter’s tape for easy removal
- Plan your shapes before taping
- Press tape edges firmly
- Dye in contrasting colors
- Let fabric dry completely before removing tape
This technique adds structure and precision to your tie-dye projects.
Galaxy Tie-Dye Design
A galaxy tie-dye design captures the swirling beauty of outer space with vibrant colors and star-like patterns.
To create this look, start with a dark base, like black or deep navy. Twist and scrunch your fabric randomly to mimic cosmic swirls. Apply blues, purples, pinks, and whites in small, overlapping sections.
Begin with a dark base, twist fabric randomly, then layer blues, purples, pinks, and whites for cosmic swirls.
Use white dye or bleach sparingly to add star effects by splattering or dotting. Let your piece sit longer to deepen the colors and create contrast.
Once dyed, rinse carefully to preserve the vibrant hues. This design demands patience and creativity but results in a stunning, otherworldly effect.
With practice, you’ll master the balance between chaos and control, turning your fabric into a breathtaking galaxy.
Frequently Asked Questions
What Type of Fabric Works Best for Tie-Dye Projects?
Did you know 90% of tie-dye artists prefer cotton? You’ll get the brightest, longest-lasting colors using 100% cotton fabric. It absorbs dye well, making your designs vibrant and durable, so stick with natural fibers for best results.
How Do I Set the Dye to Prevent Fading?
To prevent fading, you’ll want to soak your fabric in a soda ash solution before dyeing. After dyeing, rinse it in cold water, then wash separately with mild detergent to set the colors and keep them vibrant.
Can I Use Regular Household Bleach for Tie-Dye?
Bleach, a double-edged sword, can strip color away or create dramatic effects. You can use regular household bleach cautiously, diluting it properly and testing fabric first to avoid damage and achieve cool, contrasting tie-dye designs.
What Safety Precautions Should I Take When Tie-Dyeing?
You should wear gloves and old clothes to protect your skin and fabrics. Work in a well-ventilated area, avoid inhaling fumes, and keep bleach and dyes away from children and pets. Clean spills immediately.
How Do I Remove Dye Stains From Skin or Surfaces?
Imagine spotting unexpected, stubborn dye stains on your skin or countertop. Don’t panic—you can remove them by scrubbing gently with a mix of baking soda and water or using rubbing alcohol. Act quickly for best results!